How to sew a wallet with a double clasp. We sew wallets and handbags with a clasp: templates and master classes
Let's use our pattern to sew a small wallet with a clasp of an interesting shape and at the same time simple to sew.
We will make a pattern and I will show you how easy it is to make corners.
All ideas are collected from the Internet and books, I’m just showing how I did it :)
And for starters, in order to give you a creative spirit and finally stop thinking that this is something unimaginable, I will write a quote recently found in the book “The Artist’s Way” (there may be a post about it too)
“We don’t dare not because something seems difficult to us; it seems difficult to us because we don’t dare.”
SENECA
We will sew a small wallet like this. I really liked the shape, I found it in a Japanese book that I recently purchased for myself. I used the idea and made the pattern myself.
I'm not very happy with the photos. It’s not just a sewing and filming process :) But I can’t re-shoot it yet. I hope everything will be clear :)
We will need:
-clasp (I have 8.5 cm)
- fabric for the base (I have 2 types of cotton)
-fabric for lining (I have cotton)
- seal. I use duplerin, if you need to make it even denser, then you can add interlining to the lining.
Braid, lace, jewelry, stripes... whatever your heart desires!
Let's hit the road!
I’ll say right away that, in my opinion, the best MK for creating patterns is Tatyana’s “chippilyushkin puffs”
1. Constructing a pattern.
We draw axes on a sheet of paper and place our clasp in the middle

-circle from the outside (until the end of the sewing part (1))

-Approximately from the middle (to create volume) we raise the line, but so that it is the same in size on the main one, using a ruler we measure out 5 mm pieces and transfer their amount to the new part. The main thing is that the number of segments matches :)

Now we draw the wallet itself. I decided that the height of my wallet would be 7 cm and the bottom 4 cm.
I draw a line down with a 5 mm bevel. And straight down 2 cm (this is half the bottom).
When I saw patterns with a cut off corner in Japanese and Chinese magazines, I couldn’t understand how to sew it together later :) But it turned out to be even easier than you might think :)
Draw a square 2cm*2cm

This will be half of the front of the wallet. Fold the sheet in half and cut out the pattern (with the corner cut off).
Now let’s make a pattern for the lining, it will be a little different. This is so that it fits comfortably and beautifully inside.
We outline the main pattern (half (it’s more convenient for me)) and make an inward bend of 5 mm approximately in the middle.

If we plan to use 2 types of fabric (like me), then you can make 1 more copy of the main pattern and cut it as you please, I have 4cm on top and 3cm on the bottom + 4cm bottom.
2. Sewing
choosing fabrics. I sewed a wallet to go with the notebook, that’s why I got such a multi-colored look :) I didn’t use lace afterwards

Transfer the pattern to the fabric and cut it out. I make an allowance of 1 cm. And I decided to make the bottom one-piece. I liked it better this way. And you look how you want :)
If you draw a pattern on only one half, then copy the corners of the day and the top for sewing on the clasp on the other half :) We cut out the dublerin without allowances.

First we sew on all the stripes and lace

and only then sew the sides (don’t touch the corners)
If you want, you can leave room in the side of the lining for turning it inside out; if you sew the top completely, I leave room for turning the wallet inside out at the top. Do as usual :)


Press the side seams (I use a folded towel)

Well, now what do we do with the corners?
We put the side and bottom together, we need the middle of the bottom and the seam of the side to match, and secure with a pin. Do you see what correct corners we already have?

But to be sure, let's check with a ruler :) 2cm should be on the seam

Now we sew along the line, securing the seam at the beginning and end. Turn it out and admire it :)

We also do the lining.
After everything is done, we collect our wallet. We connect the top and lining with the front parts together.

We align everything, fasten the sides with pins, sew them together and remember about the place to turn them inside out :) You can sew them by hand with a back stitch using a needle or on a machine.

I forgot to show here that after sewing the top, I trim the top with zig-zag scissors and make small cuts (careful not to damage the seam) so that later it would be easier to turn the curved parts inside out :) After turning it inside out, we sew it with a hidden seam. We admire the result :)

Well, now it’s time to choose threads for sewing on the clasp

I chose orange floss and sewed it with 3 threads. How to sew a clasp is described in detail in my MK, my technique has not changed :) the only thing is that as soon as I insert the needle into the middle and bring it out, and not in, there are no extra lines, even if they are small inside :)
This is how it turned out for me inside

Decorate with charms, if provided. I decorated it with a cute baby elephant with a heart.
I also wanted to sew a beautiful handbag-purse for the summer, but I’m not a good seamstress, so I decided to look for patterns on the Internet. And, of course, I share useful finds with you. I hope it's useful.
I would like to say a big thank you to the author who made a selection of patterns for handbags of different shapes:
Patterns are not sized, but can be adjusted to fit an existing clasp. If you have decided on the shape, you can start cutting. Here is a master class on sewing such a bag with padding polyester for an 8.5 cm clasp. In English, but many detailed photos of the process:


But this is truly an antique. Beautiful, is not it? I think I know where I can use the embroidery I did a long time ago

Or you can do embroidery specially for this occasion:

Or draw a small motif:

Or use the application:


Basically, anything under the sun can be used on handbags. And if you have a lot of talents, then you need to sew several handbags. That's all, all that remains is to say goodbye and promise that I will show you what kind of bag I made. And then there will be nothing else left but to take it and sew it, without putting it on the back burner)
I wish you that your projects don’t languish and that your inspiration doesn’t leave you even for a minute)
Handbags with clasps have a special retro charm. I’ve been staring at photos of such handbags and wallets on the Internet for a long time, but I still couldn’t decide to sew such beauty myself.

Oh, how in vain I put this project on the back burner! I got great pleasure from sewing these handbags. They are very easy to sew, and the result looks professional and stylish.


I sewed a cosmetic bag with a 12 cm Aurora round clasp and a handbag with a 15 cm Aurora rectangular clasp.


Round clasps are a little more difficult to sew on, so I advise you to start your acquaintance with this type of fastener with a rectangular shape. For both clasps (Aurora 12 and 15 cm) you can download patterns for free. Click on the links below. Please note that the patterns include a 6mm (1/4″) seam allowance!

Tools and materials
- Fabrics

100% cotton from Michael Miller - Suzette collection
At work I used stunning cotton fabrics from the company Michael Miller, which I have long loved - the Suzette collection. A distinctive feature of this collection is its special print, which makes the fabrics appear textured.
And these fabrics also have wonderful large patterns. I cut it outfabric so that the central motif of the handbag front panels is different. Which side of the bag do you like best?))


2. Filler
Both bags are sewn with Aurora 150 g/m single-sided adhesive filling. I really like to use it for small handbags and cosmetic bags; it keeps the products in shape well.

3. Clasp
The 15 cm clasp included a chain for a handbag.
4. Threads
You will need several types of thread:
- for basting (any kind will do, thicker ones are more convenient)
- for sewing the body of a handbag (to match the selected fabric)
- for sewing on a clasp

Since the clasp is sewn on, you need to carefully select threads that will allow you to bring your intended design to life. I didn't want the stitching on the clasp to draw too much attention to itself, so I chose embroidery thread and stitching in a golden bronze shade (Aurora PF842).

5. Hand needles
6. Scissors
7. Water-soluble fabric marker
8. Pins

9. Sewing machine

Both bags turned out to be quite roomy. They hold their shape well and stand upright thanks to their flat bottom. Handbag on a chain 17 cm high 21 cm wide. Small cosmetic bag 15 cm high 18 cm wide.
How to sew a bag with a clasp
Wallets with a clasp have always been considered a symbol of sophistication and elegance. Unfortunately, today it is difficult to find decent accessories of this model. But even inexperienced needlewomen can sew such a wallet on their own.
First A wallet with a clasp is the simplest, and is a “half-sun” shape. As the main material for such a model, it is better to take fabrics that are not too dense, but also not thin, and certainly not loose. If this is your first time sewing in a clasp, then it is better to choose a simpler model, with large gaps, as in the photo.


Second pattern A wallet with a clasp is a little more difficult to sew, but it looks more impressive. Despite the somewhat pot-bellied shape, the accessory looks more elegant. And the model itself is more practical and convenient: it holds not only paper bills, but also a lot of small items.


Third pattern wallet with a clasp is similar in shape to the second. The only difference is that before sewing the clasp, the sides are sewn separately to the wallet blank. Sewing such a wallet should be undertaken by experienced craftswomen.


Fourth pattern A wallet with a clasp corresponds to a more squat and stubby model. According to the sewing principle, it resembles the second one, with minor differences. It is also convenient, practical, and looks interesting.

If desired, you can decorate the wallet with internal pockets, applique or embroidery. Please note that if you choose fabrics in light colors, make sure your hands are clean when making them. After finishing sewing, the product will be difficult to wash.
"offers to your attention patterns of some interesting models of wallets. To enlarge the pattern diagram for printing, click on the image of the selected pattern.
A little tip! To avoid mistakes when sewing your first wallet and not to spoil your favorite fabrics, I advise you to sew the selected wallet model from waste fabric, i.e. which I don’t feel sorry for. This way you won’t be disappointed with the result; you’ll be able to see your mistakes, try on the clasp and accurately adjust the wallet pattern to it. And the second wallet will be much easier to sew, you will be confident in your abilities and will be able to get even more pleasure from the creative process.
Model №1 .
This wallet model is very similar to the one taken as an example in MK "Puffy Wallet"(According to the text below). If someone has already tried to sew according to the pattern from MK, then there should be no problems with this option. But there is one important difference in the pattern itself - the central part of the wallet pattern (A) is smaller than the width of the clasp itself, i.e. when they are combined, some part of the clasp also falls on the side parts of the pattern (B). All other stages of the process are similar, the main thing is accuracy and regularity.
For sewing, we will need to cut out two parts A and B from the main, lining and sealing fabric.
It is recommended to pay special attention to the precise joining of parts on the bottom and sewing on the clasp. This point should be noted: do not try to “shove” the entire upper edge of the wallet into the clasp; some of the sides should remain free (i.e., unsewn), due to this, such a plump shape and folds on the sides are created. Therefore, it is recommended to start sewing the clasp to the wallet from the center.

Model №2 .
This model features a one-piece bottom. The end result will be a kind of “potty” thing.
You will need two pieces A each from the main and lining fabrics, as well as one piece B each.
The sewing process should begin with darts. Sew them on the main and lining parts, after gluing the main part with a sealant. Sew parts A (main fabric and lining) to part B one by one. It is necessary to especially carefully sew the parts in the lower part near the darts. I couldn’t do this on a machine, so I sewed it by hand. Next, align the inside out lining with the front side and...see MK "
Sew the first wallet"
(According to the text below).
Click on the picture to enlarge and print the diagram.

Model №3 .
This wallet model is interesting because of its ruffles, which give it a pleasant volume and femininity.
For sewing, you will need two parts A from the main fabric and strengthen them with a sealant (sintepon, dublerin). Cut two pieces B from the lining fabric and one piece C from the main fabric. Since part C is assembled, it is not so necessary to seal it.
We begin sewing this wallet model by sewing together the lining parts (B) - this is the easiest moment. Then we sew side panel C to one part A, simultaneously fitting and making folds. I recommend basting!
Or you can lay a basting stitch along the edge of part C (using a machine or by hand) and slightly pull the ends of the threads, evenly distributing the folds. Then, on the other side of part C, we sew the second central part A in the same way. The final stage of work is connecting the main and lining parts of the wallet with sewing on the clasp.
To enlarge the pattern diagram for printing, click on the image of the selected pattern.

Model №4 .
This model, like model No. 2, presented in first part article, has a one-piece bottom, but less wide, there are no darts, the wallet is higher. Its shape is most favorably emphasized by a more rectangular clasp clasp.
For sewing, you need to cut out one piece B for the front part and lining and 2 pieces each. parts A from the main and lining fabric.
A very interesting effect can be achieved if you choose companion fabrics for your wallet. In this case, you can experiment and sew a wallet, as in the photo: on one side there is red fabric with letters, on the other - blue, and combine them with a common background, i.e. bottom with polka dot pattern.
In model No. 2 and No. 4, we do not struggle too much with the neat connection of the side and central parts of the wallet that form its bottom. But, you should pay enough attention and patience in connecting the one-piece part to the A parts, especially in the lower corners of the patterns. If you can’t sew all the parts on a machine, don’t be afraid to make a couple of stitches by hand in especially difficult places, it might even be neater and smoother.
Click on the picture to enlarge and print the diagram.

Model №5 .
When sewing a cosmetic bag, the process sequence is the same as for a regular-sized wallet.
Pay special attention to joining the central and side parts at the base of the wallet to form a beautiful bottom. Don’t forget to thoroughly seal the parts of the cosmetic bag.
Again, please note: do not try to cram all the fabric of the sides into the clasp and start sewing the fastener to the cosmetic bag from the center.
Everything will work out!
Click on the picture to enlarge and print the diagram.

Model №6 .
Using the “Roses in Retro Style” wallet as an example, we will look at the features of sewing a wallet on a rectangular clasp.
For sewing, we will need 2 parts A and B each from the main and lining fabric. Details A for the front side need to be duplicated with adhesive synthetic padding, which will give the fabric the necessary density, the wallet will lie pleasantly in the hand. To strengthen the B pieces, I suggest choosing an adhesive calico that will thicken the fabric but will not add extra bulk to the sides.
At the very beginning of the process, sew darts on all parts A. Then baste part B to part A, fitting it to repeat the bend of the side part.
We start sewing from point 1 on part A. Please note that this point is located slightly below the top of the wallet. This small open area at the top of part A is necessary to later sew on the clasp so that the sides do not interfere with the opening of the wallet. Alternately connect all parts A and B from the main and lining fabrics. Then turn the lining right side out, place it inside the main part, align the marking lines, pin (or baste) and sew, leaving an unstitched area on part A for turning. Turn it inside out, sew up the hole with a blind seam, and iron it.
Sew on the clasp. We sew only parts A to the clasp. Due to the fact that parts B are sewn a little lower, they do not interfere with opening and closing the wallet.
Many people are interested in questions about the process and intricacies of sewing a “puffy” wallet. Therefore, I will try to lift the veil a little and show how this process happens for me.

This is the kind of “chubby” wallet we want to get as a result. Will it work out or not? I'm sure it will work!
Even novice dressmakers without much experience and without a sophisticated sewing machine in their arsenal (in Japanese books the process of sewing wallets is often illustrated with photographs of them being sewn by hand) can cope with this task.
In order to get a harmonious and stylish accessory as a result, it is not necessary to choose fabrics of the same color or pattern. Therefore, let’s not rush and, going through household supplies, apply one fabric to another, trying different combinations. When creating this “puffy”, patchwork fabric was used. It is moderately dense, does not fade or shrink when washed.
In addition to the fabrics for the front side, let's think about making the inside of the wallet as beautiful and elegant as the outside. In order for it to keep its shape, you will also need reinforcing fabric. It can be dublerin, padding polyester, adhesive calico, non-woven fabric. Also, let's think about the clasp.
Once we have decided on the fabrics, we begin cutting.
Click on the picture to enlarge and print the diagram.
Print and cut along the inner outline. The outer one is a pattern already with an allowance. We should have: 2 parts of the central part and 2 parts of the side part from the front fabric, as well as 2 parts of the central and side parts from the lining fabric. From the material for strengthening, we also cut out 2 central and 2 side parts of the future wallet, but without allowances. If we plan to decorate a wallet with lace, ribbon, or a tag, then we select and sew them on. Iron the fabric to strengthen it.

Now we begin the most labor-intensive process - sewing all the parts together. To do this, you need to chop two parts and sew them.

The seam at the bottom of the wallet should end at the corner, i.e. the place where both cutting lines meet and MUST tie a thread.

Let me explain why this is so important: if the stitching seams of the parts are at different levels, and the ends of the threads are not secured, then the wallet will not have a beautiful bottom, but there will be ugly joints and protruding threads. Thus, we sew all the details of the front part one by one and linings.
Then, using sharp scissors, we make notches in the convex and concave areas. Moreover, we perform these actions with the front and lining parts.

We turn the lining right side out and insert it into the front part of the wallet.

We match the seams, fasten with pins and sew a line along the top of the wallet, leaving a small unstitched area for turning.

Sew up the hole left for turning.
Now a few words about something important - sewing on the clasp. Whether you will admire the end result or be upset and hide it in a secluded corner depends on how well, neatly and correctly it is sewn. But on the other hand, there is no particular difficulty in this process, you just need to calculate everything correctly. First you need to determine the middle of the central parts: combine the central parts of the side panels in your hand, mark the central points with a pencil or chalk.

We insert the fabric part of the wallet into the groove of the clasp frame, start sewing from the center and move towards the seam.

When you have finished sewing to the seam, fasten the thread and, again, starting from the center, sew on the second part of the frame, if necessary, making small folds and adjusting. You can sew with matching or contrasting threads, regular or Pearl Cotton, depending on your preference.

Sew the first wallet
Maybe “master class” is a strong word, I’ll just show you how I sew myself. I will be very glad if this post helps you gain determination and try to sew your first wallet.
Let's start sewing? Forward!
We select the necessary materials: fabric for the front side and for the lining, a seal so that the wallet holds its shape well, a clasp, ribbons, lace, buttons, charms and other decorations. By the way, you can find the necessary accessories in this online store for handicrafts;)
When I start sewing a bag or wallet, I select the main fabrics, and simply put the additions in a bag, and during the process I decide everything completely - it’s easier for me.

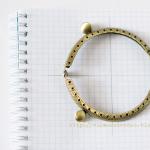
American cotton (fabric for patchwork), glued calico (for compaction), antique bronze clasp with a smooth frame, satin ribbon, bindweed braid (tea-dyed), charm.
We will sew the simplest model of a wallet, using this pattern.
Click on the picture to enlarge and print the diagram.
Print and cut along the inner contour, the outer one is a pattern with an allowance. It’s more convenient for me to adjust the width of the allowance myself.
Then we select the clasp to which the fabric part of the wallet will be attached; the photo shows the difference between the clasps.

For wallets of simple models, any of them is suitable, but for “puffy” wallets I like No. 2 better. What do you like? It is much better to attach the fabric part to it; its smoother arc allows you to avoid unnecessary folds and wrinkles.
Cut out 2 pieces:
- parts for the front of the wallet,
- for lining,
- seal.
In this case, I have adhesive calico. Non-woven fabric, dublerin, padding polyester can be used.

At this stage, we select “decorations” for the front part of the wallet and sew on lace or braid, if they are included in your idea.

Pin (or baste) the parts of the front part and stitch from corner to corner, without catching the top edge.
I like to use regular pins without fancy tips because they don't get in the way of my stitching. Painted pins, although they are longer, do not always allow you to lay a stitch close to the needle (beads at the tip get in the way) and you have to move it, etc.
I recommend defining the corners EXACTLY and tying the ends of the threads. In some cases this is not so important, but here, if the ends of the threads are not tied, then there will be ugly joints and the threads will peek out.

We sew the lining of the wallet in exactly the same way.
Then, using scissors with sharp tips, we make cuts along the curved lower part in the front and lining parts.

Now turn the lining inside out and put it into the front part of the wallet, match the seams, pin again and stitch along the top line, leaving a small area unstitched for turning.

This is what happened in the end. Sew up the hole left for turning.

And finally, sewing on the clasp.
I repeat that I don’t see anything complicated in this, you just have to try it once and then you will understand.))
This is how we determine the centers of both halves: combine the seams in your hands and mark.

We insert the fabric part of the wallet into the groove of the clasp frame, start sewing from the center and move to the side seam.
I sew with DMC Pearl Cotton Balls 8 or 12 threads, but you can use regular ones.

When you have sewn to the side seam, fasten the thread and, starting from the center, sew the other half, moving to the side seam, if necessary, making small folds and seating. Also sew on the second frame of the clasp.
You can sew starting not from the center, but from the side seam and moving to the opposite edge.
Sometimes in books and MK it is shown that they are sewn through one hole on the clasp, and then returned back. You can try this too.
I didn't like it because... If you miscalculate a little or make a mistake, and then you need to undo a little to make a fold or correct the seam itself, then you will have to undo everything, and not just a few incorrect stitches.
Choose what is more convenient and enjoyable for you. I think this is not so important, the main thing is to enjoy the process and be satisfied with the result.

We also recommend
 How to live with an ugly appearance?
 Letter Y (And short) in poems, stories, proverbs All about the letter Y short
 Natural ingredients to protect hair health
 Hardware pedicure step by step Hardware pedicure step by step
 We sew wallets and handbags with a clasp: templates and master classes
 How to greet your husband home from work?