How to make a Christmas tree stylish. Crafts for the New Year: paper Christmas trees (photo)
Creative Christmas trees are good because they are unusual; they can be created from the most different materials, and edible trees will become a decoration and the main highlight of the New Year's table.
How to make a Christmas tree from plastic bottles?

To make such a fluffy beauty, take:
- green plastic bottles;
- scissors;
- scotch;
- a wooden stick, the diameter of which is slightly smaller than the hole in the neck of the bottle.

Trim the shoulders of the bottle, leaving only the neck. You will put a wooden stick into it. Starting from the bottom, attach the blanks from the bottle here so that the fringe points up.

We decorate the entire trunk, and attach a small part on top, which will become the top.
The blanks must be fastened in such a way that the largest ones are at the bottom and the smallest at the top.
Here's what else a Christmas tree made from plastic bottles can be like. Making one with your own hands is also quite simple.

To reproduce this masterpiece, take:
- green plastic bottles;
- scissors;
- a wooden stick of a suitable size.

Now you need to make diagonal cuts on sides 1 and 2 of each tape. Fold the resulting fragments over one another.

Take the bottom of a large bottle, make a hole in it, insert the neck of the bottle into it, into which a wooden stick is inserted. Secure this part of the structure with a cork by screwing it onto the neck.
Place pre-made parts on the stick, starting with the largest bottle and ending with the smallest one.

If you threaded all the parts onto the barrel with the neck down, then place the last one with the neck up. Secure the tree by placing a lid on the top of the tree.

The result was a wonderful tall tree made from plastic bottles. From this container you can make an even larger tree by placing the bottles, for example, on a mop.

If you want to make a cone-shaped tree, then roll a piece of paper or cardboard in this way. Cut off the neck of the bottle and insert a paper blank here. Cut trapezoidal fragments from other parts of the container. Chop the longest edges of each piece into equal strips, not reaching the top 2 cm.
Secure these elements with tape, arranging them in ascending order, starting with large and ending with small.

This is what should happen in the end.
If, for example, you work in a grocery store, then you can put up a large Christmas tree made from plastic bottles, which will certainly attract customers. To do this, you need to arrange the bottles in a circle in rows, and place plywood circles on them. Each subsequent tier is smaller than the diameter of the previous one. There should be 3 bottles left closer to the top; place a star on top.

Even empty plastic bottles will become an excellent decorative element. You can backlight it so that the trees sparkle attractively at dusk.

Other waste materials will also become a picturesque Christmas tree.
Making a Christmas tree out of paper with your own hands - master class
Once magazines are read, they are usually thrown away. But you can do it differently, make a paper tree. To create it, you can use newspapers and old books.

Here is a list of what is needed:
- a sheet of cardboard or whatman paper;
- colorful magazine;
- shaped hole punch;
- glue gun or PVA;
- pencil.

These parts need to be given a rounded shape. To do this, screw each one onto a pencil. Now you can glue them to the base, starting from the bottom.

Place the pieces as close to each other as possible so that the cardboard is not visible between them. Glue in rows, placing the elements on top of each other. Wrap one of them around the top of your head. The paper Christmas tree is ready.
If you like clean lines, then check out the next option.

This tree would be appropriate in an office. On the one hand, it has a strict shape, and on the other, it looks festive. Here's what you need for this craft:
- whatman;
- double tape;
- wrapping;
- regular tape;
- decorations;
- scissors.

Roll this base into a ball and secure with tape.

The excess needs to be cut off.

Wrap the cone with wrapping paper. To do this, place it on a work surface, place a cardboard blank on top, and secure it with tape at the top of the head.

Wrap the cone completely, then secure the edges of the paper with double tape and trim off the excess.

The lower part of the tree must also be made flat by removing the paper here with scissors. Decorate the Christmas tree with a star, ribbons, you can decorate it with candies or beads.

Here's what else a paper Christmas tree can be like.

Take:
- skewer;
- designer paper or colored cardboard;
- thick cardboard;
- glue or glue gun.

Here's what kind of paper Christmas tree you can make using polystyrene foam.

For creativity you will need:
- foam or cardboard;
- green corrugated paper;
- scissors;
- adhesive tape;
- masking tape;
- marker;
- PVA glue;
- hook;
- stationery knife.
Cut a strip of corrugated paper, chop it with scissors in the form of a fringe, slightly short of reaching the opposite edge. Start gluing these decorated ribbons from the bottom.

When the entire creative tree is decorated in this way, decorate it as you wish. Glue a rectangle of cardboard from the bottom, having previously painted it in Brown color. But you can do without this part of the trunk. To attach the tree to the wall, use a hook or double tape.

This is what a wonderful Christmas tree came out of paper. Textile models are very interesting; for them you can use leftover material.
Christmas tree made of fabric and threads

To make such a stylish beauty, take:
- felt;
- cardboard;
- scissors;
- double tape or glue.
It is better to take material in two shades, then the creative Christmas tree will look more contrasting.
Roll the cardboard into a cone. You can wrap the bottom part with a small amount of tinsel. Cut felt circles and use scissors to make intersecting sections in the middle. They are needed in order to put the felt blanks on the base, which is what you will do. These X-shaped cuts will also help the circles become wavy.

First put on the larger blanks, then the medium ones, the smallest ones will be on top. When you fill the entire cone, all you have to do is decorate your creation and admire what a beautiful fabric Christmas tree you have made.
You can also make a very cute tree from threads.

To make this, take:
- a cone made of foam plastic or cardboard;
- fleecy yarn;
- pins;
- decorations;
- thick yarn.

When you have formed the entire cone, do not cut these two threads, but now wrap them around the base, moving down.

Cut the thread and secure the remaining end with a pin. Decorate the Christmas tree with beads or buttons, and also attach them with a pin or sewing.

The next creative DIY Christmas tree is made from wire and thread. Help yourself with pliers or round nose pliers, bend a piece of wire so that it looks like a star. Attach a thinner wire to it, which must first be rolled into a cone. Wrap it with threads. You can simply make such a star out of wire and attach it to the top of the blue Christmas tree you just created.

Table on New Year will look amazing if you decorate it with edible Christmas trees. Look how wonderful this strawberry tree looks.

You can make a chocolate base and attach the berries to it with the point outward using a toothpick.
Here are some other original trees you can create from products.

Check out the related workshops.
Edible Christmas tree: step-by-step preparation

To make one, take:
- wooden skewer;
- apple;
- cucumbers;
- red and yellow sweet peppers;
- plate.
Place the apple half cut side down on a platter or plate. Stick a skewer into it. Chop the cucumber into not too thin slices.
Place these slices on a skewer, starting with the largest one. Arrange them in a checkerboard pattern or approximately so that they look like Christmas tree branches.
Cut small pieces from red and yellow peppers. Place them on some cucumbers or secure them with toothpicks. Thread an elongated piece of pepper onto the top of the head, closing the skewer on top.
You can decorate a New Year's dish with this tree, for example, a salad. Place a little parsley along the edge of the plate, which will symbolize green grass.
The next tree consists of fruits, berries and vegetables. Take:
- large carrots;
- apple;
- kiwi;
- strawberries;
- toothpicks;
- grape;
- greenery;
- hole for removing the core from apples.

Wash the apple. Use a special tool to remove the middle from one side. On the other side, make an even cut so that the apple stands firmly on the plate.
Place the carrot in the hole. Stick toothpicks into it. Thread kiwi halves, strawberries and grapes onto them. The star can be cut from a suitable fruit or vegetable, or from a thick piece of cheese. Decorate a plate with greenery to make the tree look even more picturesque.
The next tree is made from apples. To prevent them from darkening, the cut slices should be dipped in a solution of lemon juice for 15 minutes.
First you need to cut out the middle of the apples, then chop these fruits into circles. Using a knife or a special notch, give these blanks a star shape. Place it on a plate and place a slightly smaller piece on top. Adhering to this tactic, lay the Christmas tree to the end. Decorate it with cranberries and physalis.

If you are making a New Year's salad, lay it out in a cone-shaped mound and compact it. Slice the leek leaves to resemble sharp angles. Stick the resulting decorations into the salad so that the leaves turn into twigs. Decorate the Christmas tree with finely chopped carrots.
If you don't have leeks, then you can garnish the salad with dill. Look at the photos to see how to arrange the branches, starting from the bottom.

A creative Christmas tree can be made from many other products.

Cut the cheese into sharp triangles, thread them onto a pre-attached skewer, and garnish with a slice of red pepper. Decorate the plate with tomato and kiwi slices.
If you have green pepper, turn its slices into lush spruce branches and make a New Year's tree from this edible material. Circles and slices of lemon or grapefruit will also become a picturesque decoration for the New Year's table.
If you use kiwi for this, use unripe ones so that the circles stick tightly to the base.
Meat lovers will also not be left at a loss. After all, an edible Christmas tree can be created from salami slices.

Place them on a skewer attached to half an apple and drape the top. Decorate the plate with greenery, and the masterpiece can be placed on the New Year's table.
Vegetarians and connoisseurs proper nutrition They will be able to make a Christmas tree out of broccoli, decorate it with cherry tomatoes, and make a star out of sweet peppers. The asparagus stalks will turn into a tree trunk, and cauliflower- into white snowdrifts.

The basis of the next Christmas tree is a salad, but it is better to take one whose ingredients can be held together well. A dish that contains boiled rice is perfect. We decorate the base with green lettuce leaves, then you need to decorate this edible Christmas tree with peeled shrimp and cherry tomatoes.

If you like Asian cuisine, make the rolls with added greens so that the base has that shade. If they contain caviar, then this ingredient will also act as a decoration. Fold the rolls as shown in the photo to create a comfortable Christmas tree.

Those with a sweet tooth can decorate the base made of polystyrene or foam rubber with candies, attaching them with toothpicks. And if your family likes to eat well, then use small sausages, slices of sausage, tomatoes and lettuce on the base. You can also add other edible ingredients here, thereby delighting those who love a hearty meal.

Gourmets will surely love the horizontal Christmas tree made from tomatoes and different types of cheese - great opportunity and a reason to try them.

If you like a tree made of candies, attach them to plastic bottle using tape. And if you don’t know what to give an adult as a New Year’s gift, then use a bottle of champagne as a base, decorating it in this way. Give this present.

If you like to bake, make gingerbread or shortbread dough, roll it out, cut out stars using special notches or just a knife. All that remains is to decorate the baked sweets with white icing and place them on top of each other.

On New Year's table even pizza will create the right mood. To do this, when rolling out the dough, cut out a Christmas tree from it, decorate with cherry tomatoes, olives and slices of smoked sausage or chicken pieces. Sprinkle your masterpiece with a little cheese and bake in the oven.

If you have a round pizza, then cut it into triangles, insert an edible straw on the round side, you will get fun portioned Christmas trees.

These are the creative Christmas trees you can create with your own hands. There are other ideas, we suggest you familiarize yourself with them and cheer yourself up.
Get inspiration for creating an edible Christmas tree from the following video.
Haven’t decided what is the best gift to give to your family and friends or how to decorate your interior? We will help you. You can create a wonderful craft with your own hands without making much effort and without investing a large amount of money. Let's make a Christmas tree out of cardboard. It's simple, fast, unusual, beautiful. Treat yourself and those around you. Check out detailed instructions with photo.
To work you need:
- a sheet of paper (the size depends on how big the tree you want);
- 2 sheets of thick cardboard (the same size as the paper);
- white acrylic paint(or any other persistent and thick);
- green and white gouache (or other thick, permanent paint).
- Moment glue (or any other glue that grips well and glues elements well);
- decorative elements (cotton wool, beads, stars);
- stationery knife,
- scissors,
- brushes,
- sponge.

Step-by-step instruction
- Let's get started. Let's take our sheet of paper, we remind you that its size depends on your desire. The more, the higher and more magnificent your craft will be. Fold the sheet in half.
- After we have folded the sheet in half on one side, near the fold we will draw the outline of the future figure. You only need to draw half of the spruce, you can be creative and make the stem wider or thinner, more branches or fewer, it all depends on you and your desire. Then we do not open the sheet, but cut out our stencil along the drawn outline. We got the symmetrical outlines of our craft. Our main workpiece is ready.
- Let's move on to cardboard. Let's trace our blank on a sheet of cardboard. If the cardboard is thick and will hold its shape well when painting our figure (when painting, the cardboard gets wet, softens and can become deformed), then we cut out 2 figures. If you doubt that your cardboard can withstand painting and not deform, cut out 4 figures. If you cut out 4 figures, then you need to glue every 2 stencils to each other, thus getting 2 trees. Glue with glue once completely dry. After applying the glue and the figures to each other, you can put them to dry under a press so that the shape does not change and remains straight. (for example, under a stack of books)
- Now we need to give our Christmas trees volume. Mark the two resulting shapes (one from top to middle, the other from bottom to middle). We made the figures 20 cm high, so our markings will be 10 cm each (exactly half of the figure), and the stripes also need to be marked in width (the width of our leg is 6 cm, therefore, the strip will be starting from 3 cm from one edge of the leg). We cut out the resulting markings with a stationery knife along the previously drawn stripes.
- Then we put our blanks into each other to make volumetric form with 4 branches on different sides (put it together like a puzzle). Let's start preparing for color. We paint our blank with white acrylic paint, completely covering it on all 8 sides and not sparing the material used (we can say we prime, create a base for the final color). If you don’t have acrylic paint, then take any other thick, durable, bright and well-holding color.
- After waiting for our white layer to dry, we move on to our real color for the beauty. Now we're laying down a nice green. We also don’t skimp on the material, but we don’t overdo it either. The color needs to be uniform and rich.
- After our green base has dried, we move on to the volume. Take any sponge. Pour the paint into any bowl or you can blot it directly into the cone. We wet the sponge in light green paint (it can be obtained by mixing our green and white paints) and spread it over the tree with point movements. The result was a beautiful pine effect on our branches. Let's further sprinkle our beauty with snow. We take a brush, fluff it, dip it in white paint and apply white paint with light strokes, barely touching our figure, so as not to overdo it. This should be done without much effort. Once dry, our Christmas tree will get a snowy effect.
- Next comes the moment of your most important creativity. We move on to decorating our Christmas tree. We showed with an example how to decorate with beads. We glued them with Moment glue. You can paint the top of the beads with a little white paint (as if they were covered with snow). We will decorate the other side of the Christmas tree with other decorative elements (we took stars of different sizes and colors). When turning in the wind (if you end up hanging it on a real Christmas tree or in the interior), it will be interesting to look at the different sides of your creativity, which differ in their design. To give a greater snowy effect, glue a little cotton wool.


Our cardboard Christmas tree is ready! She’s like a real one – a snow-covered beauty in the middle of the forest. Show your creativity, add something of your own to our interesting ideas, created especially for you. Delight yourself and those around you this New Year with your craft.

You can make a lot out of paper and cardboard beautiful Christmas trees for the New Year.
The very first way to make a Christmas tree New Year's holidays, is to take the green one colored paper, you can use blue or light green, you need to draw a circle on paper, for this you can use any round object or compass.
Divide the circle into 12 equal parts, cut lightly, it is advisable that the cuts are not cut to the middle. We make cones from the corners and secure them with glue. In this way we make several tiers for the spruce; if the spruce is large, then there will be a lot of green leaves, about 20 - 30. If you need to make a small spruce, then it will be small.
The next step is to pierce all the leaves in the center of the leaf; for this you can use a needle or other sharp object; we seal the spruce with thread or thin wire. At the top of the spruce we will have a triangular cap made of green paper, which should be glued to the top of the New Year's beauty.
The next spruce will be made from green stripes. To do this, take green paper and cut strips out of it. The length of each strip will be different, since the spruce has different tiers. The strips should be 40, 30, 20 and 15 centimeters long. The next step is to carefully twist the strips; for this you can use a pencil or toothpick. We remove the rolls made from toothpicks so that the spruce is lush, you need to let it fluff up slightly.
The end of the strip, after they have fluffed up, must be secured with glue; we make the stripes look like small droplets, which we press lightly.
We string small rolls onto a toothpick, which need to be glued together with glue. The next step is to glue our droplets to the trunk of the future spruce.
We make the top from a roll, make it in the form of a drop and glue it to the top of the spruce.
You can glue beautiful toys made from colored paper onto the prepared Christmas tree.

A very beautiful spruce is made from colored cardboard.

To do this, you should take cardboard and draw a spruce on it. Cut out the Christmas tree along the drawn lines.

Bend the tree in the middle and make small cuts. We cut the first spruce from the top to the middle, the second from the bottom and to the middle. Then we carefully insert the cuts so that they coincide with the tree. Secure with tape.

In order to decorate the spruce, you can use a brush and paints, felt-tip pens or pencils, and various sparkles.

The next spruce is very simple to make. To do this, you should take a compass and draw circles of different sizes. The circles need to be folded in half, then folded again. This should happen about three times.
The resulting circles need to be straightened, and then a small hole should be cut. We cover the pencil with shiny paper, you need to spread it with glue, we string tiers of spruce, make the top out of foil or just glue a bead. That's it, the New Year's beauty is ready.
To become the owner of a Christmas tree, you don't have to buy it- you just have to look into useful tips and find out how you can do it beautiful Christmas tree with your own hands.
Today you can find many Christmas trees in shops and on the street.
You can put it in the house a natural Christmas tree or branches from a Christmas tree for scent, but you can decorate a house or a gift for a loved one if you know a few interesting tricks.
Find out how to make a Christmas tree from paper, food, fabric and even pasta.
Make a craft like this not difficult at all, and your home will be decorated with unique decor, and friends and acquaintances will be happy to receive a Christmas tree made by you as a present.
DIY paper Christmas tree. Christmas tree made from scraps of magazine pages.
You will need:
Unnecessary magazine or book with bright drawings
Cardboard or thick sheet of paper
Glue gun or PVA glue
Shaped hole punch, optional
Pencil or pen
1. Make a cone out of a thick sheet of paper and secure it with glue.

2. Prepare pages from a magazine with bright pictures and cut out many circles of the same diameter from them. If you have a shaped hole punch (shaped like a flower or a large circle) it will be easier.
3. Wrap the cut circles around a pencil so that they curl a little.


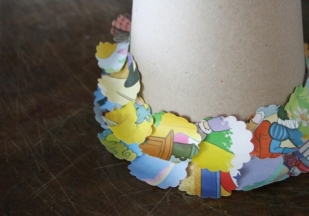
4. Starting from the bottom of the cone, begin gluing the folded circles.
Make neat rows. The circles should be tightly glued to each other so that the cardboard is not visible.
5. Make a small cone from one circle and glue it to the top of the cardboard cone.
The Christmas tree is ready!
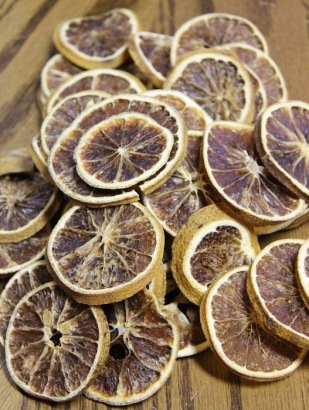
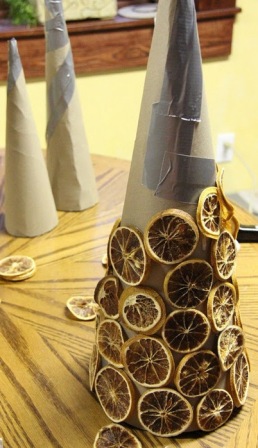
DIY Christmas tree made from pine cones and dried citrus fruits


DIY Christmas tree (master class). Christmas trees made of wrapping paper.


You will need:
Large thick sheet of paper
Wrapping
Double tape
Scissors
Decorations
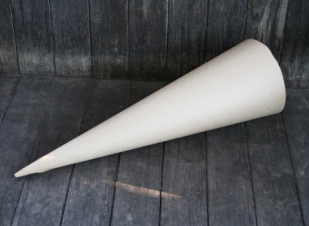
1. Make a cone out of a sheet of thick paper.
* If your wrapping paper is quite thick, you can bypass step 1 and make a cone out of wrapping paper.

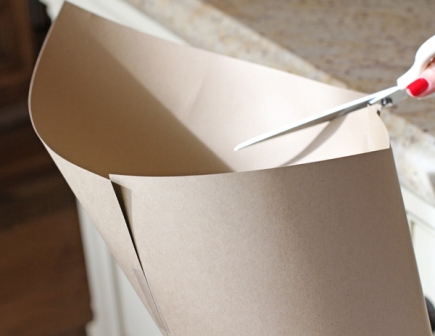
1.1 Fold the paper diagonally, holding one end to keep it sharp.

1.2 Secure the paper rolled into a cone with tape. You don't need to do everything too carefully, since you will cover the cone with wrapping paper.

1.3 Trim off the excess at the bottom of the cone to create a smooth base.
2. Prepare colorful wrapping paper and cover the cone with it. To do this, place the paper on a flat surface with the pattern facing down.

2.1 Using tape, attach the end of the construction paper to the top of the cone.
2.2 Begin to slowly twist the cone while wrapping it in the wrapping paper. You need to wrap the cone tightly.

2.3 Measure the paper and cut it before completely wrapping it around the cone. Glue double tape to the edges and connect to the other end. You need to cut off the excess at the base so that the paper is even.


3. All that remains is to decorate the Christmas tree as desired. You can make paper stars, use glitter, stickers, glue on beads and/or buttons, wrap with ribbon, etc.

Similar Christmas trees:


DIY fabric Christmas tree. How to make a Christmas tree from felt.


You will need:
Glue or double tape
Scissors
* Try using two colors of felt to make the Christmas tree even more beautiful. In this example, yellow and orange felt was used.
1. Make a cone out of cardboard. Secure the ends with glue or double tape.
2. Prepare felt and cut circles of different diameters from it, from small to large (see picture). You can use pre-prepared circle templates made from cardboard.


3. Glue Christmas tinsel to the bottom of the cone.
4. Now you need to make a crosswise cut in the center of each circle cut out of felt. Do not cut too much to prevent the felt garment from falling off. Make the cut just enough to fit the circle tightly onto the cone.
5. Start gradually putting circles on the cone. If you are using two colors, then put on the circles sequentially, first one color, then the other. Also worth noting. What to put on the next circle is not only on the cone, but also on top of the tips of the cuts of the previous circle.


6. We decorate the top of the Christmas tree. To do this, simply add tinsel, onto which you will need to add a pre-prepared small felt cone. Secure the tinsel and crown with glue.
* If you wish, you can hide a sweet gift inside the cone.


Original DIY Christmas trees. Glowing Christmas tree.
You will need:
Floral mesh (preferably several shades of green)
Scissors
Cardboard for cone
PVA glue
Cellophane
Pins
Garland
Floral wire
Decorations upon request

1. Make a cone out of cardboard.
2. Wrap the cone in cellophane.
3. Take any container and make a solution of PVA glue in it and not large quantity water
3. Prepare a floral mesh. Cut it into small pieces and place each one in a container with the solution.
4. Start gluing the pieces onto the cellophane-covered cone. Glue pieces of mesh of different shades in different directions. The joints should be coated with another layer of glue for a more durable attachment.
5. Secure the entire structure with pins and wait for the glue to dry.
6. You have now created the first layer of the Christmas tree. Now you need to make a second layer in the same style. After gluing the second layer, leave the structure to dry.
7. Now remove the Christmas tree from the cone - the glue should quickly come away from the cellophane.
8. Place a garland inside the tree, which must be secured with floral wire.
9. All that remains is to decorate the Christmas tree to your liking.
DIY Christmas trees (photo). DIY pasta tree.

You will need:
A cone made of plastic or foam (or you can make it yourself from cardboard)
PVA glue
Pasta various forms and sizes
Spray paint, acrylic paint or gouache
Brush.
1. Prepare a cone and paint it the desired color. Wait for the paint to dry.
*If you are using spray paint, you can skip this step.
2. Prepare the pasta. Start applying glue to each piece and gluing the pieces to the cone. Design your Christmas tree as your imagination dictates.
After applying the glue, press the piece a little and hold it so that it sticks well to the cone. It's okay if the glue is visible from under the pasta.
Continue until you have covered the cone with pasta. Wait for the glue to dry.

3. Start adding color to the pasta. In this example, acrylic paint was used. Try to paint all the parts carefully so that there are no empty spots.
* It is advisable to paint in two layers.
* If you paint it with white paint, the Christmas tree will look like a porcelain product.
Helpful advice: If you want to remove the craft, then put it in a plastic bag first, so you can immediately find the part that might have come off the cone.
We make a Christmas tree with our own hands. Bright paper Christmas tree.

You will need:
Colored cardboard or designer paper
Thick cardboard
Glue moment or glue gun (with hot glue)
1. Cut a square base for the tree from thick cardboard.
2. Insert the skewer into the cardboard and secure with glue.
3. Now you need to cut out circles of different diameters from designer paper or colored cardboard. You need to make 3 circles of the same size.
For example, you want to make 10 circles different sizes, then you will need to cut out 30 circles (3 for each size).


*If you don't feel like cutting out a lot of circles, just shorten the skewer and you'll end up with a cute mini Christmas tree.
4. Make a small hole in the center of each circle.
5. Before you start putting the circles on the skewer, lubricate the hole in the middle with glue.
6. Start placing the circles on the skewer, leaving a little space between them.
7. Cut out stars from paper and attach them with glue to the top of the tree. You can use another part for the crown and not necessarily paper.
Crafts. DIY Christmas trees made from thread.


You will need:
Thick yarn
Yarn with pile
Cone (cardboard or foam)
Pins
Decorations, to taste.
1. Make a paper cone or buy a foam cone from specialized stores.
2. Take both strands and pin their ends at the base of the cone.


3. Start wrapping the threads around the base of the cone, securing with pins approximately every 5 cm.
4. Now start moving towards the top of the cone, carefully wrapping both threads around the future tree. At this stage there is no need to attach the thread to the cone.
5. When you have reached the crown, pin the threads again by wrapping the threads around the crown several times.
6. Both yarns now need to be pulled down, also wrapping the cone in a second layer.


7. At the base of the cone, cut the threads and secure them.
You can leave the tree like this or you can also decorate it.

In this example, artificial berries were used for decoration, but you can use colorful beads, snaps, buttons, etc.


Try also making a decoration for the top of your Christmas tree. The top of the head can be decorated the way you like.
You can leave the tree like this, or you can also decorate it.
You can make just a paper hat or a star, or you can make something more complicated. If you chose the last option, then below are instructions for you.
You will need:
Flower wire
Nippers (for wire)
Sequins
PVA glue
Fine wire (calibrated wire)


1. Bend the wire into a star shape (see pictures) and cut off the excess.
2. Cover the star with glue and sprinkle glitter on it.
3. Attach a thin wire to the star, as shown in the picture:
4. Attach a star to your Christmas tree.
Creative DIY Christmas tree

If you want something original, or you just don't have enough space for... big Christmas tree At home, you can try to make such a simple design.
It is worth noting that such a Christmas tree is suitable for any room. It can be done both at home with children and at work.
This tree can rise 1.5-2 meters and takes up almost no space in the house. In addition, it is a good background for New Year's photography.
You will need:
Foam base or matte cardboard
Scissors
Corrugated paper
Masking tape
Adhesive tape
PVA glue
Stationery knife
Marker, optional

1. Lay out foam or cardboard on a flat surface to create a large rectangle (see picture).
2. Use duct tape to connect all the parts.
*This example used black duct tape for better visibility, but white tape is better.
3. Mark the size of your future Christmas tree using masking tape.
4. Using a utility knife, carefully cut out the shape of the future tree.
5. Prepare corrugated paper, fold it in half and cut the fringe. You should have many sheets of fringed paper to cover the entire tree.
6. Begin carefully gluing the corrugated paper to the foam, starting at the base of the tree. The fringe should hang slightly below the base to cover the foam (or cardboard), and also slightly cover the top of the tree trunk, which we will make later.

7. Work your way up to the top, covering the entire tree with a bright green coat of crepe paper.
8. Add a hook to the back of the tree so the tree can be hung. Instead of a hook, you can use double tape to cover the perimeter of the tree.
9. To make the trunk you need to cut out a small rectangle from foam or cardboard.
9.1 Cover the rectangle with brown paper, just like the Christmas tree, i.e. cutting fringe onto paper strips and gluing them.
Probably the brightest and most cheerful time of the year is approaching: New Year and Christmas. Soon the whole country will be plunged into a joyful bustle: you need to buy gifts, decorate the house, take care of the holiday menu and, of course, not forget about the main decoration - the New Year tree. Nowadays, fluffy beauties are sold all around: for every taste and budget. But if one tree is not enough for you or you care about nature, wonderful Christmas trees can be made from scrap materials. The most accessible of them is paper. Below we describe in detail how to make a Christmas tree out of paper with your own hands.
A DIY Christmas tree made of paper can be made in the most different techniques and options. This article shows just a few of them. The most simple Christmas trees You can invite children to do it with their own hands; adults will find it interesting to implement more complex models. Choose!
DIY Christmas tree from a cardboard egg tray
You will need: a clean egg tray, paints, strong thread or thin cord and a gypsy needle.
Carefully cut off 4-5 cells at the very base. Paint each cell a different shade of green (most likely you will need to apply the paint 2-3 times). When the cells are dry, string them onto a string and make a loop on top for hanging. You can decorate the Christmas tree, for example, with sequins so that it looks like a real New Year's tree.
From the remaining cells, even the smallest children can make miniature Christmas trees without the help of adults.

Well, if you have a lot of empty egg cartons, free space and time, then we offer this version of a large DIY Christmas tree for the New Year

DIY Christmas tree from disposable paper plates
Another craft accessible to kids. Paint a disposable cardboard plate in green color at both sides. Now cut it into three equal sectors. Make a trunk out of brown cardboard and glue the sectors on it one above the other. Decorate the Christmas tree with an applique in the form of balls and garlands and hang it on the wall.


Original DIY Christmas trees made from paper chains
This Christmas tree will look good on a wall or door. Its manufacture is so simple that it does not even need explanation. This is a great option for joint family creativity.


Christmas tree made of paper in the shape of squares
You will need: cardboard, paper, a skewer, and a base into which this skewer can be stuck.
First prepare the paper squares. Decide what size the largest and smallest squares will be. You need to cut 9 squares of different sizes, each time reducing it by 5-10 mm. For example, if the largest squares have a side of 10 cm, then we need to make 9 pieces with a side of 10 cm, 9 cm, 8 cm, etc. The higher you want to make the Christmas tree, the smaller the difference between the sizes of the squares should be.
Also cut small squares of cardboard - their size should be such that they do not peek out from under the paper ones. These cardboard inserts are used to give the tree some dimension without using a lot of paper.
Insert a skewer into the base. Fold three squares of the most big size and make a hole in the center. Place them on a skewer. Now put on the cardboard square. Again three large paper squares, and after them a cardboard insert. Continue alternating cardboard and paper squares, gradually reducing their size. Each time, move the corners of the paper squares slightly clockwise.
Place a large beautiful bead or other decoration on the top and secure with glue.
To make a miniature Christmas tree using the same principle, you will need a bottle cap, an English needle and thin wrapping paper (for example, tissue paper, tissue paper or corrugated paper).

How to make a Christmas tree with your own hands from cardboard tubes
If you have accumulated a sufficient number of cardboard tubes from rolls toilet paper or paper towels, make a Christmas tree that will serve as storage for small gifts or sweets.

You will need 32 rolls of the same diameter and length. Paint 28 of them outside and inside with green paint, and the remaining four with brown paint and let dry. Now you need to assemble a pyramid of green tubes: glue seven pieces together with their sides. Glue a row of six tubes on top in a checkerboard pattern. Continue assembling the tree, reducing each subsequent row by one tube. You should end up with a triangle consisting of seven rows. Now glue the four brown tubes together and attach them to the bottom of the very first row of seven green tubes. All that's left to do is decorate the top of the tree with a Christmas star and you can arrange the gifts!
Using the same principle, you can make an excellent advent calendar for kids. In this case, the Christmas tree is assembled from 24 tubes. One end of each tube is closed with a paper circle with a number from 1 to 24 written on it.

How to make a 3D Christmas tree out of paper
You will need: cardboard, wire or cord, beads, glue.
Draw a template: it can be just a triangle or the outline of a Christmas tree. Cut out 6-8 identical parts and bend each one strictly in half along the center line.

Take two parts. Apply glue to half of the first piece and glue it to half of the second piece. Wait for it to dry. Apply glue to half of the third piece and glue it to the free half of the second piece. Continue until only two halves remain unglued. Make a hanging loop at the end of the cord or wire, thread the bead through and place the cord in the middle of the tree. Glue the two remaining halves together, tie a knot at the other end of the cord and trim off the excess.
Creative Christmas tree made of paper strips or circles
You will need: thick green paper for the base, double-sided multi-colored paper for the branches, glue.

First, glue together a stable cone from thick green paper. Cut double-sided colored paper into strips approximately 2.5 x 7.5 cm. Wrap one end of each strip around a pen or pencil to make beautiful curl. Now start gluing the cone with strips of paper (glue the straight end of the strip, the curl should remain free). You need to move from the bottom edge of the cone to the top. You can glue the strips in circles, or in a spiral.
The top of the Christmas tree needs to be decorated with a star - this will hide the last row of glue.
Try to experiment: take multi-colored paper instead of green, or cut out a lot of circles or bells instead of straight stripes - you’ll see, it will be very beautiful!


Another equally creative DIY Christmas tree made from paper strips
You will need: cardboard cone for the base, multi-colored paper, masking tape, glue.
Cut strips of colored paper. Their length depends on the required splendor of the Christmas tree, but do not forget that it should decrease with each tier. Cut a strip of masking tape long enough to wrap around the base of the cone. Fold the strips of paper into a loop and stick them on tape. When the entire strip of tape is filled with such loops, stick it at the base of the cone. Continue pasting the base, moving towards the top. Place a small cone at the very top to hide the last strip of tape, or decorate it with ribbons and decorations.
If you take a foam Christmas tree cone, the loops can be attached to it without tape or glue - using safety pins.

Unusual DIY Christmas trees made from paper eights
You will need: green paper (not very thin so that it can hold its shape), ribbon, cord or hook for hanging, chenille wire approximately 30 cm long, beads in the hole of which the wire will easily pass.
Cut the paper into strips 4 cm wide and 7.5 cm, 10 cm, 12.5 cm, 15 cm, 17.5 cm, 20 cm, 22.5 cm long.
Punch three small holes on each strip: 1 cm from each edge and in the center.

Make a small loop at one end of the wire and bend it at a right angle. This is necessary so that the paper strips do not slip off. Take a strip 22.5 cm long and put it on the wire in this way: through the hole at one end, through the central hole, through the hole at the other end. We got a paper eight. Push it along the wire all the way down to the end. Next, put one or two beads on the wire, then put on a strip 20 cm long, again beads, etc. Continue until you have completed the assembly with the shortest strip.
Now put on the last bead, leave a small piece of wire for the loop and trim off the excess. Make a loop and hide the tip of the wire in the top bead.
All that remains is to thread the hanging cord through the loop and you can choose a place for the Christmas tree!
If you don’t have beads, it doesn’t matter, the Christmas tree will look beautiful without them, and the fluffy pile on the chenille wire will securely fix the eights.
DIY Christmas trees from paper cones
Such trees can be made in different sizes: from large floor ones to small ones that will decorate a table or windowsill - it all depends on the height of the base and the size of the paper cones.
You will need: cardboard tube from paper towels (30 cm long), colored paper for cones (you can use wrapping paper), ribbon for a bow, tape.
Start by making cones. They should be of different sizes - the largest will be located at the base of the tree. The closer to the top, the smaller the size of the cones should be.

For a cardboard tube 30 cm long, you will need to cut 10 squares of the following sizes: 16 cm, 14 cm, 12 cm, 10 cm. Make cones from these squares and secure them along the seam with tape.
Now, using the same tape, start covering the cardboard tube with cones from the bottom up. The distance between layers is approximately 3-5 cm. The cones should be placed in a checkerboard pattern (i.e. the cone of the top layer should be above the space between the two cones of the bottom layer).
Bend the ends of the cones of the topmost layer inside the tube and secure there. Use a bow (or other decoration) to decorate the top of the Christmas tree.
Alternatively, you can mount the cones in the shape of a Christmas tree on the wall or doors.

How to make a Christmas tree out of paper using the quilling technique
Christmas trees made using this technique look unusually openwork and festive. The simplest option is a Christmas tree made from elements called “fisheye”.

To make this element, you need to roll a strip of paper into a spiral, unravel it slightly, squeeze it from two opposite ends and glue it so that it does not unravel.
Make 6 of these elements of four different sizes and assemble them into a Christmas tree pyramid. Place the largest elements at the bottom. With each row their size should decrease.

Another simple version of the Christmas tree using the quilling technique, suitable for children's creativity.

But this option is much more complicated than the previous ones, but this Christmas tree also looks much more impressive.

Original paper Christmas trees made from quilling strips
This is quite painstaking and long work, but the Christmas tree turns out fluffy - just like a real one!
You will need: quilling strips (if you don’t have them, just cut thick colored paper), skewer, glue.

Using scissors, cut one of the long sides of the quilling strips 2/3 of the way across to create a fringe. Roll each strip into a tight spiral, secure with glue so that it does not unravel, and fluff out the fringe. Draw the outline of the Christmas tree on thick paper or cardboard and fill it with the resulting balls.
Such a Christmas tree can also be made three-dimensional - you just need to make quite a lot of balls and paste them over a cardboard cone.
How to make a Christmas tree out of paper using the origami technique
You will need: thick green paper, glue, a skewer and a base into which to stick it.
Cut circles from paper with a diameter of 5 cm, 7.5 cm, 10 cm, 12.5 cm, 15 cm. Fold each circle in half 4 times and cut off the top of the resulting triangle so that you get a tiny hole. Spread out the circles. Please note: folds in the form of peaks and valleys should alternate.

Place the smallest circle on a skewer, slide it all the way and secure with glue. Continue threading and gluing circles, moving towards the largest one. Cut off the excess part of the skewer, stick it into the base and use glue to secure a bead or bow at the top.

Christmas tree-shaped candy packaging
Such small sweet souvenirs will delight your friends and employees, and they are very easy to make.
You will need: 6 candies (it’s easiest to work with cone-shaped candies), thick green paper, ribbon, glue.

Measure the width of your candies and cut 6 strips of the appropriate size. Wrap each candy in a strip, shape the strip into a triangle and carefully glue the end. Build a pyramid from the candy triangles and wrap it with a long strip of paper of the same width. All that remains is to secure the Christmas tree with a bright ribbon and decorate it with a bow.
Postcard - Christmas tree made of paper
And in order to congratulate loved one, make a postcard with voluminous herringbone inside.
You will need: a sheet of beautiful thick cardboard for a card, thick green paper for a Christmas tree, glue.

Cut four strips of green paper about 30 cm long. Each strip should be a different width: 3.5 cm, 2.7 cm, 1.9 cm, 1 cm. Fold the strips like an accordion.
Fold the cardboard in half. Glue the ends of each strip to the card at the same distance from the fold line. The widest strip is glued down, the narrowest at the top. Decorate the card with other New Year's elements: snowflakes, garlands and gifts. All that remains is to write on it warm congratulations and the card is ready!

Like these paper Christmas trees with our own hands for the New Year, we invite you to pay attention. Decorate your home with any of the proposed Christmas trees or come up with your own version. And may the green beauty bring you happiness in the new year!
Christmas tree made of paper / New Year's CRAFTS / How to make a Christmas tree with your own hands
We also recommend
 Congratulations to parents on their son's birthday Congratulations on the birth of their 7 year old son
 Scenarios for themed parties
 Coffee for the face - recipes for the most effective masks Instructions for use
 Congratulations to grandfather on Defender of the Fatherland Day in verse
 Congratulations to the godson from the godmother in prose Birthday wishes for the godson in your own words
 Social benefits and pensions – what will change?