Volumetric Christmas tree made of thermomosaic. DIY Christmas mosaic DIY Christmas mosaic
Guys from the city of Achinsk, Krasnoyarsk Territory, study in the “Nature and Fantasy” club. They sent us their work - a mosaic made of shells on New Year's theme. All works were made using the same technique - “Mosaic Drawings”.
To work you will need:
- thick paper or whatever you are going to decorate,
- pencil,
- tassel,
- tweezers,
- PVA glue,
- paint (any quick-drying one),
- eggshell.
The inner film must be removed from the shell. You can use white, you can use any colors, for example, with easter eggs. The main thing is not to take pieces with a stamp printed on the egg.
1. We draw on the object of decoration (in this case - paper) any desired shape or picture - the plot as in our case.
2. Paint over with PVA glue part no.. Bye Christmas tree. Small for now. We take a piece of the shell and press it to the glue, crushing it as we go. Apply glue to the next piece, press the shell, and fill the entire form. You can ignore the gaps between the shells for now; we fill them in fairly roughly.
3. Now the small shell fragments left over from the work are used. We smear the empty areas with glue and select pieces for them, helping ourselves with tweezers.
4. Thus, we make the whole picture. It is not necessary to fill tiny areas, but if you need it, you can make a paste of PVA and small shells and cover the cracks with it.
5. The picture can be colored with paint. We use acrylic, but you can use watercolor and gouache. We are trying to paint over the cracks.
6. Leave to dry. The craft can be decorated with various rhinestones, sparkles, stars, as you like.
7. Can be decorated with a frame.

Khalkhozhaeva Amina, 10 years old.
Title of the work: “New Year's Tale.”

Zakirova Diyora, 10 years old.
Title of the work: “New Year’s surprise.”

Kudryavtseva Anastasia, 7 years old.
Title of the work: “Silver Hoof”.

Israilova Jasmine, 8 years old.
Title of the work: “Snowman and bunnies.”

Mannabdzhanova Durdonakhon, 8 years old.
Title of the work: “Reindeer”.

Uskova Olesya, 10 years old.
Title of the work: “Making a snowman.”

Khalkhozhaeva Zainab, 7 years old.
Title of the work: “True Friends.”

Shiroglazova Victoria, 9 years old.
Title of the work: “Cheerful Snowman.”
the work was sent by the head of the circle
Gorodetskikh Natalya Fedorovna
What wonderful mosaic paintings the guys gave us! Thank you very much!
And I still ask all readers of our site to leave comments on the guys’ works, otherwise we will not be able to determine the winners of the New Year’s crafts competition!
New Year rushing towards us! Well, what would New Year be without a Christmas tree?
Christmas tree made from candies
A tree like this will make an excellent souvenir for New Year's holidays, and it’s not difficult to make it yourself. Christmas trees look especially beautiful if you choose candies in a green wrapper with an ornament. This Christmas tree will decorate the holiday table!

Coffee shop Christmas tree
IN Lately gained great popularity various crafts made from coffee beans, and the Christmas tree was no exception.


Christmas tree made of paper and napkins
There are many options for such Christmas trees - they can be cut out from several sheets of colored double-sided paper or from magazines.


Christmas tree made of fabric and ribbons.
The Christmas tree can be sewn from felt or other fabric.


Sisal Christmas tree
Today it is very important to produce sisal Christmas trees of various colors and sizes.

Christmas tree made of thread, rope and lace
You can make a cone and simply tie it with thread or jute rope.
You can also use thread/lace + PVA glue.


Knitted Christmas tree
And knitting lovers can make one of the Christmas trees presented below on their own.

Feather Christmas tree
A tree made of feathers will look chic and airy.
Make a cone out of cardboard and start from the bottom by gluing feathers to it in a checkerboard pattern.

Christmas tree made of beads

Christmas tree made of pine cones
This tree can be made from whole cones or from small pieces.

Christmas tree made of shells

Christmas tree made from other natural materials
Tree branches and nuts are suitable here, which can then be coated with golden spray paint.

Christmas tree made of Christmas balls
The most christmas tree can be made from bright Christmas balls

Christmas tree made from pasta
This Christmas tree looks very beautiful from tubular pasta, but you can also use any other shapes.
Glue the noodles to the cone from bottom to top, then cover with spray paint and add tinsel.

Button Christmas tree
A very simple and no less beautiful option.

Edible Christmas tree


Christmas tree on the wall
If you have little space in your house, make a Christmas tree on the wall.

DIY Christmas tree with legs.

We will need:
Cardboard, drawing paper (for base),
soft yarn, threads,
wire 15 cm,
simple pens or pencils 2 pcs.,
regular and double-sided tape,
roll toilet paper or napkins,
thick cotton threads,
thick fabric,
building gypsum,
decor,
heat gun.
Manufacturing process:
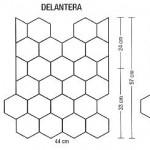
The base of this leg is plaster, which gives it stability. cut out a piece for a future boot from cardboard using a template: cut out the piece along the black lines, along the lines of blue color walk with a knitting needle, make cuts along the red lines (photo 2)

For a shoe about 5 cm, you will need a little more plaster, but the structure will also be more stable. The template is made for two shoes on a scale for a sheet of A4 paper, print, cut, glue.

Go along all the seams with a sharp object, bend along the lines (photo 3). Get two open joints where the red lines were located. For strength, it is better to cover the surface of the entire shoe with tape.
Fill with diluted plaster, having previously fixed the blank for the legs - an unnecessary pen or pencil. After the plaster has hardened, glue double-sided tape to the tip of the felt boot (photo 4).
Continue gluing soft yarn in rows to double-sided tape. Cover the surface of the entire boot, but you need to wrap it around the circumference: go from the toe of the boot to the shin, wrap it to the top and break the thread. Then glue and wind the thread on the sides of the foot (photo 5). The result will be a shoe like in photo 6.

Glue a piece of thick fabric to the sole using a glue gun (photo 7). Wrap tape around the leg and secure with hot glue (Photo 8).
Decorate the plaster by covering it with glue and filling it with beads (photo 9). Cut out circles for the bottom of the Christmas tree, cover with double-sided adhesive tape and decorate with yarn. Pre-prepare holes for the legs (photo 10). Insert the legs and pour plenty of glue on the reverse side (photo 11).

Bend a piece of wire into a shape. Glue the paper cone with double-sided tape (photo 12). Insert the wire through the hole in the paper cone after pouring glue into it. After the glue has cooled, the wire will stick well (photo 13). Wrap the wire with toilet paper, forming a smooth transition to the paper blank (photo 14).

Fill a paper cone with napkins, cut out a circle from drawing paper with a diameter slightly smaller than the bottom covered with yarn. Glue it inside the workpiece - a cone using a heat gun. The blank mug should also have two holes (a thick and light bottom can also be made from foam plastic), i.e. the pencil legs will pass through the two mug bottoms. If there is no foam, the space between the circles can be filled with paper. This will give rigidity to the structure (photo 15), glue the bottom bottom with hot glue (photo 16).
Cover the entire surface of the cone with double-sided tape (photo 17) and begin gluing the threads (photo 18).

Make a toy for the top of your head, you can use a ready-made one or make it yourself. You can make balls from threads. To do this, you can take a jar of vitamins and make two small holes in the bottom and in the lid. Thread the thread through the needle, thread the needle through the bottom and through the cap. Pour glue into at least half the jar and close the lid. Now, when wound on the base, the thread will be pulled through the structure and its surface will be evenly moistened with glue (photo 20).
Attach the ball to the Christmas tree (photo 21). You can also make a pendant, for which you need to glue a strip of double-sided tape to a piece of toilet paper reel and also cover it with yarn dipped in PVA glue and let it dry (photo 22 - 23). Decorate the inner surface of the pendant.

The Christmas tree is ready!

DIY Christmas trees.
Well, what would New Year be without a Christmas tree?
But what to do if you don’t want to spend money on expensive trees, which are either artificial or real, which are even more pity? There is an option - to do it yourself. Moreover, it is very easy to do, and you don’t need any special materials, the main thing is the desire and it is better to involve your children for this.
We offer you 10 options, this will be a simple handicraft for you. We have grouped them into separate pictures, in which you can see how a New Year tree is made. Once you've made it, you can decorate it; Christmas decorations are great for this.


Beautiful Christmas tree made of paper.

All you need is: thick paper, a pencil, a cleaver, a sewing machine (you can also stitch it by hand),
pencils and markers.
You can paint Christmas trees and even hang small toys on them, then your imagination is up to you.


No title
The appeal of eggshell mosaic is its accessibility: you can achieve excellent results without any special skills. You can decorate a variety of objects, decorate any surface - from wood to metal, from cardboard to glass. By decorating vases, plates, picture frames, tabletops, you will turn ordinary things into unique works of art.
The technology is extremely simple: glue the painted eggshells onto the surface and coat with varnish.
I use raw egg shells. For example, I cook an omelette, put the contents in a frying pan, and use the shells. They must be washed thoroughly in cold water, carefully remove the films from the inside and dry.
There are many different ways shell colors. I chose liquid ones for myself acrylic paints, they lay flat and dry quickly.
The plastic plate is sanded, primed and painted black.
The question arose: how to transfer a drawing onto a black surface, if you don't know how to draw? It turned out to be not so difficult, you just need to apply a little imagination.
We take a drawing of our future mosaic, printed on a computer. Turn the sheet over and rub it liberally with school chalk, blowing off any excess. Now the white carbon copy is ready. We place it on a black surface, fixing it in several places with tape, and transfer the drawing.

Filming our leaf and... oh, horror! It's all white and dirty! Is this what we wanted? Of course not!

Therefore, we take a gel pen (they are also called “tattoo pens”) and trace our drawing again. These pens, as a rule, write on any surface, including chalk. When we are finished with the outline, you can safely wipe the surface with a dry cloth, removing any remaining chalk.

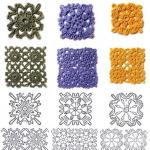
TThe plate is prepared for the main stage - gluing the mosaic. Here are our beautiful shells in all the colors of the rainbow. The more shades of each color you prepare, the more picturesque your panel will turn out.

The shell is easily glued to PVA. We smear a small area of the pattern with glue and, using thin tweezers, lay it down, selecting it by color and shape - as in a regular mosaic. The photo below shows my achievements for 2 days of work, 2 hours every day.

Shell mosaic is not such a labor-intensive job as it seems at the beginning. I assure you, it is no more difficult than cross stitching.

The finished panel must be covered several layers of acrylic varnish and your work will sparkle!
A product made using this technique will decorate the interior of any home, and T creative process will not cause difficulties - only pleasure!
The New Year is approaching and there is a desire to make some homemade decorations for the home. A holiday is a holiday, decorations should be bright, shiny and original. Good stuff Old CDs can be used for crafts.
CDs and DVDs are now almost never used for their intended purpose, but perhaps someone has some left over. From such discs you can make a reflective mosaic on glass New Year's balls with your own hands.

For work you will need to purchase transparent glass Christmas balls with pendant.
Each product will require 1-1.5 shiny mirror disks. Any will do, but CDs are difficult to cut and the film coating may fray. It is difficult to determine this by eye; you have to try cutting it.

You will also need scissors, a glue gun and a shiny gold or silver ribbon.
1. Cut CDs with scissors into small pieces different forms and sizes.
To ensure smooth edges, you need to choose good, sharp scissors.
2. For convenience, place the ball in some cup of suitable diameter.
Apply a drop of hot glue and place the mosaic piece on the glue, pressing lightly with your finger.

3. We continue to stick shiny fragments one after another until the entire surface of the ball is filled.
4. Since we are gluing the mosaic with gaps between the parts, drops of glue inside the ball can be seen through the transparent walls. To hide this flaw and at the same time make the colors of the craft richer, fill the ball through the hole with shiny tape. There are other options for using CDs, .

Photo from cremedelacraft.com
Such decorations with mirror mosaics can be made in any size and shape.
Use hot glue only on glass or ceramics. But if you are going to use some kind of quick-drying universal glue, then the base can be made of plastic or paper.
Confetti, stars, glass pebbles? Don't rush to throw it away! They can turn out wonderful, which even small children can easily make with their own hands.
In addition to decorations, you will need:
a thick sheet of blue paper or cardboard;
thick green and yellow yarn;
PVA glue;
Let's get started.
Draw a background for the craft.

We lay out the outline of the Christmas tree on the cardboard with green yarn. You can first draw an outline with a simple pencil. We glue the yarn securely.


At the top of the Christmas tree we lay out the outline of a star using yellow yarn. The basis for our craft is ready.
Let's move on to the most interesting part - filling it with mosaic elements.

To do this, apply a fairly thick layer of PVA glue inside it and quickly, before it has time to dry, sprinkle the coated area with our decorations.


You can also use small bright details from toys, construction sets, pieces of dense fabric, small puzzles - everything that can be found in the house.
We decorate the star in the same way. And so that it lights up every time a ray of light falls on its surface, we fill the contours with shiny decorations - confetti or foil figures. You can use decorative glitter.


Beads, sparkles and rhinestones dry out
We also recommend
 How to dress beautifully every day (for girls)
 How to crochet a simple napkin: diagrams and photos of work for beginners
 What to do if your husband is rude and nervous?
 Tunic from motifs - “mills” How to crochet the “Mill” motif
 Knitted women's pullover with V-neck
 Bob haircut for short hair photo, front and back views