How to quickly paint your nails at home. Beauty is in the details: neat manicure for short nails
Hi all!
A beautiful and well-groomed manicure is the dream of many representatives of the fair sex. Some of them shell out a lot of money in beauty salons, but most want to learn special skills at home.
In this article you will learn all the secrets on how to properly paint your nails with varnish at home, no worse than from a manicurist. You will receive a step-by-step technique that includes preparation, varnishing and curing.
I offer you the most complete guide By home manicure, having studied which you can easily repeat everything yourself. So, let's go!
- pusher or orange sticks;
- one or more colored varnishes;
- tweezers and nail file;
- cotton pads (balls) and sticks;
- clear nail polish.
Now you can get to work.

Soak a cotton pad in acetone liquid and press it onto your nail for 5-10 seconds. This will allow the coating to be removed faster. After the time has passed, spend cotton pad along the nail to remove old polish. Do the same with each nail plate.
Instead of nail polish remover, you can use ready-made wipes, many of which contain moisturizing oils. Then you should wash your hands. Even if you didn’t have any old coating on your nails, still do this procedure or use a special degreaser.
This will remove excess oil from the nail plates, make them grease-free and matte, which will promote better adhesion of the varnish to the nail, and as a result, the manicure will be more durable.
 Take a file, preferably glass rather than metal, and start filing your nails in one direction. Do not move it back and forth, otherwise you will harm your nail plates, they will become brittle and peeling.
Nails are not wood, file them strictly from the edge to the center on both sides in turn. Use a nail file to give them the required form, it can be round, square, almond-shaped, etc. Read more in .

The skin at the bottom of each nail is called the cuticle. They need to be pushed away with a pusher or an orange stick so that the manicure looks neat and clean. The easiest way to do this is if the nail plates are steamed.
To do this, place your fingers in a bowl of warm water for 1-2 minutes, or longer. Now dry your hands thoroughly with a towel. Take an orange stick or similar and move it away soft skin(cuticle) back to the edge of the nail.

Roll the bottle with varnish between your palms for 25-30 seconds, this will help warm its contents. This way all the pigment will be distributed evenly. But don't shake it like you usually do, otherwise there will be bubbles in the polish that won't allow your nails to be perfectly smooth.

To prevent the varnish from smearing, you should press your hand tightly to the table, while placing your fingers apart from each other. Always start painting with your index finger, moving towards your little finger, and finish with your thumb. To conveniently apply varnish to the largest nail, you need to press this finger to the edge of the table.
It doesn’t matter which hand you start painting your nails with, but it’s better to use your dominant one, and then the other. To make your manicure look equally even on both hands, only constant practice will help you.

Before you paint your nails with your chosen polish, you need to apply a base coat. This can be a clear polish, a special nail base or a strengthening serum. You can choose one or combine two at once. This will ensure better adhesion of the polish, color retention and protection of the nail plates.
Here you don’t have to worry about painting, because no one will see the transparent base, even if you accidentally go beyond the edge of the nail. After you have covered your nail plates with clear varnish, let it dry thoroughly, otherwise the colored varnish will form streaks.

Open a bottle of colored polish and wipe off any excess from the brush. To do this, wipe it a little on the inner edge of the bottle. This trick will allow your polish not to go beyond the nail itself and will make your manicure neat.
Take a look at the brush; it is most convenient to apply the varnish with flat bristles. Although now more and more varnishes are created with comfortable brushes, but before they were mostly round. To learn how to pick up the right amount of polish, you will also need practice.

This method is used by professional nail technicians, so it may take you some time to master. But eventually you'll get excellent result- neat and well-groomed nails.
To do this, you need to place the brush just above the cuticle, at the bottom in the middle of the nail plate. Then simply let a drop of colored polish fall onto the area. It should be the appropriate size to cover the entire nail.

Experienced manicurists claim that this is one of the simplest and most the best ways applying varnish coating. To do this, place the brush on a drop of varnish and stretch it along the nail strictly in the center, moving from the hole to the tip. Put the brush back and make exactly the same line on the left side of the nail plate, and then move on to the right.
Remember that you should have enough polish in the socket to cover the entire nail without having to dip the brush into the bottle again. If there is too much of it, the layer will be too thick, and it, in turn, will take a long time to dry. You will have to wait, otherwise you may smear the polish on your nail.
Nail technicians advise brushing along the sides, leaving a small distance between the nail and the skin. This gap will be practically unnoticeable, but this way you will avoid getting the varnish on your finger, which will not look very neat. But don't worry, everything can be fixed.

Getting the perfect manicure almost always requires multiple applications of polish. Usually it is two layers, but sometimes there are three. So you have to learn how to make them thin. Thick layers can simply smudge if you don't dry your nails completely.
Therefore, once you have applied the colored varnish for the first time, let it dry for 3-10 minutes, depending on the varnish coating. Then reapply the varnish in the same way. Take your time, be patient, because your goal is a beautiful manicure. Let dry thoroughly.
As you can see, painting your nails is not a quick procedure, so set aside at least 30 minutes of your time. To avoid boredom, turn on the TV or your favorite music. This will allow you to have a pleasant time.

Apply a layer of clear polish over your finished manicure, thoroughly covering each nail. Here you don't have to follow the three-lane rule. At the end, it is advisable to secure the tips of the nail plates by brushing along their upper edge.
This must be done after the color coating has completely dried. It could be regular varnish or top. This will give your nails a glossy shine and protect them from premature cracking and peeling.

We are all human and can make mistakes. If you accidentally go beyond the edge of your nail, it can be corrected. But this should be done only after the last layer has completely dried. Take cotton swab and dip it in acetone liquid, now carefully go around each nail with it, removing any excess color.
But don’t rush, otherwise you’ll get stuck right into the painted nail, and you’ll have to do the whole procedure again, the only good thing is that it’s only with one nail. Although in terms of time it takes almost as long, because the varnish coating must have time to dry.
Add design - it's more fun
I suggest you watch a few videos from u-tube that will help you learn how to handle gel polishes and get inspired by the most beautiful manicure techniques.
Painting nails with gel polish
Manicure "Cat's eye"
Lace and sequins
Oh, what beauty! Is not it? Well, it's time for us to say goodbye. I hope you were able to learn from the article useful information and now you know how to properly paint your nails with varnish. I would not advise you to use cosmetics that are too cheap, as they can be toxic. I recommend that you carry out the procedure in a well-ventilated room.
Good luck to you! See you!
How to beautifully paint your nails at home is a question that interests many novice girls who want to give themselves or their friends a manicure at home. In order to learn how to do a perfect manicure, you need to know some skills that are necessary for this.
Interesting photos:


First you need to know how to properly apply polish to the nail plate.
If you have already encountered this and know how to paint your nails well, then success in this matter awaits you. In fact, there are a lot of ways to apply nail polish, which means that even if you don’t know how to paint your nails, there can definitely be a way for you.


First, let's look at the simplest method that any girl can definitely use.
It consists of covering the nail with one color. This is a standard method of painting nails and there is nothing complicated about it. Because one color manicure became popular again after some time after many variants of complex styles, then feel free to use this technique not only because it is simple, but also because it is popular.
Before you start painting your nails, be sure to apply one coat of clear polish to protect your nails from harmful substances further varnishes.
After this, you can already paint your nails with colored varnish, starting from the middle to the bottom of the nail plate in small strokes. Then you need to paint the sides of the nail in the same way. When the first layer of colored varnish has dried, if you are not satisfied with the color, you can do one or two more layers to achieve the desired result. Remember that you should not dip the brush completely into the bottle of polish, as a large drop on the nail can ruin the entire painting and the layer will be uneven.
In principle, there is nothing complicated in this process, especially if you have at least a little idea about it. If they are not there, you can always watch how this happens in the video offered in the article. Also, it is worth remembering about the cuticles, the distance from which must be retreated by 1-2 mm for the skin to breathe. In those places where you got a little nail polish on the skin or cuticles, you can later wipe it with a cotton swab, dipping it in nail polish remover. In order for the manicure to last as long as possible, masters use a transparent varnish at the end. You can do the same. Another little secret Something to keep in mind is that you should always shake the polish bottle before use as this will help get rid of any clumps or thickening.


In this case, we will paint our nails with two colors.
This method is a little more complicated, but still simple if you follow all the steps correctly. In addition, a manicure that contains several colors, and in our case there are two, always becomes the center of attention. As a rule, in this case there are several coloring options. The more popular of them now is gradient, which also has several directions. For example, horizontal or vertical, smoothly transitioning from one color to another; gradient with sharp transitions of different contrasting colors; French manicure style, in which the tips of the nail are painted with one color and the main part with another; and the most popular - different colors on all fingers.
All of these double nail styles are more than popular this summer. But if we talk about the first version of a gradient manicure, then you still have to try. To do this, you will need two colors of polishes that will not differ much from each other (hot pink and soft pink) and a makeup sponge or a regular sponge. Once all the tools are ready, you can start getting down to business. To do this, apply two colors to the sponge so that the distance between them is as small as possible. Next you need to apply the sponge to nail plate so that the border between shades becomes blurred. Using this method of applying flowers, you can easily and simply go beyond the boundaries of the nail plate. Therefore, it is necessary to remove excess as quickly as possible.


What is needed for a good result
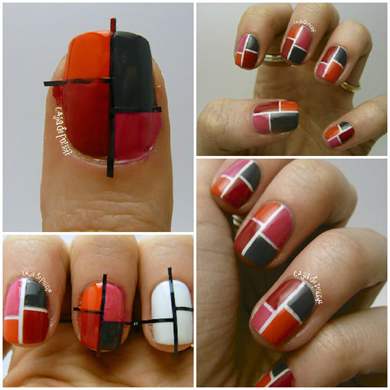
In order to paint your nails with three or more colors, you need to stock up not only with other tools, but also with patience, because not everything works out the first time, as we know, the first time is a bit of a disaster. So, to achieve better color combinations, try to select two shades first, and the third is brighter and different from them. In our case, let's take the colors pink, white and black as an example.
What do we do? We will apply the main part of the nail and the highlight with two matching colors, and the design with the third. To get a more successful manicure, you should not immediately set yourself a difficult task. For the first time, let these be ordinary images in the form of (un) neat blots. In this case we apply White color as the main one, pink - depicting a large blot, and black - several dots on a pink spot. There are also other options where you can use multiple colors. For example, a striped manicure, in which you will need to add tape to the list of tools. By separating the strips with tape, you can achieve an even, neat and, most importantly, beautiful result.
Thanks to the skills of painting nails at home, you can save a lot of time and money, as well as get a lot of pleasant emotions during such an activity as a manicure. Enrich your ideas with new fantasies and do not forget about the stages of painting your nails and protecting them.
Video on the topic of the article:
In order for our nails to look well-groomed, we must not forget about regularly strengthening the nail plate at home using special products, and it is also important to follow the rules for preparing your fingers before painting your nails with varnish. The technique of applying varnish to long or gel-extended nails is somewhat different from the final stage of manicure for short nails. In order to paint correctly short nails varnish, it takes longer to hone your skills, since applying an even layer close to the cuticle and choosing the shades of varnish suitable for nail design is more difficult than in manicure for long nails. For manicures on short nails, some women choose gel polish coating technology (for example, shellac) with quick drying of the applied layers in a UV lamp. In this material you will find master classes with photos and step by step videos lessons for beginners that will help you do a manicure correctly at home.
♦ PREPARATORY STAGE OF MANICURE
Before painting your nails with varnish, you must prepare each nail plate for the procedure.
▪ First, the length of the nail plate is adjusted and given the desired shape (square, with rounded corners, almond-shaped, oval, peak). To do this use manicure files with varying degrees of abrasiveness . To correct extended nails, you can use metal files, but treat natural nail plates with glass or “laser” files;
▪ Then the periungual skin and cuticle are softened using a bath with a special product or oils (jojoba, castor, wheat, burdock);
▪ Now let's work on the cuticle so that the varnish lies evenly on the entire surface of the nail. Some women prefer to completely remove the cuticle with a cuticle remover or using manicure tools. But it is quite enough to carefully move it with an orange stick to the base of the nail and the side ridges;
▪ Grind the surface of the nail plate evenly with a file (240-500 grit abrasiveness), and then polish it with a buff;
▪ We clean the treated nails from dust with a manicure brush and remove the water-fat layer with a cleaner for better adhesion to the coating.
♦ IMPORTANT RULES
Before painting your nails with colored polish, apply a protective base coat to the natural nail plate. The base will not only protect the structure of the nails from the penetration of pigment and other active substances colored varnish, but will also help level the surface of the nail plate for applying an even layer. As a base, you can use a transparent varnish with minerals and nutrients or biogel;
Apply two layers of colored varnish to eliminate the appearance of streaks and unevenness, and also to make the manicure more saturated;
To protect your manicure from chips, cracks and scratches, apply a fixative layer over the layer of colored varnish. After this, the nails will become stronger and shiny;
After applying each layer during the process, do not forget to dry your nails for at least 20 minutes. If the varnish is of high quality, then you can dip your fingers in cold water to speed up the drying process of the coating;
Try to carefully apply the varnish to the nail plate with a brush so as not to paint over the periungual ridge and cuticle. If traces of varnish remain on the skin around the nail, then carefully remove them with a cotton swab (swab) dipped in nail polish remover. But first you need to wait for the decorative coating to dry completely. 
- click on the photo and expand the rules for applying nail polish and protecting your manicure
♦ CHOOSING NAIL POLISH
√ Please note that the varnish does not contain acetone;
√ choose a varnish with mix balls in a bottle to quickly mix the contents until smooth;
√ The brush for applying varnish must be securely fixed in the cap. The brush should be long enough, and the bristles should be elastic and even;
√ it is advisable to choose the color of the varnish, focusing on already painted samples of artificial nails, and not on the newly applied, not yet dry layer on a white sheet of paper;
√ The consistency of the colored varnish should not be too thick, as it will be difficult to apply an even layer to the nail. Check that a drop falls from the probe brush within five seconds;
√
When properly stored, high-quality varnish retains all its properties for 5-6 months. If the varnish has thickened a little over time, you can add a little solvent to the bottle. 
- click on the photo and expand 20 nail design ideas
♦ HOW TO CORRECTLY PAINT LONG NAILS WITH POLISH
❶ It is advisable that the lamp be located on the left side of the manicure table. The lamp stand should be high enough so that the light falls from above and to the left;
❷ The base base will protect both the natural nail plate and nails extended with gel or acrylic;
❸ Before applying colored polish to your nails, warm the bottle in your hand and shake well;
❹ Take a brush and completely immerse the tuft of bristles in the varnish, and then carefully squeeze out the excess on the edge of the bottle;
❺ With your fingers spread, place your hand on the edge of the manicure table so that the bottom of the hand hangs freely. It is most convenient to start painting your nails from your little finger;
❻ All movements with the brush must be confident and fast enough. First, you can paint the middle of the free edge of the nail, and then draw a brush straight from the cuticle to the painted tip. Then we consistently apply varnish to the cuticle area, to areas of the plate on both sides of the center line. When the varnish dries, apply another thin layer; 
- in the photo: stages of applying nail polish
❼ Once the colored varnish is completely dry, you can apply a thin layer of the fixative;
❽ If varnish gets on the periungual ridges or on the skin at the base of the nail plate, then after the coating has dried, carefully remove unwanted strokes with a cotton swab moistened with a special product.
♦ HOW TO CORRECTLY PAINT SHORT NAILS WITH POLISH
The technique of applying layers (base, main, fixing) on short nails is not much different from decorating long nails, but there are some nuances.
❶ On short nails, a combination of pastel shades of translucent varnishes looks elegant. Bright colors will blend harmoniously if you choose
Hands - business card girls. Well-groomed, beautiful nails, soft skin brushes are the key to success and good mood. If you want to diversify your usual manicure, but you don’t have time to painstakingly paint your nails, or you spend a long time choosing between your favorite pair of shades and can’t decide what color to paint your nails today. You will be interested to know how to paint your nails with two colors. Two-color manicure is in trend today; it refreshes the nails and adds zest to the look.
You can paint your nails in two colors different ways and by combining color shades you can get a unique, interesting manicure. We choose color combinations depending on our mood and don’t forget about the whole look - clothes and makeup. It is necessary that the color scheme be combined and the color of the manicure be “friendly” with color scheme clothes. Varnish is combined not only in color, but also in texture - glossy and matte, with or without glitter.
How to choose the right polish colors to paint your nails with two colors?
It’s not enough to just take two colors of polish you like and paint your nails. It is important to choose a combination of colors according to certain rules, otherwise the manicure will look tasteless.
Of course, someone has a natural instinct and intuitively sees beautiful color combinations, but someone needs to be guided by the rules (at least for a start :) Now we will talk about the most win-win and basic color combinations:
Monochrome combination is a combination of different shades of the same color
This is the most harmonious and easiest combination to select. The shade differs only in lightness and color saturation and excludes the dilution of color by other tones. For example:
- dark blue and light blue;
- violet and lilac;
- warm brown and muted orange;
- dark herbal green and delicate light green.
This manicure looks very light and soft, which is what we see in the photo.


Combination of related colors
Here colors that are located next to each other on the color wheel are combined. This combination looks calm and harmonious and is already more interesting. For example, you can paint your nails with the following pairs of related colors:
- red varnish and orange;
- green and yellow;
- blue and purple;
- light green and blue;
- dark blue and eggplant.
Related colors of different lightness will also go well together. For example:
- dark blue and lilac;
- dark blueberry color and pink.


Contrasting color combination
The most catchy, bright combination of opposite colors. These are varnishes of such colors as:
- yellow and purple;
- red and green tones;
- orange and blue;
- purple and yellow-green;
- turquoise and coral.
And softer combinations of contrasting light colors:
- delicate light green and light pink;
- pastel lilac and light lemon.


In any of these methods, you can reveal the overall color and contrast by combining lighter colors with saturated ones. Or combine only bed colors according to one of these three schemes.
Achromatic colors are also used - black, all shades of gray, white, for manicure this includes flesh and beige colors. These tones can be combined with each other or refreshed with any other colors and shades.
If you want to make a color stretch, you don't have to look for and buy 5 polishes for each nail. It is enough to have 2 colors of varnish (gray and white, for example) and change the shade by mixing these two colors - for each nail, dilute the gray varnish with white in greater quantities than the previous one.

Two colors of varnish can be applied according to different types and drawings. The manicure can be a French manicure with an even or smooth transition.

Beautiful combinations of black glossy varnish and varnishes of other colors with glitter. You can paint your nails in two colors according to type moon manicure, moon manicure, when the “suns” at the base stand out in a different color. Geometric manicure is also interesting - two colors break the nail vertically, diagonally or horizontally.


How to paint your nails in two colors using a sponge with a smooth color transition
Everything is very simple, the main thing here is to do everything carefully and not rush anywhere.
Step 1 First, choose two suitable varnishes and determine which color will be the main ones, cover your nails with them (photo 1).
Step 2 On any hard surface (plastic, thick glossy cardboard, etc.) apply two colors of varnish next to each other. Using, for example, a toothpick, carefully mix the two at the point of their contact - you will get a color stretch (photo 2). You can skip this step and apply the polish directly to the sponge.
Step 3 Take a small narrow sponge (slightly wider than your nail) and scoop the polish onto the sponge (photo 3).
Step 4 Gently transfer the polish from the sponge to the nail, making an imprint (photo 4).
Step 5 The polish will also imprint on the finger itself, so you need to soak a cotton swab in nail polish remover and clean your finger of unnecessary polish. To make it easier to remove, apply it to your fingers first. fat cream. Using the same stick, correct the coating line near the cuticle, making it even and smooth, then the manicure will look neat.
Step 6 Finally, cover your nails with a protective coating or just a clear varnish.

You can also use an applicator for these purposes, then the skin practically does not get dirty:


Paint your nails with two colors with a transition brush
You can also make a two-color manicure without a sponge, but this requires more skill. Paint your nail with your base color and let dry. Then carefully apply another color in layers, the brightest layer will be at the tip and gradually fade away in the middle of the nail.

You can add more glitter here for greater effect.

You can also use glitter polishes to focus on one nail – most often the ring nail. It will add a festive feel to the look.


The combination of matte and glossy varnish looks original and stylish:


Look for your combinations and delight your nails with new shades!
Almost all the time, women's hands are in plain sight, which is why it is so important to properly care for them. A beautiful manicure is part of the beauty routine, and in this article we will tell you how to give yourself an excellent one correctly, quickly and with maximum savings of money and time.
Where does any manicure begin? Of course, with nail care. You need to remove the cuticle and then give it a beautiful shape and attractive length. According to the latest fashion trends The current length can be called short - the edge of the nail protrudes only 1-3 millimeters.
Correct application of varnish
One of the main rules for covering nails with colored varnish is to apply a protective layer. Before painting the plates with a decorative shade, be sure to cover the nail with a special transparent coating. It happens various types, and you need to choose it based on the characteristics of your hands:
- Crack filler - will make the nail smoother and without unevenness.
- The strengthening solution will not only create the necessary protective layer, but will also strengthen the plate from the inside.
Why is this necessary? By their nature, nails have a rather porous structure, which leads to the appearance of unsightly spots after decorative design.
You need to apply the varnish in a small layer from the center of the nail plate - the result is a neat and even layer. For everything to work out in the best possible way, the brush needs to be set one or two millimeters from the beginning of the cuticle, and move forward. You need to cover the entire nail with three even and not sharp strokes. The root area is painted last using light shearing movements.

After the first thin layer, you need to apply a second one - it will give the nail a rich color and cover all possible gaps in the first layer. You need to complete your perfect manicure with a transparent finish - a protective varnish.
Also, do not forget about such an important detail as correctly immersing the brush in a jar of varnish. If you do not follow this rule, the manicure may not turn out very neat and beautiful. The brush is immersed each time before applying varnish to the nail - get rid of excess by lightly touching the walls of the bottle.
Types of decorative manicure
In this article we will describe several methods of decorating women's marigolds. In fact, there are many more of them, and you can choose the right one for yourself from huge list. In the coming new season, the most relevant and popular are:
French style. And not only its classic variations (natural coating and white edge), but also completely different shades - from bright pink or yellow, to rich burgundy and even black. lovers of universal options choose for themselves, since manicure is great for business meetings, and for romantic dates, and even for a wedding event. You can create a perfectly smooth French manicure at home using convenient stickers.

Aged paint effect. It is otherwise called craquelure and can be perfectly created at home without any effort. This technique involves applying two varnishes - a multi-colored smooth base and a coating with a cracking effect. This special varnish, after application, spreads across the nail plate in intricate patterns that make up an excellent overall picture. For beginning fashionistas, experts recommend experimenting with classic black craquelure, which goes well with gold, white or silver base polish.

"Scotch tape" patterns. You can create your own unique style using ordinary, familiar masking tape. It turns out that it is used not only by builders to protect surfaces from paint, but also by manicurists. The technique of using tape for manicure is clear to everyone:
- Apply the first layer of the selected varnish.
- After complete drying, use tape to protect areas that will not be painted over with a second layer of a different shade.
- After this, you can apply a second coat, and after three to five minutes the tape is removed.
You can use not only masking tape, but also stationery tape (often leaves sticky marks) or special thin manicure tape, which was invented specifically for this technique. Due to its structure, it can be used to create the finest decorative strips.
Important : If you want to get visually longer nails, apply vertical rather than horizontal stripes.
Finishing coats for an extra shiny effect of your manicure
The topcoat is a real protection for the decorative layer, which must be maintained in an attractive condition. The finish protects against chips, cracks and scratches, and many products combine several additional functions. For example, the top can also be a dryer, reducing the drying time several times.
Add a stunning shine to your nails with a glossy or diamond finish. The beauty of this coating also lies in the fact that after several days of wearing your manicure, with the help of such a product you can renew it, giving it its original beauty and freshness.
We also recommend
 Educational games for children of the fourth month of life
 How to make wartime hairstyles with your own hands What hairstyle can be done on May 9
 Daedra Quests (Final) House of Horrors - Molag Bal
 Solcoseryl facial ointment for wrinkles: how to use Solcoseryl in cosmetology
 What types of groups are there in kindergartens?
 A two-year-old baby does not speak: looking for reasons and developing speech Teaching a child to speak for 2 years