How to decorate a snowman from plastic cups. How to make a snowman from plastic cups with your own hands: step-by-step instructions
Elizaveta Rumyantseva
Nothing is impossible for diligence and art.
Approaching new year holidays make us use tricks to decorate our home. Now it has become fashionable to make Christmas tree decorations and other attributes with your own hands. More recently, the snowman from plastic cups. This product is used to decorate apartments, office spaces, and schools. Forming a figurine of the winter symbol is very painstaking, but interesting job.
How many cups do you need for a snowman?
Before making crafts, purchase required material. Creating a snowman from plastic cups involves purchasing at least 3 packages of disposable tableware, 100 pieces each. Create a composition standard size, taking vessels of 200 g each, use small ones of 100 g each for a smaller diameter toy. The size of the festive attribute is regulated by the number of glasses. The larger the figure, the more material you will have to buy. You can make a classic snowman with 3 segments or a smaller one with 2 parts.

It is better to buy dishes in one store so that they do not differ from each other. Choose containers with narrow rims so that the joints between parts are less visible. If desired, use a container different sizes To make the head and body of a snowman from plastic cups, try to choose dishes of the same color and texture, so the product will look more aesthetically pleasing.
Step-by-step instructions on how to make a snowman with your own hands
When making a spherical figure, the material used is not at all round shape. Cups, fastened together in a certain way, form spheres. Before making a snowman, study the master class on how to make New Year's crafts from plastic cups. Needlewomen recommend taking photographs of the process so that you can remember everything next year. Manufacturing scheme New Year's decor very simple. First you must make the torso, then the head. Next, fasten both parts and decorate your New Year symbol.
Scheme
Do New Year's craft from cups you can use the following ingredients:
- disposable glasses – 300 pcs.;
- stapler or glue;
- packaging of paper clips for a stapler.

Manufacturing scheme:
- Lay out 25 pcs. disposable cups in a circle with the bottom inward. Fasten their edges with a stapler or use glue.
- The second row needs to be laid out in a checkerboard pattern in relation to the first, fastening not only the dishes on the side, but also on top. Stability of the workpiece will be ensured by moving each line a little back. In total you need to lay out 7 rows. The structure must remain open to attach the head.
How to make a head
To make a snowman's head you will need:
- disposable glasses;
- stapler;
- tennis balls;
- plasticine.

Production in stages:
- The first row should have 18 vessels that need to be fastened together, just like for the body.
- Lay out all other details in a checkerboard pattern. A hole will form in the ball; you can hide it under the hat by putting the accessory on the snowman.
- You can make his eyes using tennis balls painted black. If there are none, cut out paper eyes and attach with glue.
- Make the snowman's carrot-shaped nose with plasticine. The head is ready.
How to fasten a snowman

To attach the head and body, use a stapler or glue, placing the small ball on top of the large one. This creates a seam. You can hide it by wearing a scarf over your holiday item. Unevenness will not be visible under the accessory, and the snowman will become more comfortable. Place a regular piece of paper inside the craft made from disposable cups. Christmas garland. When you plug it in, the toy will begin to glow, which will create a special holiday atmosphere.
Video: craft snowman
New Year It’s a time of miracles and everyone wants to somehow diversify their decorations for this holiday. Products made at home have become fashionable. Suitable for creating cute New Year's items various materials. Use a toy made of plastic glasses as a craft for the New Year in kindergarten, just make your child happy, decorate the interior by inserting light bulbs. A bright and cute product will become an invariable attribute of the holiday. You will learn all these secrets from the video below.
Found an error in the text? Select it, press Ctrl + Enter and we will fix everything!Content
Winter is coming, New Year's holidays, matinee time, time to decorate your home. Now you can practice creating several interesting New Year’s items; you won’t notice how time flies by and your child will demand a craft for school or kindergarten. And there will be something to decorate your home with. So, involve the kids in the creation. In this article we will look at several options for creating a snowman from cups.
The simplest option
Let's start with a simple option. For this we will need a couple, or even more, disposable paper cups, felt-tip pens, thread, glitter, glitter glue, paint, and wire. This set of items may vary, it all depends on how exactly you want to decorate the snowmen.
Turn the cups upside down. And start creating: draw eyes, a carrot nose, a button mouth with paints or felt-tip pens. Knit from wool threads a kind of scarf for a snowman; on top you can wear a knitted small hat. You can make a kind of headband with ear cannons. Use glitter glue or glitter polish to decorate your snowmen.
By the way, instead of disposable cups? can also be used plastic bottles from under yoghurts, detergents, decorating it all with buttons, colored paper, paints and bright varnishes.


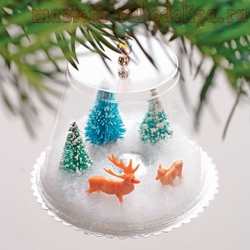
New Year's toy made from a plastic glass
Another one is quite simple, but interesting way create New Year's toy. We will need a transparent plastic cup, polystyrene foam, cardboard, a bell, a snowman figurine, and a Christmas tree.
You need to cut a circle out of cardboard that will be slightly larger than the top of the glass. We attach a snowman figurine and a Christmas tree to it, and decorate it all with grains of polystyrene foam. Cover the composition with a glass and attach it with glue. The protruding part of the cardboard can then be carefully cut off or also decorated with small grains of foam plastic. You can glue a bell on top, the souvenir is ready!
Any figures can be used as internal filling. Small figurines of angels, deer or favorite children's characters are suitable.

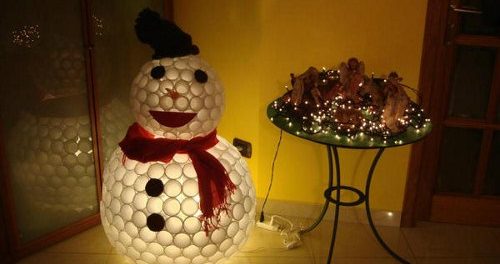
Snowman made of plastic cups: lamp
A snowman made from plastic cups with your own hands can be very multifunctional: firstly, it will decorate the house and please the eye, and secondly, it can become an excellent night light or lamp for reading a book or doing handicrafts. What we need:
- about 200-300 pieces of plastic disposable cups (yes, you will have to splurge a little here, just a little);
- stapler with paper clips or glue;
- colored paper for decoration;
- scarf or piece of red fabric;
- light bulb or garland.
To begin with, we lay out 25-30 cups inside with the bases and fasten them with a stapler or glue. We lay out another row on top, but with fewer glasses and in a checkerboard pattern. And so you need to lay out about 6-7 rows, do not completely cover the structure so that you can attach the head.

Now we prepare the snowman's head. For the head, first fasten 18 glasses together, as in the version with the body. Next, lay out several rows, and you should be left with a small hole, which you then just need to cover with a hat.

Please note: the glasses must be connected to the glasses from the previous row.
Now you can decorate the snowman's face. To do this use colored paper, cut out eyes, mouth, create a voluminous nose. For the eyes, you can use tennis balls, after painting them black or dark blue color. The nose can also be sculpted from plasticine and attached to one of the cups; many people use foil for the nose.
The junction between the body and head can be covered with a scarf. The craft will look impressive if you place a light bulb or a whole garland in the middle.

To create such a snowman, you can use both matte and transparent disposable cups, it all depends on what effect you want to achieve.
You can also use colored plastic cups as decoration; you can use them to make buttons for a snowman, and blue cups can serve as eyes.

In addition, such a craft can be a good decoration for a wall or door to a school classroom. To do this, you do not need to make a full circle of glasses, but leave a semicircle to make it easier to attach the product to a flat surface.
Use a garland to highlight the body and head separately; it looks very original and at first glance you can’t even tell that the snowman is made from disposable tableware.

By the way, not only plastic cups can be used. Also use plastic bottles from under water, transparent or can be painted White color. The assembly principle is similar, only it is better to use serious glue rather than a stapler.


It looks amazing, and, most importantly, it teaches children, and adults too, to reuse plastic products.
And here is a version of such a hybrid of a snowman and Santa Claus. Please note that there is a method of using materials of different colors.

If you want to please your children and guests with something unusual, then we suggest you make a funny snowman from plastic glasses with your own hands.
The financial costs for its production are minimal, and it won’t take much time, but a positive mood is guaranteed.
We will need:
- plastic cups;
- black and orange plasticine;
- stapler or glue.
Progress:
In order for the snowman to be stable, the bottom row should not be a perfect ball, but almost a hemisphere.
We lay out the glasses in a circle, fastening them together with a stapler. The first row of this snowman took twenty-five glasses.


For the next row we use the same number of cups, attach them on top bottom row, also using a stapler.
Each subsequent row will require fewer and fewer cups, since all the glasses are cone-shaped. The main thing is to start, in the process of collecting everything will become much clearer.


The next snowman ball should be rounder and slightly smaller. To do this, take eighteen glasses, also lay them out in a circle, and repeat the whole process, as with the first hemisphere.
Then we turn it upside down and lay out a few more rows, but not all the way. Your second piece should not be finished either.

You shouldn’t make three “snowballs” like a classic snowman. In this case it will be very unstable. Try installing the second ball on the first and make sure everything looks decent.
And if everything is in order, move on to decorating the snowman!
For decoration, you can use real carrots and pieces of fabric, or you can glue together a fake hat. You can also place a Christmas tree garland under such a snowman and turn it on.
Just a little more, and the New Year will come into its own. The long-awaited first snow has already fallen, children are writing letters to Santa Claus about their deepest dreams: dolls, cars, etc. New Year trees and performances are ahead.
Everyone, young and old, is preparing for the New Year: they cut out snowflakes, put up Christmas trees, and decorate their home. And, of course, Santa Claus will visit all the children in the kindergarten, or rather those who behaved well and prepared a gift for Santa Claus.
So we had the joy of making a craft for the New Year in kindergarten. It seemed like nothing complicated, but cotton wool snowmen, snowflakes and other common crafts were brought in from year to year, and I wanted to surprise both myself and the kids with something.
Thank God, nowadays we have the Internet, and interesting ideas There are plenty of crafts for the New Year. Our choice fell on a snowman, but this time we decided to make it from plastic cups.
Articles on detailed description There is a lot of information on how to make a snowman from plastic cups on the Internet, but we went beyond the instructions; you will now find out what came out of it.
So, at the initial stage we purchased 324 cups. All this quantity fits into 27 packages of 12 cups. Not as much as it seems at first glance. At home, when we began to unpack the cups, we discovered that a third of the cups turned out to be “defective”, because... the cups were noticeably wrinkled. But, as it turned out later, this does not affect the appearance crafts and crumpled cups cannot be distinguished from normal ones.
It is better to start making a snowman from the circumference of the lower ball, which has 25 cups. Each of them is connected to the neighboring one with a stapler. The second and subsequent layers of cups are superimposed on each other and connected in a circle with all the cups in contact. All this is done to ensure that the structure is solid, because in the process of connecting the cups with staples, many cups burst.


For those who decide to repeat our feat, we recommend choosing cups with a small rim or without it at all, because... It interferes greatly when working with a stapler. Of the two staplers we have at our disposal, only one could cope with this obstacle.

Making the bottom ball is not difficult. Everything is intuitive and fast. In three evening hours we managed to make one and a half balls. We could have done more, but the snowman's "head" caused difficulties. No matter how hard they tried, the “head” turned out to be the same size as the body.


Overnight we came up with an idea that we brought to life the next day. We bought additional red cups (48 pieces) and, having dismantled the bottom layer of the “body”, remade it in red.
The head still wouldn't give in. The advice in the instructions that the head should be made from a circle of 18 cups still did not help. Ultimately, the second ball was the same size as the previous one. After many attempts to find a compromise between the possible bending of the cups and the dimensions, we were finally able to complete the head.
In order not to suffer with your “head” like we did, we recommend that you squeeze the bottoms of the cups, which will significantly reduce the radius of the ball.

Almost the entire evening was spent on my head.
The third day was the logical conclusion of creating a snowman from plastic cups. We attached the head to the body, which is quite difficult, and began decorating our New Year's craft.
A New Year's cap also filled with cups, a scarf made from purchased fabric, stars from last year's purchases, safe Christmas decorations instead of buttons - all this gave our snowman a unique New Year's charm.
The nose for the snowman was made from white and red cups glued together and inserted into place.
The final version of our craft can be seen in the photo.

The kindergarten children were delighted! All the groups, along with their teachers, came to see our craft. Already on the first day kindergarten a legend was born: if you stroke a snowman’s “button” and make a wish, it will definitely come true!
We completed this craft in 3 winter evenings, although it can be done in one weekend. Our costs for a snowman made from plastic cups were:
|
What is needed and how much does the material for a snowman made from plastic cups cost? |
||
|
Name |
Quantity |
Price, rub.) |
|
White cups |
||
|
Red cups |
||
|
Scarf fabric |
||
|
Head cap |
||
|
Christmas balls |
||
|
Stars on a scarf |
||
|
TOTAL: |
||
We had staples and staples in abundance at home, and we didn’t have to spend money on them.
For those who like to save money or don’t know where to buy “spare parts” for a snowman, we recommend going to the FixPrice and Carousel store. It was in these two stores that we purchased almost all the necessary material.
As you can see, the price is not that high for such a fun and interesting craft, and it will surely become the most talked about craft in your garden. Plus, you'll have a great time with your family doing this fun activity.
If you have any questions about making a snowman, ask them in the comments, we will definitely help you and share our experience.

Increasingly, disposable tableware is used to make all kinds of crafts from it. Especially on New Year's Eve. This is how Santa Claus appears from plates and a snowman from plastic glasses. These crafts are always unique and cute. Moreover, the whole family can be involved in the work. And then surprise guests and friends.
Therefore, the largest and interesting craft For the New Year, we propose to make it in the form of a huge Snowman, which also feels great outside. It is made from disposable plastic cups and can be used as a street New Year's craft or to decorate large halls and schools. kindergartens. He feels good at home too! And the step-by-step instructions on how to make a snowman from plastic cups are very simple.
How many cups does a snowman need?
This question is important because the size of the future craft depends on it. It turns out that in order to make a snowman from disposable cups, you need to purchase at least 300 of them and preferably white cups rather than transparent ones. Moreover, from this amount you will get a figurine of two balls. And its height will be about a meter (if the cups are 200 ml).
If you want to make a craft bigger size, then more glasses will be needed. The same thing happens when the third - the largest ball - is added. However, it is worth noting that this winter craft turns out to be very unstable. It will require additional support and attachment to it.
What to look for when buying disposable tableware? They must be from the same batch, then the product will turn out neat. It is advisable to choose glasses without rims. This will simplify the assembly process and the joints between parts will not be so noticeable.
In the process of making a snowman from plastic cups, you will need the following tools:
- a stapler with small staples (so that when fastening the dishes do not crack);
- transparent super glue.
To decorate a Snowman craft made from disposable cups, the following will be useful:
- a cap and a scarf (they can be made from paper and tinsel, respectively);
- imitation carrot nose (cardboard or plasticine cone);
- paper eyes and grew;
- Christmas balls for holiday buttons.
Snowman made from cups step by step instructions
First you need to think through a scheme for creating a craft. And it is very simple: the torso and head. This is if you create a simplified snowman craft from plastic cups. In the full version there will be three parts varying in size. Subsequently, all the parts must be fastened together to decorate.
First detail: torso. The beginning of its production is the central part of the sphere. It is formed by 25 cups. They are supposed to be fastened with their bottoms facing inward. The shape of the dish will tell you how to hold the circle together. There is no need to tightly fasten the cups; they should be positioned freely.
Then lay the next rows of glasses in a checkerboard pattern. It is necessary to take into account that in each of them there will be less and less dishes. For the structure to be stable, the hemisphere does not need to be completed. The hole left will be the bottom of the snowman.
Turn it upside down in the starting circle. Continue the same work. That is, lay the circles in a checkerboard pattern (there should be 7 of them), gradually completing the ball. The topmost one does not need to be installed. This hole will be useful for fastening the snowman parts.
Second detail: the head. It is made similarly to the body. Only the initial circle is supposed to be made from 18 plastic cups.
Fastening parts. Use super glue to attach the head and body of the snowman. You may end up with an uneven seam at the attachment point. This defect can easily be hidden with the tinsel of a scarf.
To add decorativeness to the craft and a festive New Year's effect, place an electric Christmas tree garland on the floor under the snowman. The snowman and plastic cups will sparkle and shimmer like Christmas tree with the onset of dusk.

We also recommend
 When is the best time to send your child to kindergarten?
 Cast iron wedding: how many years have passed since the wedding?
 Milanese bracelet watch (754)
 Live broadcast - Dzhigarkhanyan’s divorce from his young wife How the relationship between Vitalina and Armen Borisovich developed further
 Minimum length of service for an old-age pension: what it should be in Russia
 Set yourself up for positive thoughts