Basic rules of manicure. Types of manicure and technique
Hands are the second face of a person. Well-groomed beautiful nails always attract the attention of strangers and encourage conversation. IN Lately Even men have begun to use the services of specialists who help give their hands a good look. In this article we will talk about what they are and the technique for performing them. You will learn the main nuances and details of the work. It’s definitely worth mentioning the manicure technique. The master class will be described below.
What is a manicure? General description of the procedure
Before you find out what types of manicure and techniques there are, it’s worth saying a few words about the general understanding of the process. involves not only applying decor and cutting the plate. Manicure is primarily about caring for the skin around the nail bed (cuticle). The procedure also involves healing and improving the appearance of the nail.
Types of manicure and techniques may vary. Currently, masters and specialized salons offer to choose what is right for you. Let's try to find out everything about manicure. Types of manicure will be described below.

Hardware treatment of nails and skin
Recently, this type has gained great popularity. In order to do such a manicure, you need to have a special device (machine). It comes with a lot of attachments. Some of them are needed for polishing the nail plate. Others are used directly on the skin.
Before work, do not wet your hands or soften the cuticles. You need to start processing it with a machine right away. The device can do all the difficult work for you. All that remains is to trim the nail and, if necessary, coat it with varnish.

Spa manicure and its types
Several categories can be included here. Spa manicure has two subtypes of nail treatment: cold and hot. In addition, there is Japanese and Brazilian technology. Paraffin therapy (manicure) is also becoming very popular.
- Manicure techniques (hot and cold spa types) involve exposing hands to special medicinal solutions. Most often, salt, herbs, and various oils are used to prepare them. All these substances heal the nail bed and add shine to the plate. After this treatment, the hands look well-groomed and beautiful.
- Paraffin therapy is another popular way of treating hands and nails these days. During the procedure, oil or cream is applied to the skin, after which the brushes are dipped into hot paraffin. The temperature of the composition can reach 50-60 degrees. Next, the hands are removed and the product seals the skin. It is this manipulation that allows the cream or oils to have the most effective effect on the skin of the hands and nails.
- Japanese manicure. The processing technique in this case will be as follows. The skin is treated in special baths, for which only natural ingredients. Moreover, all the tools that the master uses are also of natural origin. After this treatment, the nails become stronger and shiny.
- The Brazilian type of processing involves the use of individual sets for each visitor. So, in the salon you will be provided with gloves, several chopsticks and some other accessories. All of them will be disposed of immediately upon completion of work.

European type of treatment (manicure)
Manicure techniques (types described above) can be combined in this option. involves the use of special gels, solutions and pencils that soften the cuticle and allow it to be easily removed. First, the master uses such solutions, after which he removes excess skin. In this case, piercing or cutting objects are never used. After carefully processing the roller, the nail is cut and polished. Next, you can use oils, creams or medicinal compositions for the plate.

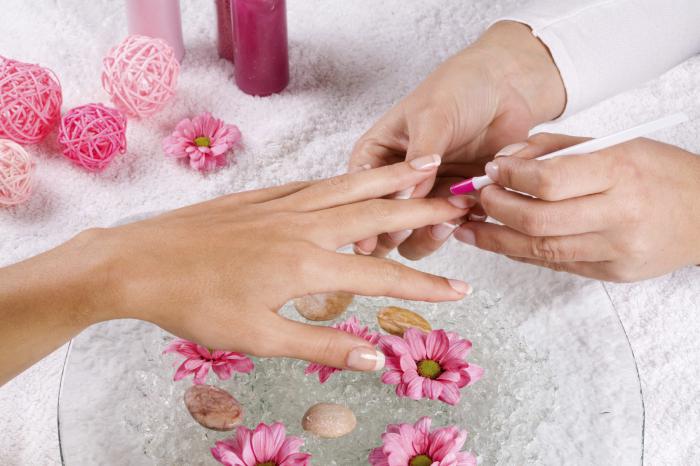
Classic manicure
The classic manicure technique involves the use of files, scissors, cuticle tweezers and many other items. It is worth noting that this processing method is the most dangerous. That is why all items and instruments must be sterilized after each client. Consider a master class on how to perform this manicure.
First stage: softening the skin and cuticles
To treat nails and fingers, technicians most often use a regular soap solution. If desired, you can add salt, herbs or oils to it. Dip your fingers into the prepared heated mixture for about 15-20 minutes. The drier your skin, the longer the exposure time should be.
After the specified range, you need to blot the skin of your hands with a soft cloth, leaving moisture on the nail area.

Stage two: cutting the cuticle
After thorough softening, excess skin from the periungual fold is removed easily and without much effort. Using a stick, move away the part that has grown on the plate. After this, use scissors or sharp tweezers to remove excess cuticle.
Be sure to pay attention to the resulting burrs. They need to be carefully cut off without damaging the deep layers of the skin.

Third stage: nail treatment
When the skin of each finger is processed, you need to trim the length of the plate. This should be done using sharp scissors or tongs. After this, carefully file the edge of the nail and give it the required form. Remember that it is better to cut from the edges to the middle. In this case, the plate will not delaminate and crumble.
Stage four: application of design or softening composition
Once the nail is shaped, you need to apply the final design to it. This could be varnish, stickers or any other decoration. If you want to leave the plate clean, you can use wax or aromatic oils that are rubbed into the bed and soften the cuticle. After such a manicure, the hands look natural and beautiful.
Summing up and a short conclusion
So, you now know the main types of manicure and the technique. Previously, only the classical method was used. IN modern world At the same time, more and more opportunities are being provided for bringing hands and nails into proper shape. Choose the technique you like best and use it constantly.
Remember that when applying nail extensions, you should do a manicure about one or two weeks before the next correction. Otherwise, your cuticle may become thinner and begin to develop cracks and abrasions.
It is also not worth extending nails after paraffin therapy. In this case, the plate is saturated with oils and nourishing creams, and is also saturated with moisture. After such treatment, the gel or acrylic may simply not lie on the nail.
The classic type of manicure should not be done on dry skin. Before such treatment, be sure to moisten the cuticle and soften the roller. Otherwise, injuries will be inevitable.
Take care of the health and beauty of your nails. Get your nails done regularly and always be beautiful!
This article will introduce you to different types of manicure. Describes the advantages and disadvantages of each type, and also gives short description their main features.
Classical
It is one of the most common types.
Characterized by:
- the need to use scissors and nippers to give the nail plates the desired shape and;
- moving the cuticle with a pusher towards the nail bed, and then cutting it off;
- by cleaning the ptergy - the layer under the cuticle, using the sharp tip of a pusher.
Pros:
- Wearing a manicure for a long time, since the cuticle grows slower when removed correctly.
- Marigolds take on a well-groomed appearance.

Flaws:
- When removing the cuticle, it can be damaged, causing burrs to peel off.
- Improper damage to the cuticle can cause it to grow back faster and become stiff.
European
In this manicure, the cuticle is not cut.
Peculiarities:
- the cuticle softens under the influence of the remover, and then moves back to the bed. An orange stick is used for these purposes;
- To keep your hands looking well-groomed, the procedure is performed at least once a month.
Pros:
- A non-traumatic type of nail care.
- The procedure is completely painless.
- The risk of infection is reduced to a minimum.

Flaws:
- This manicure will not cope with hard, rough skin without scissors and nippers. Therefore, this type is not suitable for everyone.
American
Similar to the classic type.
Characterized by:
- the need to soften hands in the bath;
- shifting and trimming the cuticle;
- the nail plate is polished using a buff;
- and then made oval in shape;
- For coating, a bright varnish with a cream consistency is used.
Pros:
- A moisturizing effect occurs.
- Nails acquire a natural shine.

Minuses:
- When cutting the cuticle, it can be damaged, causing hangnails to appear.
- Improper damage to the cuticle can cause accelerated growth and keratinization.
Japanese
It has its own distinctive features.
Peculiarities:
- refusal to use metal accessories to create a manicure;
- wood files and a buffer are used, which is covered with suede fabric of natural origin;
- the cuticle is treated with a softening serum;
- the nail plate is cleaned, and then a paste containing minerals and esters is applied to it;
- Using mineral powder and buff, the master polishes the nail until a pearly natural shine appears.

Pros:
- Various nail defects cannot be masked with varnish.
- The texture of the nail plate improves natural means, which independently improve the appearance of the nail, making it healthy.
- Natural paste heals the nail by filling its microcracks.
Flaws:
- Requires frequent updating of manicure.
- The therapeutic effect is achieved by completing a course of procedures.

Spanish
Looks like a European manicure.
Characterized by:
- a pair of bright varnishes are used, which are applied in stripes, layering on top of each other;
- The nail treatment procedure is identical to the European type of manicure.

Advantages:
- Visually lengthen the nails when applying vertical stripes.
- Does not injure the cuticle.
- Removes the risk of infection.
Flaws:
- This treatment will not cope with hard, rough skin without scissors and nippers. Therefore, this type of nail care is not suitable for everyone.
- Requires frequent manicure updates.

SPA manicure
Essential for caring for the skin of your hands and nails and improving their health. It is a complex procedure. Includes the use of a brush bath.
Peculiarities:
- an exfoliating procedure is carried out, ending with peeling;
- massage is done;
- masks are applied to the brushes;
- complemented by manicure;
- The nail plates are covered with strengthening agents.
Pros:
- Gives the skin softness and moisture.
- Reduces the activity of age-related changes.
This type of manicure has no disadvantages, apart from individual intolerance to cosmetics.

Hardware
All care procedures are performed with a special apparatus using various attachments.
Characteristics:
- the shape of the nails is given using rotational filing movements of the device nozzle;
- attachments polish the nail to a shine and also process the cuticle;
- This can only be done on dry brushes.
Minuses:
- Difficulty using the device at home.
- Incorrect selection of speed mode or nozzle will lead to thinning of the nail and cuticle injuries.

Hot
It is one of the types of classic manicure.
Peculiarities:
- use a bath with lotion heated to 45 degrees;
- brushes are kept in lotion for a third of an hour;
- Next, a classic type manicure is performed.
Pros:
- Softens dead skin.
- Accelerates blood circulation.
- Promotes high-quality absorption of nutrients.
- An excellent option for caring for dry or rough skin.
Minuses:
It is better not to use for oily shiny skin, they can be replaced with vitaminized and mineral masks.

Types of decorative manicure
French
They are short nails, shaped like a square with rounded edges.
Characteristics:
- the nails are covered with a light varnish that has a natural shade;
- The “smile” zone along the edge of the nail is highlighted in white;
- there is also a color one, when the “smile” is colored;
- two-tone design involves using a pair of contrasting colors;
- They also use additional elements, emphasizing the lower edge of the “smile,” for example, with rhinestones.
Pros:
- Gives brushes a well-groomed and elegant look.
- Suitable for almost all clothes.
- It looks festive, but is also suitable for everyday wear.
- As the nail grows out, natural tones blend with the color of the nail, making the grown area invisible.

Minuses:
This design is popular, so it will not surprise others.
Lunar
Appeared in the twenties of the last millennium. It’s similar to a French coat, but it’s not the “smile” that stands out, but the hole; There are several types of such manicure.
Peculiarities:
- most of the nail is not painted with varnish, only the hole is treated, and then the entire nail is covered with top coat;
- the nail plate and hole are painted in different shades;
- a metallic color is used to highlight the hole;
- decorative elements are also used.
Advantages:
- Special ones help to easily perform a manicure.
- Hands look bright and interesting, suitable for any occasion correct selection color range.

Flaws:
It is difficult to draw a hole by hand if you do not use special stickers.
Features a gradient design.
Characterized by:
- several shades are combined that smoothly transition into each other;
- There are a couple of options for this manicure;
- different shades cover one nail plate in any direction;
- develops from the thumb to the little finger, or vice versa.
Advantages:
- Looks fashionable and interesting.
- Suitable for weekdays and weekends. The gradient will be a great option for the holidays.

Flaws:
- Difficulty doing it on your own.
- You must either mix the colors yourself or have a wide range of color shades available.
cat's eye
Manicure with iridescent stripes.
Characterized by:
- magnetic varnishes are used;
- a strip is formed on a non-dried coating by holding a magnet close to it for 15 seconds;
- After drying, a protective layer is required.
Pros:
- It has deep color and volume.
- Easy to do at home.
- Gives the hands an interesting nuance.

Minuses:
Small color range of magnetic varnishes.
Water
A spectacular manicure that is easy to perform.
Peculiarities:
- add a couple of drops of varnish to a container filled with water;
- drops are converted into a pattern using a needle;
- the finger, nail upward, is immersed in the water, placed under the varnish, and then raised out of the water;
- the drawing is transferred to the plate;
- the design dries and is covered with topcoat.

Pros:
- Any girl can easily pull off this design.
- Speed of execution.
- Each nail will have an individual design.
Minuses:
- Inability to create a clear drawing.
- It is impossible to predict the spread of polish on the nail after it has been applied.

Lace
Delicate design for sophisticated natures.
Peculiarities:
- real lace materials are used;
- modules necessary to create the design are cut from the material;
- the nail plate is covered with colorless varnish, onto which the lace is immediately placed;
- For fixing, 2 layers of top are used.

Pros:
- Perfectly complements an evening or holiday look.
- Gives the girl tenderness and emphasizes femininity.
- Easy to do.
Minuses:
- Thin lace is hard to find.
- In the process of execution, it requires speed of action so that the varnish does not have time to dry.

Stamping
Creating designs using silicone imprints.
Peculiarities:
- nails are coated with base and dried;
- a pattern is selected and varnish is applied to it;
- the stamp is applied to the plate;
- the drawing is ready.
Pros:
- Large selection of kits for.
- The drawing turns out clear and identical.
- Allows you to make the finest lines.
Minuses:
- Requires additional tools, for example, a stamp, scraper, cliche.
- Requires skill acquisition.
- Expensive kits.

Each of the described types of manicure is beautiful in its own way. The main thing is to choose the right style and color scheme to clothing and occasion. At the first unsuccessful attempts at design, you should not give up, you need to practice regularly, and soon you will become a real professional.
Women who once discovered gel polish rarely return to regular manicure. Beautiful appearance and the durability of the coating make it indispensable for busy ladies. If you follow the technique, your nails will be gone for three or even four weeks.
Beautiful manicure
Today, equipment and products for manicure are available to everyone. All that's left to do is learn the sequence of applying gel polish to your nails and you can start applying.
What you need for a manicure
At home, you need the same products that are used in salons.
For manicure you will need:
- dehydrator;
- base, color and top coat.

Applying base coat
Today you can buy gel polish in different price categories. When choosing a base and top, do not skimp, since the durability of the manicure depends on them.
Choosing a lamp
There are two types of lamps on the market – LED and UF. The sequence of applying gel polish does not depend on them, but the drying time of the nail plate does. For manicures at home, UF lamps are most often purchased, since they are much cheaper. Among the disadvantages - for a long time hardening and the need to change light bulbs. However, this does not affect the quality of the coating in any way.

UV lamp
An LED lamp will cost several times more. It does not require replacement elements. In addition, the hardening time is much shorter - about 10 seconds. In addition to the high cost, the disadvantages of LED lamps include the fact that they are not suitable for some types of varnishes.
For home use It is better to opt for a UF lamp. The main condition is high power of the device.
Preparation for application
Any manicure should begin with treating the nail plate and removing the cuticle. To do this, dip your fingers in warm water, then carefully cut off the cuticle or push it back with a spatula.
Then we give the nails the desired shape and process them using a sanding file. It is better to choose an abrasive buff to remove the gloss. This will ensure a better connection to the base.

The sequence of gel polish coating includes treating the nails with a degirator. It is applied with lint-free wipes. This way we remove excess fat and moisture. IN as a last resort, can be used, but they are very drying and can even affect the final color.

It is not necessary to use a primer at home. If you want to comply with the rules as much as possible, then apply it after treating with a degreaser.
Application process step by step
Remembering the sequence of a gel polish manicure is quite simple. It uses a base, colored varnish and finish.
- First you need to apply a base coat to your nails. Use a quality base and you won't have to worry about how long your gel polish will last. The base also provides additional protection against color pigment. It must be applied in a thin layer so that voids do not form. It is better to leave just a little product on the brush and carefully distribute it, starting from the tip of the nail. We seal the end. If gel polish gets on the skin, remove it with a wooden stick. Then dry it in a lamp for 2 - 3 minutes (10 seconds if it is an LED lamp).
- The color layer must be applied in the same way. Make sure that the product does not spread around the edges, otherwise unevenness will form. Dry the gel polish in a lamp. Typically, for a high-quality coating it is necessary to apply 2 – 3 layers. Each of them is dried separately. Do not remove the sticky layer of colored varnish.
- The manicure sequence includes the application of a finishing agent. The top, like the base, seals the edge of the nail. The finish can be applied in a slightly thicker layer, but it also takes a little longer to dry. Remove the sticky layer using a degreaser. Once completed, use cuticle oil.

Popular techniques for nail design
If you are doing a manicure at home, you should not immediately use a complex design. Learn how to work with basic colors, after which you can begin to learn additional techniques.
Today, two main methods are at the peak of popularity:
- gradient;
- Effect broken glass.
Use the instructions that explain step by step how to do unusual design nails
Gradient
In order to create on your nails, you will need a sponge, brush or sponge. Before starting application, repeat the same steps as for a standard manicure. We remove the cuticles, polish the nails, use a degreaser and apply a base coat.
- Visually divide the nail into upper and lower parts. Carefully spread one color of varnish on the bottom, the other on top. Press the sponge quickly a few times to blend the shades. You can also use a brush. Dry the layer in a lamp.
- In another method, varnish of two colors is distributed on a sponge or sponge, and then pressed against the surface of the nail. Excess product is removed.

Types of coating using gradient technique
If you don't succeed right away, don't despair. To get started, you can practice on paper.
Shards
This design uses holographic particles that have a fairly dense structure and create the effect of broken glass. The beginning of a manicure is exactly the same as in other techniques. Once you have applied the base and color varnish, attach the decorative elements to the adhesive layer. Distribute them one at a time, preferably using tweezers or a rhinestone pencil.
Important! Try not to use too many large particles on the side of the nail. The finishing layer may not completely cover them.
Top coating– the final step. After this, remove the sticky layer and you can enjoy the finished manicure.

Technique shrapnel (broken glass)
What determines the service life of the coating?
If it does, it means you have sanded the plate too much. Chips can occur due to a poor-quality base. If the ends are poorly sealed, already on the second day you may experience the varnish coming off the nail.
Follow the consistency of the technique, and the coating will last you 3 to 4 weeks. The advantage of gel polish is that, if desired, you can change the design if you carefully remove the top layer and apply a different color.
A beautiful manicure is not only a stage of basic nail care, but also an important hygiene procedure. Edged manicure is in demand, despite the popularity of European and Japanese unedged techniques. Classic manicure allows you to keep your nails in perfect condition for 2 weeks without additional care.
Trim manicure – classic look nail care, which involves removing the cuticle from the surface of the nail folds. The procedure is carried out with preliminary steaming of the keratinized layers of skin around the nail in warm water, which is why this method is called “wet” manicure.
 Classic trim manicure is done in the same ways for both men and women.
 A classic manicure prepares your nails for further application of any coating. Trim manicure is carried out even when the nails are in poor condition. Treating your hands with nourishing products after a session is comparable to spa treatments, because it has a positive effect on the surface of the nail and cuticle.
Advantages of the method
Trim manicure is a classic manicure method.
Compared to other types of nail care, it has many advantages:
- Efficiency. By trimming the cuticle, your nails retain their presentable appearance much longer.
- Execution speed. The complete classic manicure procedure takes no more than 30 minutes.
- Versatility. Trim manicure has no contraindications. It can be done by both men and women.
- Additional hand care. Using baths with useful components has a positive effect on the skin of the hands and strengthens the nail plate.
- Manicure can be combined with other caring procedures, for example, paraffin therapy or peeling.
- The procedure is carried out not only in salons, but also at home, subject to mastery of the technique.
Flaws
The main disadvantage trim manicure The possibility of skin damage during cuticle removal is considered. In this regard, many clients abandon the classic manicure in favor of the European one.
Improper handling of instruments can lead to HIV or hepatitis infection. Therefore, some people prefer to perform trimmed manicures themselves in order to monitor the quality of disinfection of manicure accessories.
Nail service specialists do not recommend getting a manicure if:

- inflammation of nails and nail folds;
- fungal diseases;
- wounds and cuts;
- decreased blood clotting;
- diabetes mellitus
Differences from hardware manicure, European
Hardware manicure is performed special device with a set of different attachments designed for treating nails and cuticles. This device is used in beauty salons, since working with it requires professional skill.
It is suitable for various types coatings, including gel polish. A manicure takes less time, and the speed of cuticle regrowth will allow you to schedule the next session no earlier than in 2 months.
When performing a hardware manicure, you do not need to soften the cuticle in the bath in advance, but only lubricate it with a special gel, and then remove it with one of the attachments of the device. Polishing the nail plate and length correction is also performed by the device in a few seconds.
The disadvantage of this method is its pain. Due to the high speed of the mechanism, it is possible discomfort due to nearby nerve endings in the nail. Therefore, you should not purchase the device for hardware manicure to use it at home. 
European manicure is a method of nail care without the use of scissors and clippers.
When executing it:
- The length of the nail is adjusted using files;
- the cuticle is not removed, but softened, and then pushed to the edge with a pusher or an orange tree stick;
- The possibility of infection from a poorly processed instrument is practically excluded.
Its main disadvantage is that to maintain a presentable appearance, it is necessary to constantly moisturize the cuticle with cream or oil. For this reason, the service life of European manicure is short. It needs to be updated after 5-7 days. Trim manicure is considered the most universal method that allows you to quickly and painlessly give your hands a well-groomed look.
Required Tools
Trim manicure, classic version which involves removing dead skin from the nail folds, requires a certain set of tools. They are used to polish nails, shape them and trim cuticles.
Basic accessories for trim manicure:

The hardness of the file should be selected depending on the thickness of the nail and the desired functional use. To correct the length, a tool with an abrasiveness of 200-400 grit is suitable, and for polishing a hardness of 900-1200 grit is sufficient.
It is best to choose ceramic, plastic or glass files. They carefully file the nail without damaging the plate. You should not purchase metal files, which lead to delamination and brittleness of the nail.
To apply drawings and create nail designs, you will need additional tools:
- Dots are a metal or plastic stick with a spherical tip for depicting dots and circles.
- Brushes of different thicknesses - for drawing details and completing french manicure.
- Stamps and plates with designs (stamping kit) – for applying ready-made images to the nail.
Covering the nail involves applying varnish of one or more colors, a base for the varnish and a fixative. Sometimes a liquid is used to quickly dry the varnish, but in the case of a regular coating it may not be useful.
It is also necessary to have acetone to remove any remaining polish from your nails. To care for the skin of your hands after completing the procedure, you will need cream and cuticle oil.
Execution technology: step-by-step lesson for beginners with photos
Those who decide to master the technology of classic manicure should remember that to achieve desired result practice is important. After the 5th session, the skill will be developed sufficiently so that you are not afraid of damaging the nail plate.
It is important to study in detail the sequence of each step and be extremely careful when working with tools. A trimmed manicure done at home will not only save money, but also eliminate the risk of infection. 
Before you start working, you need to organize your workspace. It is enough to lay out a towel or napkin on the table, and also take care of good lighting.
Even if one person uses a set of manicure tools, it is necessary to disinfect it with alcohol or an antiseptic before the session. They should also treat their hands, especially the cuticle area.
Step 1: Removing the Coating
Depending on the type of coating, various manicure removers are used. Regular varnish can be removed with acetone or its mixture with glycerin.
Some people prefer to use removers that do not contain acetone, but they do not always cope with thick coatings or varnish with added glitter.
Step 2: Creating a Nail Shape
Correction of nail length is carried out using scissors and a file. The movement of the scissors should be sharp and clear in order to remove the overgrown edge in one movement. This technique does not violate the integrity of the nail plate and does not lead to delamination. Nails should be filed at an angle of 90°, without chaotic movements. The tool should be directed in one direction - from left to right.
It is better to start the process from the edges of the nail, and finish it by filing its middle. First you need to treat the nails of the little fingers, gradually moving towards the big fingers.
After adjusting the length, you should place the file under the nail and make a few more movements with it to remove possible nicks.

When the desired shape and length of the nails have been selected, the plates should be treated with a polishing buff to give them shine and shine. This step also helps the varnish finish smoother. It is important to perform these steps on completely dry hands, otherwise your nails may begin to peel.
Step 3: Steaming
To soften the cuticle, you need to make a nail bath. Sea salt or other components that strengthen the nail plate are dissolved in warm water. If there is dirt, you can add a little soap. 
The steaming procedure should not last more than 5 minutes, as this time is enough to soften the skin. When the cuticle is steamed, you should treat the surface of the nail, as well as the area under it, with a brush. Dry your hands with cotton or paper towel so that no moisture remains on them.
Step 4: Cuticle Work
Before trimming the skin, you need to push back the edges of the cuticle with a pusher. This is a double-ended instrument with a round and sharp tip. The round side is used to treat the skin below the nail hole, and the pointed edge pushes the cuticle away from the side ridges of the nail.
You need to work with a pusher extremely carefully, without pressing on the nail, as the tool can damage its surface and lead to scratches and microcracks.

When the cuticle no longer adheres to the nail, it needs to be trimmed with clippers. To avoid damaging the skin, the movement of the instrument must be continuous and confident. If you do not follow this rule, hangnails may appear. To avoid cuts, do not grab too large an area of the cuticle with the nippers.
Step 5: Nail Covering
To protect and even out the nail, you need to apply a base before applying varnish. Next, varnish is applied. You need to start coating on the left side of the nail, and with 3 strokes of the brush, completely paint the entire area of the plate.
Finally, a fixative is applied to give the nails shine and protect them from chipping. The last stage of a classic manicure is the application of hand cream and cuticle oil.
Classic dry manicure with gel polish: features, technique
Trim manicure is a classic method of nail care, in which the skin of the hands is pre-steamed in warm water. This technology is not always used before applying gel polish. Instead of softening the cuticle with water, use a gel to remove it.
It is applied to the nail folds and after the specified time, the cuticle is pushed back to the edges of the nail with a pusher or an orange stick. Therefore, this method of manicure is called dry. Compared to a regular product, gel polish (or shellac) lasts from 2 to 4 weeks, and the technique of applying it has its own characteristics.
Set of tools for work:

- fine-grained buff;
- cuticle pusher or orange stick;
- cuticle softening gel;
- lint-free wipes;
- degreaser;
- primer;
- base;
- gel polish;
- gel polish remover;
- finish(top);
- foil;
- sticky layer remover;
- cuticle oil;
- Ultraviolet lamp;
- cotton pads.
After shaping the nails and processing the cuticles, it is necessary to sand the nail plate with a buff.
Then the nails need to be degreased using a lint-free cloth, primer and base coat are applied. After applying each layer, dry your nails under the light of an ultraviolet lamp.
When choosing a lamp for baking gel polish, you need to pay attention to the features of UV and LED devices. They differ not only in the sealing time of the varnish, but also in other characteristics.
| Lamp type | UV | LED |
| Power | 36 W | 3 W |
| Drying time | 180 sec | 60 sec |
| Gel polish drying time | 2-3 min | 30-60 sec |
| Life time | 6 months (lamp replacement) | 50,000 hours |
Cover the nails with colored varnish in 2-3 layers, also drying each of them with ultraviolet light. Typically, drying takes no more than 2 minutes, depending on the manufacturer of the gel polish. It is important to lubricate the end parts of the nail well so that the manicure lasts longer without peeling or chipping.
The coating is fixed with a finishing agent, and then the sticky layer is removed using a napkin. This step promotes adhesion of all applied layers to each other. The last step of the session is to oil the skin around the nail. If handled correctly, a manicure coated with gel polish will last about 3 weeks. This period also depends on the speed of nail growth. 
During manicure correction, the previous coating is removed, which is also done differently than with the classic trimming method. To do this, you need to moisten it well. cotton pad in the composition for removing gel polish, apply the disc to the nail and wrap each of them with foil.
After 15 minutes, massage the nail plate and remove the foil and cotton wool. The remaining coating is carefully removed with a pusher.
French manicure with shellac
French manicure is one of the most popular types. This is a classic manicure and Any will do situations. French involves painting the tip of the nail with white varnish, and applying a neutral shade to the remaining nail plate: beige, pink or clear varnish.
The processing of plates is carried out in the classical way. It is not necessary to use a buffer for this type of coating, since shellac has excellent adhesive properties. Apply a thin layer of primer and base to oil-free nails, and then dry them under a lamp. 
Then apply the colored coating and bake it for 1 minute. Use white shellac to paint the tip of the nail. This should be done in 2 layers, not forgetting to dry the nails under ultraviolet light. A top coat completes the French manicure procedure.
How to avoid hangnails
Hangnails are particles of skin that have peeled off on the surface of the nail fold.
They can appear for several reasons:
- Dry cuticles caused by overuse of harsh chemicals found in detergents.
- Incorrect technique for performing trim manicure. Cuticle removal should be done smoothly and continuously to avoid ragged edges.
- Filing nails from side to side, as well as using metal files.
- Poor circulation caused by aging processes.
Hangnails bring discomfort, and often inflammation and abscess appear in their place.
Following a few steps will help prevent their occurrence: important rules:

- It is mandatory to use rubber gloves when working with any types of household chemicals.
- Technically correct execution of trimmed manicure with a well-sharpened tool.
- Using oils and creams to moisturize the skin around the nail.
- Massage cuticles and nail folds to improve blood flow. You can do it yourself.
To achieve a positive effect, self-massage should be done 2-3 times a day. It will take no more than 3 minutes. The massage should begin with light stroking of the hand, and gradually move on to kneading the fingers. It is enough to repeat this action 4-6 times.
Rubbing the phalanges of the fingers is the main element of self-massage. To do this, you need to clench your hands into fists and alternately rub the phalanges against each other. The massage ends with the application of nourishing cream.
Regularly performing this procedure has a beneficial effect on the appearance and health of the nails, and also prevents the appearance of hangnails.
Advice from experts on hand care after a manicure
A manicure will last much longer if you properly care for your hands after the procedure.
Nail service experts advise following a few simple recommendations that will help maintain the beauty of your nails:

What video tutorials will help you learn the correct classic manicure technique?
Novice manicurists can benefit from videos on how to properly care for their nails and prepare them for the procedure. They show all the processes and stages of a classic trimmed manicure session, with step by step instructions and comments from nail service professionals.
After studying these videos, you can begin to master the technique of cutting manicure and take care of your hands without visiting beauty salons.
A classic manicure gives a well-groomed look and maintains healthy nails. Having learned the technique of cutting manicure, you can perform the procedure at home.
Article format: Mila Friedan
Video about classic manicure
Classic manicure:
Beautiful nails give self-confidence, lift your spirits, and increase the status of their owner.
But not everyone can afford to visit a salon all the time. For many, the topic of manicure at home is relevant.
To do it right beautiful manicure, preliminary preparation is necessary.
It includes the purchase of manicure tools, disinfectants and related items that you cannot do without.
Necessary tools for manicure at home
Good, solid tools– this is the key to high-quality cuticle care, prevention of nail splitting and high speed of the procedure.
For a classic edged manicure you will need the following tools:
| Tool | Description |
| 1. Cuticle tweezers. | It is best to purchase a Solinger brand tool, this is an old German brand of cutting tools. Tweezers have their own sizes. They determine the length of the blade. It’s good to take 0.5 cm. |
| Double-sided cuticle spatula: on one side it resembles an oar, on the other it resembles a hatchet. Must be metal. | |
 3. Knipser 3. Knipser
|
Tool for cutting the length of the nail. It looks like a small guillotine, it can be used for fingernails and toenails. |
 4.File 180 grit 4.File 180 grit
|
The grid should be imprinted on the file itself. |
 5. Polisher 2000 grit 5. Polisher 2000 grit
|
There are double and triple polishers, then the grit for each side must be printed. |
| Related Items: | |
 1. A large bowl, preferably ceramic - it holds the temperature well; 1. A large bowl, preferably ceramic - it holds the temperature well; |
|
 2. Towel or napkin; 2. Towel or napkin; |
|
 3. Cotton pads; 3. Cotton pads; |
|
 4. Orange sticks; 4. Orange sticks; |
|
 5. Nail polish remover. 5. Nail polish remover. |
|
| Disinfectants: | |
| 1. Chlorhexidine; | |
| 2. Alcohol solution 70%. | |
| 3. You can buy it at the pharmacy professional product for processing hands and metal tools. | |
Which manicure tools should you use and which should you not?
If you still have little experience in nail care, orange sticks will come in handy. They can move the skin near the cuticle and clean the eponychium.
Some people use it to trim cuticles. manicure scissors. This is acceptable, but best quality you will get a manicure if you use it tweezers. Scissors have straight blades, while tweezers have beveled blades. That's why It is the tweezer that cuts the skin more and deeper and after them the manicure lasts longer.
 Nail fork
 Since we are talking about the cuticle area, No blade pressure is allowed. This can damage the matrix - the growth cells of the nail under the hole. As a result, the nail will grow crooked for the rest of its life.
Choosing a nail file, which one is used for what
Files vary depending on the grit. Grits measure the amount of abrasive applied to 1 square centimeter of a file:
The coarsest file is 80 grit. It is used to reduce the length of artificial nails;
Technique for performing European unedged manicure at home:
Step 1: Wash your hands with soap;
 Hand washing
 Step 2: Apply cuticle remover;
 Applying cuticle softener
Step 3: Starting from the little finger, use the rounded tip of a file or an orange stick to push the roller away;
 moving away and grinding the roller
 Step 4: Remove the softened thin skin from the surface of the nail;
 Cuticle removal
 Step 5: Process the rollers with a 180 grit file;
 processing rough rollers with a file
 Step 6: Wash your hands with soap;
Step 7: Degrease nails with an alcohol solution;
 Degreasing nails
 Step 8: Apply varnish coating.
 Varnish coating
 How to paint your nails evenly and beautifully
There is no difficulty in painting your nails easily and quickly and doing it exactly at home, without using a brush on the roller.
First of all, the varnish must have a certain consistency. The new varnish applies well and dries quickly, because the solvents have not yet evaporated from it. If the varnish has thickened, add 3-5 drops of varnish solvent to it.
Do not try to thin the varnish with acetone. or nail polish remover. These products will cause the varnish to curl.
Technique for applying varnish in bright or dark tones:
Step 1: Dip the brush into the varnish, squeeze out the excess with the back of the brush onto the bottle in a “pull away” motion.
Step 2: Place the brush in the middle of the nail at an angle of 45 degrees and move towards the cuticle. Before reaching the roller, stop the brush and move towards the free edge of the nail. This entire double movement must be done without lifting the brush from the nail or stopping it.
 Positioning the brush
  Smooth movement towards the cuticle
  Moving the brush towards the free edge
 Step 3: Place the brush on the nail in the cuticle area so that the brush lies in the hand perpendicular to the finger. Make a stroke with the brush along the cuticle to the side roller, round the stroke along the contour of the nail (the brush changes position - now it lies in the hand parallel to the finger) and bring it to a free edges of the nail.
 Movement to the side roller
 Step 4: Repeat this movement on the other side of the nail. If you run out of varnish on the brush during the process, turn it over and continue.

Step 5: With a well-wrung out brush, run along the end of the nail, sealing it.
 Result
 Technique for applying varnish in nude and dense pastel colors:
 Nude polish
 Step 1: Dip the brush into the varnish, squeeze out the excess with the back of the brush onto the bottle in a “pull away” motion.
Step 2: Place the brush in the middle of the nail at an angle of 5 degrees and move towards the cuticle, holding it almost suspended. The brush does not put pressure on the nail, only the polish touches the nail. Before reaching the roller, stop the brush and move towards the free edge of the nail.
Step 3: Bring the brush to the cuticle area. Keep the hand parallel to the finger. Barely touching the nail, move the brush towards the side roller and down to the free edge. The brush should go along the side of the nail without touching the roller.
Step 4: Repeat this movement on the other side of the nail. If you run out of varnish on the brush during the process, turn it over and continue.
Step 5: With a well-wrung out brush, run along the end of the nail, sealing it.
Nail designs at home
Exist beautiful options designs for which it is not necessary to go to the salon. They can be done at home: rhinestones, glitter, gel pen painting, stickers, bouillons, varnish painting, craquelure, velvet, cat's eye.
 cat's eye- stripes
  Cat eye-waves
 1. Cat's Eye Design. For it you will need to purchase magnetic polish and a Cat's Eye nail magnet. Still releasing options “Wave”, “Stripes”" and others. But the most spectacular is “Cat's Eye”.
 Cat's eye - made with gel polish
 It is done on the newly applied layer of varnish. The magnet is brought to the nail so that the strip is along the nail. Hold for 1 second.
If you hold the magnet closer to the nail, there will be a clear line, further away it will be blurry.
If you bring a magnet first vertically and then horizontally, there will be a bright point.
 Gel polish - made with ordinary varnish
 2. Craquelure design. A new product, hard varnish, has appeared on the product market. This is a special cracking varnish that is applied to the dried previous layer.
Substrates made of gold, white, and black varnish look good. Crack polish dries quickly. It can be diluted as regular varnish.
If you apply it in a thick layer, it will crack into large pieces. If in a thin layer - into small ones. You can combine it: make one side of the nail with large fragments, and the other with small ones.
 Craquelure - large, medium, small.
 3. Velvet design. The varnish for this effect is called “Satin”. After drying it becomes matte, hiding all the unevenness of the nail.
If you apply a top coat on it, it becomes shiny, like regular varnish. You can make two nails shiny and leave the rest matte. This design looks good in dark or bright colors. On pastel colors it is almost invisible.
4. Leopard design. On a dried substrate (for example, coffee-au-lait color), uneven spots are applied with a brush with a slightly darker (beige) varnish and, without waiting for them to dry, a black dot is added to each spot. Using an orange stick, each dot is given the appearance of a comma.
 Leopard design
 This design is classic. It can be performed not only in natural tones, but also in the avant-garde. The backing looks good turquoise color with blue spots and black commas.
5. Zebra design.
 Zebra design
 On a dried substrate white apply black lines with a thin brush. There are varnishes for design, they have just such brushes.
The lines are drawn diagonally on the nail. The first line is drawn simple. The second, parallel to it, with a thickening coming from the middle of the line. It looks like a very narrow triangle. The third line is drawn simple along the previous one. The fourth is drawn with a thickening on the other side. The fifth is simple.
You can draw with a regular black gel pen. When the drawing is dry, simply seal it with topcoat. One zebra nail looks good, the rest are white.
 Nails with rhinestones and bouillons
 6. Design with stickers, bouillons and rhinestones. It is used on special occasions (weddings, graduations) and requires a beautiful dress.
Decorate two nails, tightly covering them with rhinestones of different sizes.. Swarovski rhinestones are suitable; they can be purchased in a set. The largest stone is placed in the center, closer to the cuticle. Near it on both sides there are smaller stones.
The smallest stones are placed on the edge of the nail. The space between large stones can be filled with golden broths. On the remaining nails, place one small stone in the center near the cuticle.
 Pencil for rhinestones
 Place stones on wet varnish. The stone is taken by simply bringing an orange stick moistened with water or a special pencil for rhinestones to it and it sticks to it (there are special pencils for attaching rhinestones on sale). It is placed on fresh varnish, corrected, trimmed, it sticks to the varnish and releases the stick.
Sterilizing instruments at home
IN nail salons Instrument sterilization is carried out in a dry-heat oven.
 Manicure tools
 At home, you can use the oven for these purposes. Place metal tools in a specially designated bowl, turn on the oven at 250 degrees and heat for 15 minutes.
If during the procedure a wound was caused and blood came out, the instrument is soaked in the solution before sterilization chlorhexidine or wiped three times with 70% alcohol(in the presence of special pharmaceuticals , it is better to carry out processing with them, according to the instructions).
Files and orange sticks can also be soaked in a disinfectant solution. But if there was no blood while working with them, it is enough to wipe them.
Below you can find detailed video about sterilization of manicure instruments, some information will be useful to you at home.
What pharmaceutical products may be useful?
In addition to chlorhexidine, you can buy hawthorn tincture 70% in the pharmacy. This alcohol solution can be used as a disinfectant.
The professional line of pharmaceutical products for sterilization is very diverse. Disinfectants are divided into two types: for hands and for metal tools. The pharmacist at the pharmacy will always tell you what products are available.
You may also need it glue BF-6. This is a medical glue for treating wounds. It is convenient for cuts, disinfects and seals the wound instead of a band-aid.
Good to have on hand for warts "Mountain celandine", Brown herbal balm. If a wart is discovered during the manicure procedure, you can immediately cauterize it with this balm.
Baths and oils for strengthening and growing nails after manicure
To keep nails healthy, they need to be nourished and treated. Aggressive environment makes them thin and brittle, appear on them. To avoid this, it is good to do it with sea salt.
You don’t have to buy expensive sea salt; the kind sold in grocery stores will do. You can add it during manicure to steam your nails.
In the process of saturating the nails with such water, a phenomenon called osmosis. This is an exchange of salts between two environments. Nails, like appendages of the skin, are an excretory organ. Nail effusion emerges through microscopic holes on the surface of the nail.
After taking a course of antibiotics, it forms very actively, preventing artificial nails from sticking to the nail bed. That is why after taking antibiotics, two weeks must pass before nail extensions.
Those who spent a lot of time in sea water on vacation notice improvements in the condition of their nails. Baths do not have to be done for a long time. 15 minutes is enough. This procedure can be carried out in the evening while watching TV.
After the bath, hands are lubricated with nourishing cream. The best creams are with fruit oils. This could be avocado, aloe, or apricot oil. Just don't confuse them with essential oils. This is a completely different product.
If the cream says that it contains mineral oil, it is better not to buy such a cream. This is a product of chemical distillation of petroleum. It won't be good for your nails.
You can always look beautiful, you just need to get used to it.
We also recommend
 When is the best time to send your child to kindergarten?
 Cast iron wedding: how many years have passed since the wedding?
 Milanese bracelet watch (754)
 Live broadcast - Dzhigarkhanyan’s divorce from his young wife How the relationship between Vitalina and Armen Borisovich developed further
 Minimum length of service for an old-age pension: what it should be in Russia
 Set yourself up for positive thoughts