DIY New Year's panel. Master class with photos
Attention everyone photo New Year's panel clickable, enlarge on click.
Nothing lifts your spirits like that. as a constant reminder of the holiday.
And what holiday can compare with the New Year, except perhaps a birthday.
And what is always before our eyes, New Year's panel photo You can view.
photo
DIY New Year's panel
I’ll say right away that such New Year’s panels are very difficult to execute, so you shouldn’t take on such a thing. hard work.
It will be doubly offensive when after many hours of labor have been spent. As a result, what you get may not be what you expected.

New Year's panel photo
I apologize full photo The New Year's pano didn't work out, so it's something like this, in parts.

Photo of a New Year's panel with a clock
So first, try building a simple snowman.
I don't want to offend anyone in any way. But as a rule, the pile, a masterpiece of a New Year's panel, disappears at this stage.
So we go from simple to complex.
We make panels together with the children, believe me, it’s much more interesting for both the children and you.
By the way, here are some interesting articles:
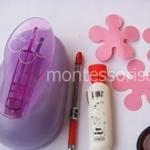
So let's go, first we need:
Felt: colors white, dark brown, grey, green, yellow and blue
- 1 sheet of cardboard, or the cover of a case, binder, album, whatever you have on hand
- glue, scissors
-sample
We will find the cellophane bag in the process, the whole process of work is in the photo, look from left to right.

A simple panel for children and training
Our snowman snowman template, print it out, the larger the format, the better.
But we need to learn, so it’s an A4 sheet.
Cut out the parts along the contour.
We put the cut out parts on felt, and now we cut them out of felt, look at the colors, be careful.
We glue some details like eyes.
Glue felt onto a rectangular sheet of cardboard; the cardboard will be the base.
For toughness.
And onto this cardboard covered with felt, which serves as a background, we glue the snowman, not forgetting about the details.
The final stage is to ensure that our DIY New Year’s panel looks great.
Place the cardboard with the snowman glued on in a plastic bag and iron it through the fabric.
That's all, in my opinion, it turned out to be a very cheerful New Year's panel made with your own hands.
Is not it?
But in my opinion it’s complete nonsense, NOT VERY MUCH.

New Year's panel decorated with Christmas tree decorations
A good New Year's panel made by professionals or real amateurs looks much better.
It's done in much the same way, with a few differences. The base is different, the frame is a little better, the tinsel is a little better, a little paint and...
This is a real hand-made New Year's panel that catches our eye.

New Year's panel decoration elements close-up
In my opinion, THESE ARE EXACTLY New Year's panel beautiful.
If needed step by step instructions on creating a New Year's panel, write in the comments, I will describe in detail, that's just step by step photos unfortunately no.
If only you take it apart in a new way. 🙂
Please note that all photos of the New Year's panel are clickable and can be enlarged by clicking on them. Nothing lifts your spirits like that. as a constant reminder of the holiday. And what holiday can compare with the New Year, except perhaps a birthday. And what is always before our eyes, you can see the New Year's panel photo. I’ll say right away that such New Year’s panels are very difficult to execute, so you shouldn’t take on such difficult work. It will be doubly offensive when after many hours of labor have been spent. As a result, what you get may not be what you expected. I apologize for the full photo...
Review
On the eve of the holiday, you can easily become a magician and wizard. Even if you haven't done any crafts in a while, don't be afraid to spend a few minutes creating creative decor. Find out how to do DIY New Year's panel 2018 and what interesting ideas there are.
DIY panelsThe New Year's mood is overwhelming and I really want to diversify my usual decorations! Each owner can create a unique canvas that will give the room a unique, magical charm or will be an excellent gift.
 An original panel can make your home more beautiful
 By the way, the name “panel” comes from a Latin word meaning “piece of fabric.” Nowadays it is a popular interior element, decorating ceilings or walls. Many people mistakenly call such works paintings. But paints are used for images, and these products are created using unique methods using unusual materials:
- fabrics;
- paper;
- clay;
- plastic;
- wood;
- salt dough.
Such crafts can be done by the whole family, distributing tasks between children and husband. Collaborative creativity will help not only to quickly and usefully spend pre-holiday days, but also to lift the New Year’s mood from an interesting activity.
The old frame will get a second life and become original decor to create a festive atmosphere in the house.
 Panel - photo frame, will save your memorable events
 Components:
- canvas fabric;
- cardboard;
- glue;
- pencil;
- multi-colored scraps of material;
- frame.
A “base” is cut out of cardboard, which corresponds to the photo frame. The canvas material is glued to thick paper with the front side on top. The remaining allowances are hidden.
 Let the New Year 2018 be remembered for a lifetime
 On the resulting “easel”, the chosen plot is carefully drawn with a pencil. Transfer diagrams of parts onto colored pieces. Alternately glue different elements to the canvas. After drying, the panel is inserted into a frame, like a regular photograph.
An interesting craft that will become a chic decor for your apartment, giving the room a rustic charm.
 Panel on a hoop - original and beautiful
 Components:
- small fingers;
- a piece of fabric;
- New Year's decor;
- ribbon;
- threads;
- needle.
The fabric is pulled tightly onto an old embroidery jig, trying to avoid wrinkles and holes. Stepping away from the center, attach a ribbon loop for hanging. The decor is carefully sewn to the canvas, not allowing any remaining threads to peek out from the front side. As decorations, you can give preference to snowmen or dogs, Christmas trees or snowflakes. If the material has a rough texture (canvas, burlap), then it is better to look at knitted or textile figures.
 Christmas tree made of beads and sticks
The proud and bright Rooster is coming to an end, and a cheerful Dog is rushing to replace him. A friendly animal can be quickly and effortlessly depicted on a holiday panel. If you are into ceramic crafts, you will like this work.
 Panel in the form of a Dog
 Components:
- clay;
- twine;
- metal hook or ring.
The first step is to decide on the shape of the animal, so we recommend making a schematic representation of what you need to get in advance. The animal consists of several parts, but only its paws are movable. They sculpt the body, head and tail, which are connected into one whole. While the body is drying, the paws are made.
 A handmade panel will delight the patron of 2018
 Remember: facial expressions, fur and other designs are applied to wet clay. In the area of the limbs, head and tail, holes are punched with a nail for ropes. A few hours to dry and you can assemble the structure. Using twine, the movable elements are connected and a loop is threaded for the holder with a hook (ring). The dog is hung on the wall or a special frame with canvas is built.
From buttons
An original and bright panel can be made from anything. For example, kids will love creating items made from buttons.
 Create such a panel with your children, they should like this process
 Components:
- frame;
- canvas or burlap;
- cardboard;
- glue;
- threads;
- needle;
- multi-colored buttons.
A sketch of a drawing is applied to the canvas, which will be the plot of the painting. You can choose a Christmas tree or a New Year's wreath, and if you have patience, we recommend trying to make a symbol of the coming year - a Dog. Buttons are sewn to the material, alternating large and small. The more imagination, the more beautiful the image will be.
 Christmas trees made of different materials - panels decorating the house
 Thick paper is cut to fit the frame and glued to the work. The finished panel is fixed in an old photo frame and hung on the wall. You can use a hoop or plywood as a base, and replace the threads and needles with a glue gun.
Combining different materials By combining textures and colors, you can create an exclusive, unique element that will be an excellent addition to New Year's decor. There are no absolutely identical works, since each master brings something of his own to the proposed template.
 Christmas tree is a beauty
 There are several interesting options, allowing you to obtain original compositions.
 Green beauty
 - Natural materials. Dried flowers, cones and spruce branches will help you create original combinations for New Year's scenes.
- Silk. Images are applied to expensive fabric with special paints.
- Products. Cereals, pasta, coffee and other products are glued to sections of the canvas. Depending on the creator’s imagination, they come up with unique, bright panels.
- Beads. Embroidered on New Year theme material.
- Bijouterie. Old, “grandmother’s” jewelry looks great as a holiday decor. They are sewn or glued to the base.
- Cotton wool. The seemingly simple material will be a good addition to a New Year's panel. It is used to make snowdrifts and fluffy clouds. Sponges are used to create snowmen. To make the picture look great, we recommend choosing a contrasting dark background.
 Let the wreath panel bring good luck in 2018
 Interesting three-dimensional images can be created from salt dough, clay or a pack of ordinary children's plasticine. Even with minimal creative skills, it’s easy to make a Christmas tree or a symbol of the coming 2018. As a basis, they take a special board on which all the elements are installed.
 Holiday attracts bright lights
 DIY New Year's panel 2018 can be made from anything. Our recommendations will help you find best option or they will teach you how to combine several technologies to create an interesting, festive picture.
New Year's time is a time of fairy tales and miracles; millions of people around the world experience a certain euphoria on the eve of this holiday. Preparation of gifts for this global celebration begins several months in advance, and everything is used. However, very often, when preparing gifts, people do not pay enough attention to such an aspect of the pre-holiday preparation as decorating the room. In the best case, in addition to the New Year's tree, the room will be decorated with garlands or snowflakes; in the worst case, they will forget to install the tree.
Today we want to invite you to create a New Year's panel with your own hands. Let's share some ideas.
Exclusive panel using original technique
Silk painting has been one of the most popular hobbies in Europe for many years. Requiring perseverance, such a hobby can give real masterpieces. To work you will need:
- any motif you like;
- a piece of silk of the appropriate size and neutral color;
- paints for working on;
- contour pen for transferring the design onto the material;
- varnish for fixing paints;
- frame for painting on silk;
- cardboard;
- frame for the final decoration of the work.
First of all, you need to stretch a piece of silk onto the frame. Then you need to transfer the design onto the fabric using a special pen.
The circuit must be thoroughly dried. Drying the first lines makes it possible to draw each element more clearly. After the contours are fixed, you can begin the most interesting part - coloring. Having completed this stage, you also need to wait until the material has completely dried. After this, the picture is removed from the frame and the excess material is trimmed. The finished work must be mounted on a sheet of cardboard and inserted into a frame. Everything, the exclusive New Year's panel, made with your own hands, is ready. By the way, this decoration can also be an excellent gift.
New Year's panel made of salt dough
From such fairly ordinary products, available in absolutely every home, you can create real works of art! In addition, even a child can do New Year’s, so don’t forget to involve your children.
In order to prepare the mass for such a panel, you will need only four ingredients: 1/2 cup each of flour and salt, 1/4 cup of plain water and 1 tablespoon of any vegetable oil.
So, mix all the dry ingredients, add the oil and pour in cold water in a thin stream. Knead until the mass for the future panel becomes homogeneous and elastic.

Let's start sculpting. The selected motif must be printed in full size and placed under glass. On the latter, you need to model each of the elements of the future panel. Leave until completely dry (this will take several days). After the panel has dried, it can be glued to a cardboard base, painted with paints and inserted into a frame.
New Year's panel made from scraps of fabric
You can create a unique decorative element with a thematic plot without spending significant money on the purchase of materials. Probably everyone has unnecessary ones at home. beautiful shreds fabrics. Is there such a thing? Great, let's get started!
New Year's panels can be made from fabric using the patchwork method. To do this, you need to select a sketch and select materials. Several hours at sewing machine- and you are the author of an amazing piece of folk art.
New Year's panel (patchwork) made of polystyrene foam

If you don’t like to sew, you can use the fairly common foam-based patchwork technique. To work you will need:
- foam sheet 2.5-3 cm thick;
- motive (avoid drawings with very small elements);
- textile;
- sharp stationery knife;
- glue.
The technique is simple: transfer the motif to foam plastic, cut each contour line to a depth of 1.5-2 cm with a knife, insert fabric of the corresponding color into the slots (we first cut the shreds to the size of the element, leaving a few centimeters so that the fabric holds firmly on the foam plastic) . Lightly coat the edges of the material with glue before placing it in foam. All! A New Year's panel, created with your own hands from scrap materials, decorates your wall. Children can also be involved in the creation of panels, in particular at the filling stage
Embroidered New Year's panel
You can also make a New Year's item. A product embroidered using any technique will look great. Naturally, embroidery is considered the simplest. However, even the most basic New Year's motif will sparkle in a new way if you experiment with the thickness of the thread or make part of the pattern in a half-cross. You can also embroider only part of the design applied to the canvas, which will add volume and expressiveness to the work.

If time permits, try to master others:
- satin stitch;
- beads;
- soutache technique.
By the way, it is easy to create a very extraordinary product from soutache, although it can only be called embroidery conditionally. It is advisable to supplement such cords with all kinds of beads or beads, as well as cabochons.
Felt panel
Many needlewomen are more than favorable towards fabrics such as felt. Easy to process, pliable and very pleasant to the touch, it is not for nothing that the material has won the hearts of craftswomen around the world. You can make a New Year's panel with your own hands quite simply, because patterns of various themes are easy to create yourself by outlining a picture you like.

After you have prepared all the necessary parts, take the time to finish the edges. This rather labor-intensive procedure will give the product a finished look, but if you do not have the time to carry out this kind of work, do not despair. Due to the fact that the material does not crumble at all, your New Year's felt panel will last quite a long time without being treated with an overcast stitch.
A product made from such material will look great in a children's room.
Panel with lighting effects
Most ordinary people in vain believe that creating a New Year's panel with your own hands (you see the photo in our article) is very difficult, especially if there are light elements. Of course, making this kind of decor from scratch will only be possible for representatives of the stronger sex. However, women can also try their hand at decorating the wall decorations they already have with various garlands, the most important thing is that the outlet or power supply is located nearby.
If you nevertheless decide to construct New Year’s light panels yourself, stock up on all the necessary details and, preferably, an accurate description of at least the work on connecting all the electrical elements.
Papier-mâché panel
Papier-mâché is an amazing branch of applied creativity that opens up enormous prospects for us. It gives wide scope for the imagination of both kids and adults. When you create a New Year's panel with your own hands, you can put the photo of the sketch in a distant drawer.
Today, papier-mâché lovers can be divided into two types: those who buy the paste in the store, and those who make the paste themselves.
You can use papier-mâché balls. By collecting several balls in a bunch and adding a bow, you can easily decorate front door.

In addition, it is easy to make a relief picture from papier-mâché. Elements of such decor should be sculpted on a glass surface, where they will remain until completely dry. After which all parts are glued to the backing and painted. As the basis for such a picture, take a sheet of cardboard, which can later be mounted in a frame.
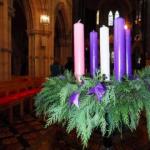
New Year's wreath-panel
You can decorate your walls or front door very beautifully with New Year’s wreaths. This fairly simple element will bring a fresh air and add a festive mood.
In order to make a wreath from Christmas tree branches, you will need:
- branches of various coniferous trees (preferably thin);
- ring - the basis for a wreath with a diameter of 20-25 cm;
- wire.
The branches should be cut into pieces about 5-6 centimeters long and collected into small bouquets. Using wire, secure the Christmas tree blanks to the ring, positioning them so that the base is not visible. Decorate with flowers or artificial viburnum berries.

You can decorate a ring not only with branches of coniferous trees. A wreath made of moss will also look great. You can decorate such a wreath panel with bows or any available natural material.
Thick cardboard panel
A New Year's panel on the wall, made of thick cardboard, is a source of pride for the owners of the house. Of course, it is advisable to involve children in the manufacturing process, but imagine how much joy there will be when the work is finished!!!
Cut out the main large elements from thick cardboard (this can be Christmas tree or Santa Claus, a round dance of animals near a forest spruce or something else). Decorate the main details with smaller ones cut out of colored paper.
When preparing such decor, do not forget that, in addition to traditional colored paper, you can purchase velvet paper, corrugated paper, self-adhesive paper, as well as colored foil in stores selling goods for children or for creativity. By combining different textures in one panel, you will achieve relief in the finished product.
You can also glue small hooks onto such a panel for hanging small sweet gifts or make an Advent calendar out of it.
As you can see, it’s very easy to make your holiday even brighter, richer and even more memorable. To do this, you will not need practically anything except a small amount of free time, the appropriate mood and imagination.
Master Class: decorative panel « New Year's surprise»
Tsareva Tatyana, student of the creative workshop “House of Miracles” of the Khanty-Mansi Autonomous Okrug-Yugra “ Rehabilitation center for children and teenagers with disabilities"Solnyshko", branch in Yugorsk.Age 13 years.
Supervisor: Nazmutdinova Tatyana Stanislavovna, labor instructor of the Khanty-Mansi Autonomous Okrug-Yugra Rehabilitation Center for Children and Adolescents with Disabilities “Solnyshko”, branch in Yugorsk.
Purpose: interior design, making gifts for family and friends.
Target: making a souvenir for the New Year holidays.
Tasks: improve skills in decoupage technique, develop imagination and Creative skills, cultivate perseverance, hard work, accuracy.
Hello, Dear colleagues and friends!
This master class is intended for children school age. The idea of making a souvenir will be interesting for teachers and parents.
So, let's start making our souvenir - a decorative panel.
For work we will need the following materials and tools:
paper disposable plate, primer (white acrylic paint), three-layer napkins for decoupage with a winter theme, glue pencil, glue – “Crystal” moment, acrylic varnish, blue acrylic paint, blue and office paper white, white thread (No. 10), decorative beads, beads (according to the number of pendant threads), felt snowflakes, foam balls, white lace, contours for decoration, brushes, scissors, ruler, pencil, needle, shaped hole punch “snowflake” .

Execution sequence:
1. Prime a paper plate with white acrylic paint by 2-3 times.

2. Glue the selected napkin, having previously cut or torn off the design and separated the white layers, using the decoupage technique. If anyone is not familiar with this technique, I draw your attention to the fact that glue (PVA, diluted 1:1 with water) or varnish (we use acrylic varnish directly) is applied with a brush from the center to the edges over the design, which is previously applied to the plate. It is better to use a flat synthetic brush. Let it dry.


3. Paint the edges of the plate with acrylic paint of a suitable color.


4. Using a figured hole punch, cut out snowflakes and glue them along the edge of the plate, using the decoupage technique. Cover the entire plate with acrylic varnish.


5. We make paper beads for pendant threads. To do this, a sheet of printer paper blue color draw into triangles with a base of 2 cm. Along the upper edge of the sheet we mark 1, 3, 5 cm, etc. Along the bottom edge of the sheet 2, 4, 6 cm, etc., each time we add 2 cm. We connect the marks and cut them into triangles.


6. Make paper beads using a toothpick. Glue the ends of the triangles with glue - a pencil.

We coat the finished beads with acrylic glossy varnish.

7. For pendant threads, cut 20–25 cm. At the end of each thread, tie a knot and string a bead.

Then, using decorative beads, foam balls and made paper beads, we assemble the pendant threads.


8. Cut off individual elements from the lace.

We glue the pendant threads and lace details from the wrong side. We fix the threads with rectangular pieces of paper.
9. We decorate the plate with additional contours, highlighting the details of the picture.

10. Glue decorative felt snowflakes onto the lace details - pendants.

And our decorative panel is ready!

That's all!
We wish you all creative success, new ideas and inspiration!
We also recommend
 Why does a child cry and how to calm him down?
 DIY crafts for Mother's Day for kindergarten and school
 world earth day april 20 earth day
 Quilling for beginners: patterns with detailed descriptions
 A story about Christmas in Great Britain
 Fountain “Friendship of the Peoples of the USSR Fountain with golden statues in a circle