Ball of pumpkin seeds. Master class - New Year's balls made from pumpkin seeds
You can buy many different New Year's decorations for your home, and even more interesting, make them yourself.
Now is the time to stock up on pumpkin seeds and dry them. You can use them to make golden balls that will decorate New Year tree or the interior of your home.

To create a New Year's Eve you will need:
Pumpkin seeds,
Styrofoam ball,
Hot glue gun,
Dry gold glitter
PVA glue,
Gold satin or fabric ribbon.

Making balls from pumpkin seeds is very simple; you can use either a ready-made foam ball or one you cut yourself as a base. The only thing is that if you have a homemade ball, then you should wrap it tightly with any thread, since its surface is not thermally treated, and the glue will simply melt it. You can crumple the newspaper into a tight ball and also wrap it with thread. The main thing is that the base is light.
So let's get started...
We take the base ball and first fix the tape with hot glue, approximately as follows.


And so on until the end...


Crafts from natural materials beautiful in themselves and require almost no additional decor.
We will just gild our pumpkin seed Christmas trees a little with dry glitter. To do this, dilute PVA glue with water 1:1 and add gold glitter to this mixture. Apply with a regular brush.

If you have a little time, you can spend it usefully in preparation for the New Year: making items New Year's decor interior design and souvenirs for your loved ones and friends. Such a holiday gift and, at the same time, a decorative item can become Christmas tree of pumpkin seeds.
Pumpkin Seed Crafts are low-cost, their products have an interesting texture and look very impressive and unusual.
We will make a Christmas tree with a curved top; I have never seen anything like it on the Internet. Therefore, I really hope that my Master Class Readers and needlewomen of our site will like it.
To do Christmas tree made from pumpkin seeds You will need:
- pumpkin seeds,
- a cone made of polystyrene foam or floral foam,
- adhesive plaster,
- a plastic or paper cup, a small pot or other suitable container,
- some medium hard wire,
- 2-3 skewers for shish kebab,
- a little building plaster (alabaster),
- PVA glue,
- dry gold glitter,
- brush,
- hot glue gun,
- for the crown: a bell, an asterisk or a small ball, etc.
- decor - optional (ribbons, beads, etc.).
So, let's begin…
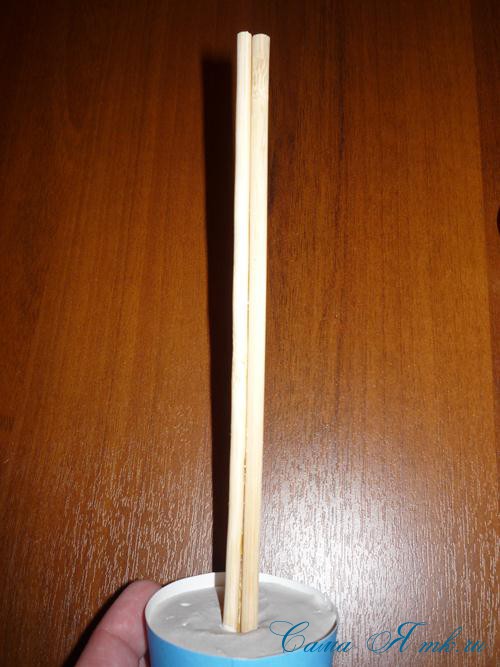
First, let's prepare the trunk of the Christmas tree...
We saw off the skewers to the desired length and glued them together with hot glue.
We dilute the plaster with water to the consistency of thick sour cream and place it in the prepared container. I have a paper cup that I cut in advance.
Place the base of the Christmas tree in the center and wait a couple of minutes for the plaster to completely harden.
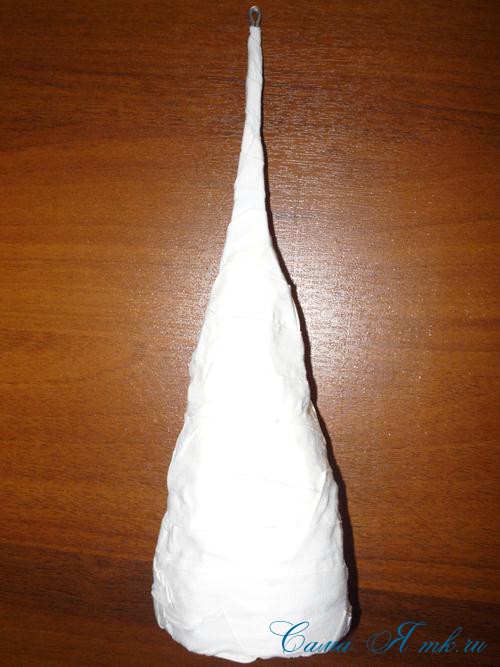
Now you need to prepare the cone...
We attach 2-3 small pieces of wire on top, one a little longer. We will make a loop on it to secure the decoration for the crown.


Let's start gluing with pumpkin seeds...
I immediately decorated the stand a little. Until our Christmas tree takes its rightful place, it is much more convenient to do this.

Carefully glue the bottom, trying to do everything as symmetrically as possible.
We lower the first row down half the seed, glue the next ones in a checkerboard pattern, also going half a seed onto the previous row.


Now you need to bend the crown. We attach the decoration and continue to cover it with pumpkin seeds.

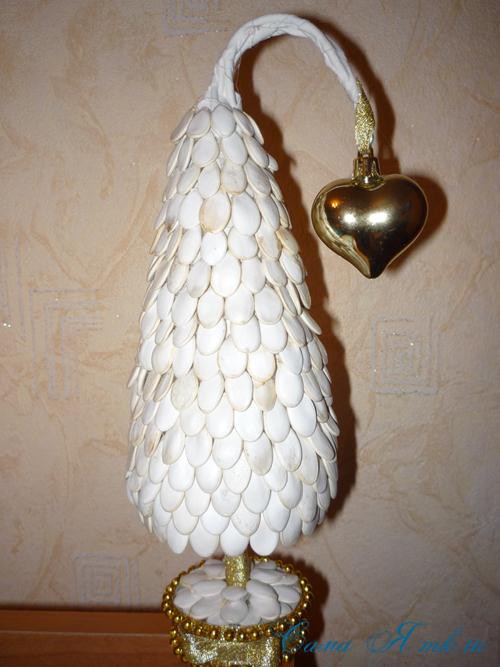
Like this…

We dilute 1:1 water and PVA glue, mix with gold dry glitter and with a regular brush cover the entire Christmas tree, as well as the seeds on the stand.

You can leave it like that. I decorated it a little with gold snowflakes.
It turned out like this Christmas tree made from pumpkin seeds.


I don’t think anyone will immediately guess what it’s made of. Christmas tree made from pumpkin seeds It turns out to be a very interesting texture. And it turned out to be very simple to do. Definitely try to do this DIY souvenir!
I was glad to help!
Let's save nature! Therefore the Christmas tree is on New Year we will do it ourselves. There are a lot of master classes on the topic New Year's crafts from various materials. Christmas tree crafts made from natural materials are popular: pine cones, coffee beans, acorns. In this master class it is proposed to make christmas tree with your own hands from pumpkin seeds. This is an easy craft that even the youngest children can do. No special materials are required for its manufacture; creative lovers will find everything they need.
Materials and tools:
Pumpkin seeds;
- cardboard;
- plastic tray;
- green sparkles;
- acrylic lacquer;
- fluffy colorful balls;
- plasticine;
- paper for decoration;
- tinsel;
- scissors;
- cotton wool;
- pencil;
- glue;
- stump.

How to make a DIY Christmas tree from pumpkin seeds
Let's start by making the base for our Christmas tree. We take any cardboard, roll it into a cone and fix the ends, which can be done with glue or a stapler. We place the wide part of the cone on a sheet of cardboard and draw a pencil around the perimeter of the cone, then retreat about 1 cm in a circle and again draw a line, going around the perimeter of the cone. We cut out a circle along the second line, from which we make cuts every 1 cm to the first line.

Glue the bottom to the cone using the cuts made. Since our crafted Christmas tree cannot stand on a flat surface (the seeds will interfere with it), it should have a trunk. In our case, this is a small block of a thick branch. Glue it to the bottom of the cone.

We take pumpkin seeds (some will be covered with a thin film, this must be removed, since it will not allow the seed to stick well to the cardboard) and glue it to the cone, one at a time, moving in a circle from the bottom of the tree. It is better to glue using a glue gun or Moment type glue. We glue the seed with the pointed part up, which we lubricate with glue; the whole seed is not smeared.

Having glued one circle, we move on to the second, one row should overlap slightly with the second. 

We cover the entire cone row by row. Glue a fluffy ball to the top. 
We grease a small area of the Christmas tree with acrylic varnish and while it is still wet, sprinkle this area with green glitter (this is convenient to do by dipping a clean and dry brush into the glitter, and then shaking off the glitter with your finger over the desired area). So gradually coat the entire tree with varnish and sprinkle it. The varnish will not only fix the sparkles, but also add shine to our New Year's craft. You can mix glitter with PVA glue and coat the Christmas tree with this mixture; when the glue dries, it will become colorless, and the glitter will stick well.

Glue the Christmas tree to the tray. 
We glue cotton wool to the tray around the tree. 
From the remains of plasticine we make a cube, which we wrap in decorative paper (you can take holiday packaging plastic bags). It turns out to be an imitation of boxes with gifts.

We glue the gifts and multi-colored fluffy balls onto the cotton wool; they will add bright colors to our New Year's craft. 
We glue tinsel around the perimeter of the tray. 
We did it! Creative handmade Christmas tree craft for the New Year! Now you can start decorating the interior of your apartment or give a homemade New Year tree to your loved ones. Happy New Year!


Irina Nagibina
Сhudesenka.ru
Master class: DIY “Christmas tree toys” made from pumpkin seeds and cereals for children 6-8 years old
Valueva Elena 6 years old, student at the Center for Correction and Development, Krasnodar.
Teacher: Statsenko Larisa Viktorovna, speech therapist-defectologist, special psychologist, Center for Correction and Development, Krasnodar.
Description: The master class is intended for making Christmas tree decorations as a New Year's gift for students with disabilities aged 6-8 years. The presented master class will be useful for teachers in practical activities. primary school and teachers additional education, correctional specialists, as well as everyone who prefers handmade gifts.
Target: Making Christmas tree decorations for the New Year as gifts for friends and family.
Tasks:
- teach how to make Christmas decorations using non-traditional materials ( eggshells, pumpkin seeds and millet);
- develop students' creative imagination, associative thinking, mnestic processes, attention and perseverance, hand-eye coordination and finger praxis;
- develop aesthetic taste and design approach in process creative activity: the ability to create a symmetrical pattern of seeds when forming each subsequent row on an egg shell, as well as the ability to combine color palette paints when creating an ornament on a product;
- cultivate diligence and accuracy in work.
Materials and tools:
- eggshells from two eggs;
- pumpkin seeds (large);
- millet cereal;
- PVA glue; glue “Moment Crystal” transparent;
- paints: gouache, decorative silver and gilding;
- brushes;
- embossed colored paper;
Decorative satin ribbon (2 pcs.) and lurex ribbon;
- scissors;
- 2 containers (for seeds and cereals).

Progress of the master class:
Poem "New Year"New Year - beautiful holiday!
The smell of pine and candy,
And the fireworks sparkle in the sky brighter than the stars and all the rockets,
Noise and laughter flow everywhere, despite the cold and snow...
Children's hubbub and fun -
Round dance near the Christmas tree.
All fluffy in needles,
With lanterns and balloons,
In serpentine and lights,
Our Christmas tree is all twinkling
So beautiful for the guys!
New Year is coming - a long-awaited holiday for adults and children! It's time to decorate your home and prepare for the New Year's celebrations. Of course, the main decoration of every home is a green and fluffy Christmas tree.
How nice it will be for our loved ones if, on the eve of the holiday, we decorate our beauty with our designer toys. Such a holiday will be unforgettable, because every New Year's toy made with your own hands carries warmth, love and kindness loved one who made it and donated it.
Let's start making this extraordinary New Year's decoration.
1. Let's prepare a frame for the craft - an eggshell. To do this, take two chicken eggs and carefully make a small hole in each of them on top with the sharp end of a knife, pour the egg into the container with shaking movements. Then rinse each egg inside with running water and let it dry, turning the hole down. After 1 hour, carefully coat each egg inside with PVA glue with a thin brush so that our frame is strong, let it dry for 1 hour. After that, the frame is ready for use.
2. Take the egg with the hole facing up and carefully apply Moment glue in a circle. We will glue the first row of pumpkin seeds onto the adhesive base (the seeds should be placed with the sharp end up, without breaking the line of the row).

3. Next, apply each row of glue sequentially and glue the pumpkin seeds one by one.

4. We will make two different Christmas tree decorations, so one egg must be completely covered with pumpkin seeds, and the second egg only half covered. Let dry for 1 hour.


5. Now take the second egg - cover the lower part of the egg with Moment glue and pour thick millet into the glue mass, lightly press it with your fingers, let it dry for 1 hour.


6. When the eggs are dry, place them on a stand (for ease of coloring) and begin to apply the ornament.
First egg - we alternately apply decorative paint to one seed, silver, and to the other, gilding, observing the symmetry of the design.

Second egg - paint the 1st and 4th rows with gouache in red, 2nd row - in Blue colour, 3rd row – in yellow, let it dry for 30 minutes, turn the egg over and paint the millet yellow with gouache.


7. While the eggs are drying, make a pendant from embossed paper, one pink and the other red, make a hole in the center, thread a lurex cord, glue the ends to the paper, and the pendants themselves to the egg using Moment glue. At the base of each pendant we will tie satin ribbons on the bow.

8. Our Christmas tree decorations are ready for the New Year.
You can buy many different New Year's decorations for your home, and even more interesting, make them yourself.
Now is the time to stock up on pumpkin seeds and dry them. You can make them out of them golden balls that will decorate the New Year tree or the interior of your home.
For creating New Year's crafts You will need:
- pumpkin seeds,
- a foam ball,
- hot glue gun,
- dry gold glitter,
- PVA glue,
- gold satin or fabric ribbon.

Are being done pumpkin seed balls very simple, you can use either a ready-made foam ball or one you cut yourself as a base. The only thing is that if you have a homemade ball, then you should wrap it tightly with any thread, since its surface is not thermally treated, and the glue will simply melt it. You can crumple the newspaper into a tight ball and also wrap it with thread. The main thing is that the base is light.
So, let's get started...
We take the base ball and first fix the tape with hot glue, approximately as follows.
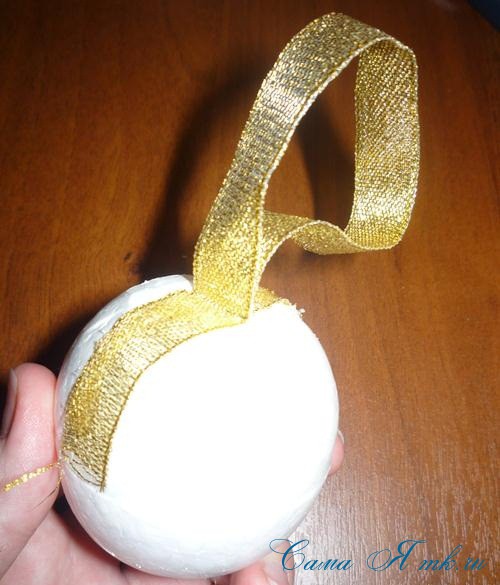 Master Class - Christmas balls from pumpkin seeds.
  Master class - New Year's balls
 And so on until the end...
 Master class - New Year's balls made from pumpkin seeds.
  Master class - New Year's balls
 Crafts made from natural materials beautiful in themselves and require almost no additional decor.
We'll just gild ours a little Christmas decorations from pumpkin seeds dry glitter. To do this, dilute PVA glue with water 1:1 and add gold glitter to this mixture. Apply with a regular brush.
 Master class - New Year's balls made from pumpkin seeds.
  Master class - New Year's balls made from pumpkin seeds.
 Decorate with a small bow made of gold fabric ribbon, and that’s it, ours. Christmas decoration ready!
We also recommend
 Law of attraction and how it works
 Reasons for the appearance of bacteria in urine during pregnancy - effects on the fetus and treatment
 Congratulations on Valentine's Day Who is customary to congratulate on Valentine's Day
 Saxophonist for an event
 Why does a baby cough during sleep or after feeding?
 How to make an owl from pine cones