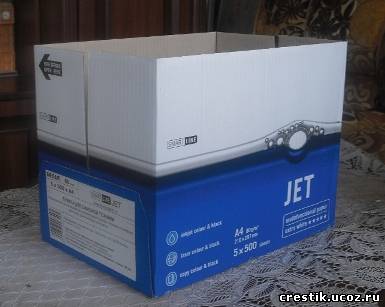
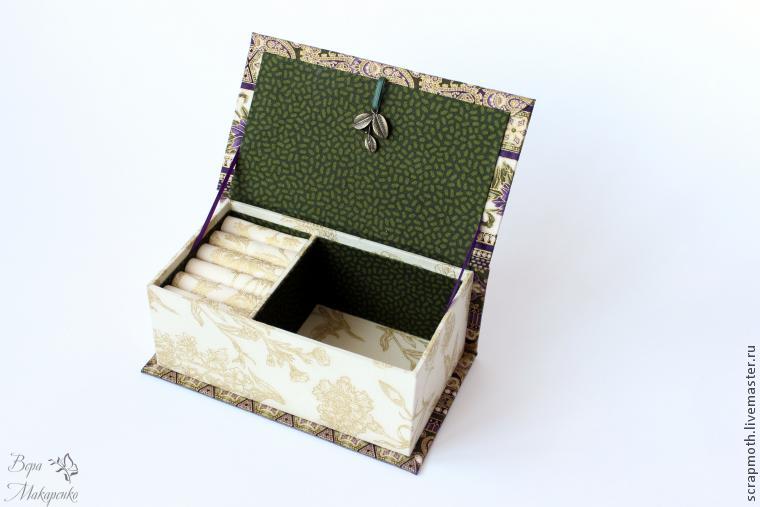
Craft box made from a shoe box. Cardboard box
I used this cardboard box as the basis for my craft box. At work we have reams of printer paper like this))
I measured the height of the bobbin - it turned out to be 5.5 cm, added a little and measured the height of 7 cm along the entire perimeter of the box, drew a line and cut it with a stationery knife.
Since the box is square (in my case), I left one side and glued the other. Here's what happened:

I shortened it and glued it back together. Important point— I glued it like this: first I bent the wall, and glued the “straps” from the outside, because it will be braided anyway, but the inside is neat, and the “straps”, in turn, should reach each other. Perhaps the photo will make it clearer

For gluing I used a glue gun, because it hardens quickly, so there is no need to wait for it to stick. If it is not there, you can glue it with any glue that is convenient.
The result was a box with an internal size of 21.5*21.5 cm. External size - 22*22 cm.


We layer the allowances, cut off the inner, corrugated part with a stationery knife, bend the outer ones in different directions and slightly cut off the ends


Initially, I wanted to make compartments for bobbins and what was left to be made into a compartment for scissors and other small things, but when I started marking, I ended up with 4 identical compartments, and I filled them all with threads, which seems even better to me.
We mark 3 lines at equal distances on 2 opposite sides; for me they turned out to be at a distance of approximately 5.4 cm. Glue the partitions along the marks. I took a photo of how I glued the 1st one, and all the others similarly. I glued the partitions a little, leaving a gap at the bottom (1-2 mm no more), then I’ll write why.

Since the sides of the box turned out to be multi-colored, and the base is visible through the weaving, I glued them before weaving plain paper for the printer. Looking ahead, I want to say that the paper still had to be painted in the same color that I painted the box because no matter how hard I tried to paint it well, the white still showed through.
The outer part of the box can be decorated in any way you like - pasted over with wallpaper, fabric or some other option, but I wanted to try weaving from paper straws.
Let's start weaving paper tubes right away. I don’t remember exactly how many newspapers I got, because I prepared the tubes a long time ago (about a year ago), when I first found information on them, but I think 3-4 newspapers will go (that’s 60 pages). We only need the top and bottom white stripes of the newspaper; we cut them about 4-5 cm wide. I cut off several sheets at once

Now we twist the tubes. I twisted it on wooden skewers for shish kebab, take a strip of paper on it at an angle of about 45 degrees, and start twisting, glue the corner with PVA glue or glue stick, twist it so that the white stripe looks out

When making straws, it is very important to control the twist angle so that it always remains the same. If this is not the case, then the tubes turn out to be short and at the beginning they have the same thickness, and at the end they are much thicker, but your hand will fill up very quickly. When we have woven enough tubes, we begin weaving.
For clarity, I took a few photos from here. We turn the boxes over and glue the tubes to the bottom, I repeat, I glued them with a gun, and on the site where the author took the picture, she used Titan glue (it is shown in the photo). I got 7 tubes on each side (every 3 cm) + 1 for weaving, no need to glue in the corners.

Then we turn the box over, put something heavy inside so that it doesn’t move, bend the tubes so that they look up and start weaving, I connected the tubes like this, dripped glue inside the ending tube with a gun and inserted the end of the next one there.

When we have woven it to the top, we cut the tubes that are vertical and glue them inside

We make an edging on top - take a tube and glue it on top


There was not enough paint for the entire box, so I painted the box with one and the lid with another (different shades). It was necessary to take either 2 sets or paint separately by color, there are large jars. Well, I digress from the topic, paint it and let it dry. We paint 2 more tubes - we will use them to make the edging at the bottom.
Next, using a stationery knife, we thin out part of the tubes that are glued to the bottom and inside the box, we do this very carefully so as not to cut it at all. We decorate the bottom of the box, I glued cardboard for appliques, and glue the prepared tubes at the bottom, here is my bottom

We decorate the inside of the box - I decided to cover it with colored paper, but I needed a lot, and the set contains 1-2 sheets, so I bought colored paper for the printer (in my case, bright yellow), I took 10 sheets of it, almost all of it was gone. I glued it like this - from the beginning of the side with a bend to the bottom and the partitions, then the partitions - I took a sheet, measured it so that it could be glued on both sides, folded on top, and glued the bottom in one piece, pushing it between the partitions and the bottom.
Now let's move on to the lid.
To make it, I took another similar box, and “disassembled” it, measured my box, after braiding it turned out to be 24.5 * 24.5 cm. I drew the lid according to the diagram

The smallest rectangles are what we will glue - I removed the bottom and corrugated cardboard layers from them, folded them outward and glued them. Let's put it aside for now and get on with the embroidery. I measured the embroidery and cut out a square from thick cardboard according to these dimensions (if this is not available, then it can be made from fiberboard), cut out the padding polyester according to the size of the cardboard (so that the embroidery was voluminous) and stretched the embroidery.
Apply glue to the back of the cardboard with embroidery and glue it onto the lid, exactly in the center. We cover the inside of the lid with paper in the same way as we covered the box.
Now the final stage - I covered the remaining part of the undecorated lid with already painted tubes, because if you glue it right away and then paint it, you can smear the embroidery. In the end, we got this do-it-yourself box for handicrafts.

I hope my master class will help you get some boxes. I tried to describe all the stages in detail, but if you have any questions, please ask.
Categories,Jewelry box, the most versatile and required item women's everyday life. It is very convenient to store all your jewelry in a box, especially if you can make it yourself. A jewelry box made of cardboard looks very beautiful; it is not difficult to make it yourself from simple and affordable materials. You can also give a jewelry box made by yourself, and this will be the most memorable and dear gift to a person. Handmade products are always more valuable because they are exclusive. You will see below how to make a jewelry box with your own hands.
Materials you will need: binding cardboard (preferably choose 2mm thick), PVA glue, masking tape (4 millimeters wide), Moment-Crystal glue, regular Whatman paper, fabric (preferably cotton), tapes - 2 pieces of 15 cm each
Tools: knife, scissors, self-healing cutting mat. or an unnecessary piece of linoleum, a ruler, a synthetic glue brush, a pencil, a stack for smoothing surfaces and corners, a jar of glue
Start by assembling the base. To do this you must make a drawing.

We glue the walls from above to the bottom, not from the sides. Glue must be applied to the parts along the entire length. We apply a large number of We don’t skimp on glue so that the box is durable.

When applying the part, always level it, the glue dries slowly, so you have the opportunity to place the part straight.
First we glue the long wall, then two short ones, it is better to apply the glue on both sides so that you get a neat corner

In order to glue a partition between two sections, mark in advance the place where it will stand.
Next, apply glue to the partition and insert it into the place where it will stand. Now you need to take the white ones acrylic paints and paint all the upper sections of the parts so that the color of the fabric on the sides is not distorted.
 To reinforce all corners, take a piece of masking tape and apply it to all corners of your box and smooth it out well. It’s better to spread it out in a stack and then press it tightly.

 Next, you need to tape the inside of your box.
 Here again you need to use the stack, iron the tape from the glued edge towards the corner and along the depression.
 We strengthen all the joints inside.


Finally you have completed the cardboard base of your box. The next step is to decorate.
In order to decorate a box with fabric, you should know a few tips.
- The fabric completely covers the cardboard. There should be no gaps anywhere in the finished box.
- Avoid open cuts.
- Apply the glue in a thin, even layer so that it does not bleed through the fabric to the front side.
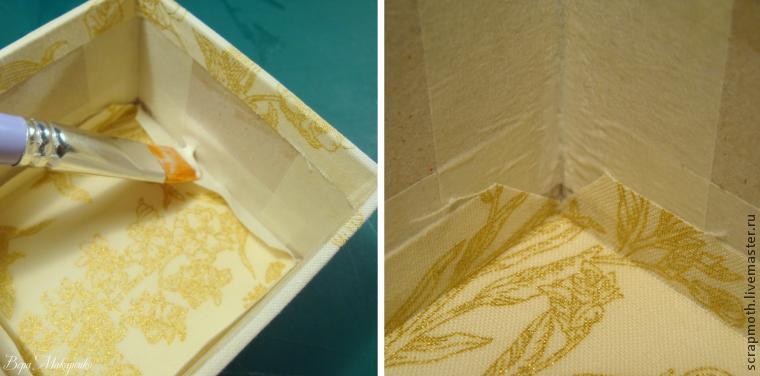
Glue the fabric to the cardboard with PVA glue.

Apply glue to the edge and the strip on the inside of the wall.
Apply a thin, even layer of glue to the paper piece.
Glue the paper piece to the wrong side of the fabric.
 Before you are going to glue the seam allowances to the back wall, you must make cuts on them and form the corners.
 Fold the protruding seams and glue them.


Next we attach the allowances at the bottom.

After gluing, we get flat corners.


First, coat the bottom with glue and place our part there. Then we glue the allowances and corners. We smooth everything out with a stack.
Cover the cut of cardboard with a rectangle of fabric.


Now let's take on the cover for your box.
The cover should consist of three parts: bottom, cover and spine. The lid will have a layer of synthetic padding. The bottom and spine are lined with white paper. Here you need to first glue the paper to the cardboard, and only then the fabric. We coat the cover with glue and apply it to the padding polyester.

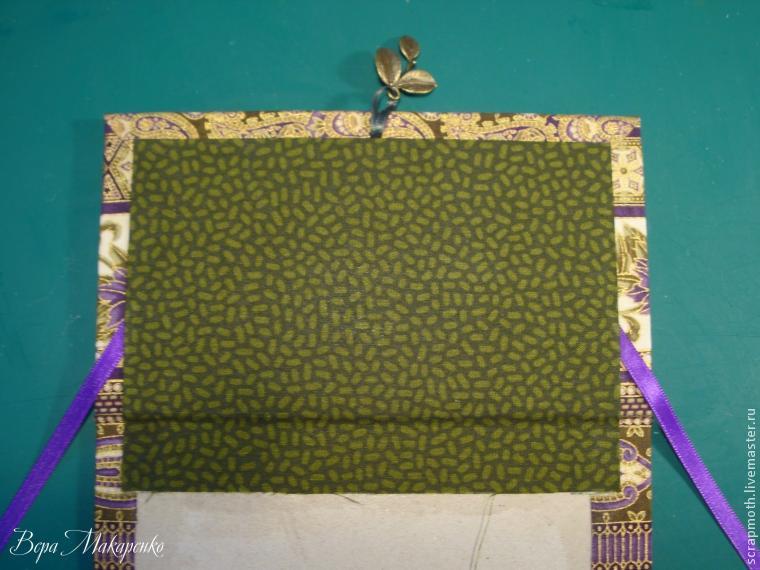
To decorate the lid with a pendant, make a small slit. Along the long side we mark the middle. On the short side - 1cm from the edge. We make a small slot, insert a ribbon there and glue the tails to the cover.

For the cover, cut out the fabric with 2 cm allowances on each side.

Place all three parts on the fabric, leaving a distance of 3-4 mm between them. We immediately glue the flat parts, the part with padding polyester is temporarily attached to the spine with pieces of masking tape so that it does not fidget. And glue the allowances along the long edge.

We make a cut for the pendant.

We make corners with minimal thickening, trim the fabric along the cardboard, not reaching the corner 2mm. After we have formed all four corners, glue the allowances on the short sides.
Now is the time to glue the stopper tapes. Thanks to them, the hinge will last much longer. And it’s more convenient to use a lid with stoppers.
Cut two ribbons 14 cm long and glue them symmetrically at an angle to the cover. They should be free at a distance of 1 cm from the edge. The rest is glued.

Now let's make the endpaper. To do this, cut out a piece from paper that is 2 cm shorter in length than the cover and 1 cm narrower in width. On three sides the allowance is 1.5 cm, on the fourth - 3 cm. This long allowance will then be hidden between the spine and the back wall.

Form the corners on the paper parts as follows: on the long side, cut off the excess fabric flush with the edge of the paper part. On the short side we make a broken line, as in the photo below. We glue the long side first, then the short one.

Glue the resulting part onto the endpaper. It will turn out like this:
It's time to connect the main box of the box and the cover. To do this, coat the bottom with moment-crystal glue. We apply glue to the smaller part, i.e. on the bottom of the box, not on the lid. We do not reach the edge a little and carefully spread the glue so that it is distributed evenly.
Press the bottom of the box to the bottom of the lid. We align the back wall with the edge of the part; the three outer walls will have indentations of 7 mm. In general, cardboard sticks together quickly, the main delay is in the fabric allowances. You need to wait until it all sticks together and the bottom does not lag behind the box.
Then I glue the spine to back wall. In the same way, you just won’t be able to crush it with books.
After this, you can glue the free ends of the stopper tapes to the box using PVA. This must be done symmetrically on both sides.

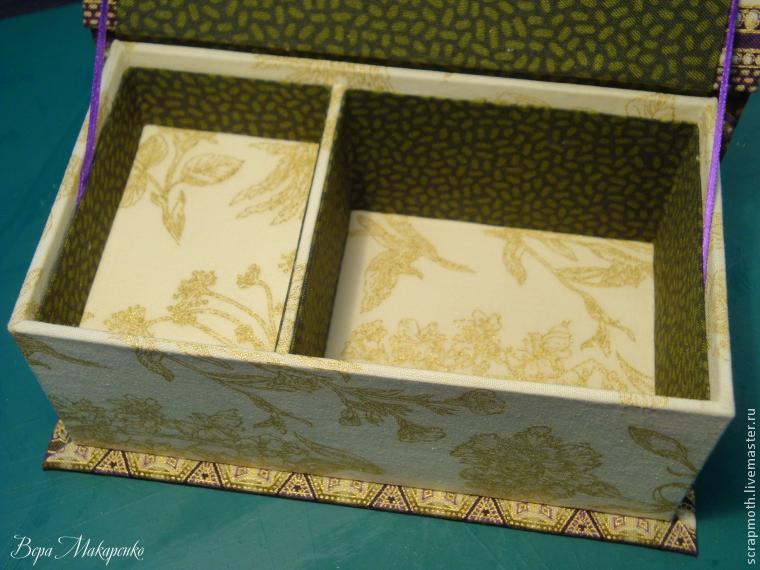
We will cover the inner walls of the box. To do this, cut out two long rectangles. For a deep compartment, this rectangle will be 5.2 cm in height, for a shallow one - 2.3 cm.
Glue the paper parts to the fabric, cut them out, and glue the seam allowances. Leave the seam allowance free on one narrow edge.

Carefully glue the part into place. We start from the end where we have a free allowance. We glue the part in stages onto each of the 4 walls. Carefully iron the corners with a stack. If you don't iron it, there will be rounded holes in the corners inside the box.

We make the joint near the front wall.
All that remains is to make rollers for the rings from rolls of white felt.
For your box you will need 6 pieces of felt, 20 cm long and 5.5 cm wide. Roll them into loose rolls and seal them with instant glue. Lay the rolls tightly together and glue them together.


So we have a magnificent handmade cardboard box. You can also show your imagination and design the box the way you want. Below is another DIY box idea in a video tutorial.
Content
A craft box differs from a regular box in several important nuances. Firstly, it must be of significant size so that all the necessary handicraft supplies can be placed in it. Secondly, it should have several compartments inside in which you can fold different materials and tools.
Made from cardboard and fabric
There may be several options.

To make such a box with your own hands, which will consist of five sections, you need to prepare cardboard, fabric, glue, cardboard thread cylinders, scissors and braid. If cardboard cylinders There are no knitting threads, you can also make them yourself from thick cardboard.
For each cylinder you need to cut out a suitable bottom from cardboard of the required diameter, and then cover them with fabric.

There should be five of these cylinders in total; they will fit most harmoniously in a handicraft box. An additional gasket on the bottom of each cylinder should also be glued with fabric and placed inside.

To seal the structure and cover uneven edges, another strip of fabric must be glued inside the cylinder. It can be in a contrasting color.

If desired, the cylinders can be decorated with braid.

Next you need to make the base and lid. To do this you need to take cardboard bigger size, inside which all five cylinders can fit. Two identical circles are cut out of cardboard, which are then connected to each other by a movable rectangle so that they can open. The width of the rectangle should be equal to the height of the cylinders.

The base is also glued with fabric.
For the inside, contrasting fabric is selected, which was used to glue the internal parts of the cylinders. They should be neat and even to hide all the unevenness of the lower layer of fabric.

The next step is to glue all the cylinders to the base. To do this, it is best to use Moment glue, which will reliably connect the fabric and cardboard together.

The box for handicrafts is ready.

From a shoe box
A box for handicraft supplies, which is based on a ready-made box, is made faster and lasts longer. The main task in this case is to decorate it beautifully and make it functional inside.

In order to make a beautiful box for needlework from a shoe box, you need to prepare: an unnecessary box, glue, scissors, decor for decoration and two cardboard cartons of juice or milk. Boxes are needed to make compartments inside.

Their number and dimensions must match the internal dimensions of the shoe box in order to fit evenly inside. If you don’t have a suitable shoe box, and you don’t want to make such “pockets” from regular cardboard, you can change the measurements of the box by cutting it along the fold lines and then gluing it again to the size you need.
All the squares are inserted inside the box and glued together to form a single solid structure.

Chest size 45 x 30 cm; height 38 cm.
The chest turned out to be quite large. I wanted to decorate it, so to speak, “interior”, not for storage in a closet, so the color scheme was chosen specifically in combination with the interior of the room.
Next is a master class on making
Master Class
for making a craft chest from a box.
1. Base.
To make such a chest you will need 1 box as a base and another 1-2 boxes for cardboard. In my case, corrugated cardboard boxes used for household appliances.
Fig.1
First you need to completely close the box, sealing it with tape. Mark the lid of the future chest, moving a few centimeters down from the top edge (for me, with a total height of the chest of 38 cm, the lid needed 8 cm). Then, using a cardboard knife, cut off the upper part (Fig. 1).
For structural strength, it is necessary to duplicate the walls, bottom and lid with cardboard (except for the sides of the lid). For this we will need an extra couple of boxes that I mentioned above. Moreover, the cardboards for the back and side walls of the chest should be several centimeters higher than the side, and for the front wall you can leave the size to size (Fig. 2).
Thus, at the preliminary stage we have: a base in the form of a box with a lid and 6 cardboards that duplicate the walls, bottom and “ceiling”.
2. External upholstery.
For the external upholstery we will need: fabric, padding polyester and a hot gun.

Using a hot gun, using broad strokes, glue the padding polyester to the outside of the box. We measure the upholstery fabric with a good allowance at the top and bottom so that it can be firmly glued to the hot gun from the bottom at the bottom and at the top, folded inward. It is more convenient to start from the top edge, securing the fabric with clips. Then, pulling a little, glue it to the bottom
(Fig. 3)

Since I used fabric with a fairly large pattern at the seam, I ended up with a funny combination :), some kind of zebra elephant :), but you can’t guess. Carefully pin and sew with a blind stitch. (Fig. 4)

Figure 4.
Little trick:
The joint is best placed as close to the corner rib on the back of the chest as possible. This will look more aesthetically pleasing.
For the lid we sew a cover in the most primitive way. Cut a fabric rectangle to fit the size of the top of the lid. We sew a wide strip around the perimeter to it. The width of the strip should be twice the height of the edge of the lid. In my case, with a lid height of 8 cm, the width of the strip is 16 cm. In order to fold the fabric inward, the inner side of the edge of the lid was also upholstered. (Fig. 5)
First, we cover the top and edges of the lid with padding polyester, then we put on the upholstery cover and glue it from the inside to the hot gun.

3. Internal upholstery.
For interior upholstery, you can use either fabric or paper. With paper, of course, everything is much simpler, but I used fabric, so I will dwell on this stage in more detail.
We already had cardboards prepared to duplicate the walls of the chest. Now we will need to cover them with fabric. According to the size of each cardboard, we cut out the fabric with a substantial allowance of at least 4 cm on each side. From the back side we tighten the fabric with threads, first from the sides, then from the top and bottom. The stitches can be done in large increments, but sufficient to evenly stretch the fabric. (Fig. 6, Fig. 7

rice. 6
Little trick:
To pre-fix the fabric on the cardboard, it is very convenient to use masking tape. It holds the fabric quite firmly (especially slippery ones, as in my case) and does not leave marks after removal. In addition, it can be used repeatedly

This is what it looks like from the back. Special care is not required here, as it will be out of sight. It is important to grab the fabric away from the edge so that the thread holds firmly and the edge does not crumble (1 - 1.5 cm from the edge).
4. Connect the box with the lid.
I connected the lid to the box using regular furniture hinges. This is perhaps the most special stage. This was my first time using this method, so I miscalculated a little. Or rather, I did everything exactly as I had planned, but now I think that in next time I will try to place the loops inside, not outside. I will try to experiment with this issue in the future, but now let’s return to our lid.
The lid was connected to the box using two hinges. Since the box is basically cardboard, I simply sewed these loops on. first to the lid and then to the box. (Fig. 8, Fig. 9)

5. Decorate the chest.
To decorate the chest, the following materials were needed: jute twine, wooden beads, bamboo sticks (skewers), a hot gun.
In several rows, quite tightly, I wrapped the box with twine at the top and bottom, retreating 2-3 cm from the edge. (Fig. 10)

Then I inserted bamboo sticks, imitating weaving (Fig. 11). Subsequently, the excess part of the stick (sharp edge) was removed and trimmed to size.

4 sticks on the left and right on the long side, and 3 sticks on the short side. It was possible, of course, to thread the sticks evenly around the entire perimeter, but somehow I didn’t want to drive the animals into the cage :).
I glued tape to the top and bottom of the hot gun.
Along the perimeter of the lid, I also glued a wide decorative braid with wooden beads to the hot gun.
I will dwell on the braid in more detail.
6. Braid.
To keep the decor in the same style, I made all the braid myself, from the same jute twine.
To finish the bottom of the chest, I crocheted the braid. Quite primitive - on a chain air loops one row of single crochets (Fig. 12)
Svetlana Dyubina-Laikova 4267
Every home should have a handicraft box where the most important items are stored. necessary accessories for sewing. Let's look at several master classes for making handmade boxes from scrap materials for different needs.

 |
Aegidius | RUB 1,020 | |
 |
Aegidius | RUB 1,820 | |
 |
Aegidius | RUB 1,690 | |
 |
Aegidius | RUB 2,380 | |
 |
Aegidius | RUB 2,160 | |
| More offers | |||
Wicker box for needlework: master class for children
For this box you will need any cardboard, plastic or metal jar with a lid. Stepping back a couple of centimeters from the edge so that the lid can be easily closed, make holes at the same distance at the top and bottom.


Using a darning needle, pull wool threads through the holes so that there are vertical stripes on the front side and short horizontal stitches on the back side. Fasten the end of the thread from the wrong side. Next, move on to horizontal lines.
To do this, weave the vertical “columns” alternately, as when weaving paper rugs. The bottom and top of the box can be covered with decorative tape. In such boxes you can store light items (sewing accessories, stationery, hair ties, small toys etc.).


Who owns weaving newspaper tubes, can braid a cardboard box. The finished product needs to be painted (mix paint in PVA) and varnished. Then the box will be durable and you can store balls of yarn, needlework kits, hooks, needles and other sewing accessories in it.
 |
Aegidius | RUB 1,210 | |
 |
Aegidius | RUB 2,150 | |
 |
Aegidius | RUB 1,130 | |
 |
Aegidius | RUB 1,160 | |
 |
Aegidius | RUB 1,140 | |
 |
Aegidius | RUB 1,290 | |
| More offers | |||
How to make a craft box for a child in 1 hour
Children can cover any plastic container with beads and decorative fittings and get beautiful boxes for handicrafts. In the first option, you select beads and braid by color. Cover the lid and middle of the box with beads. As soon as the product dries, glue the tape onto double-sided tape.


You can string beads on a thread and then paste them on the sides of the box. The technique is exactly the same as in manufacturing New Year's balls. Beading professionals can braid boxes and lids. This method is labor-intensive, but the product cannot be distinguished from store-bought boxes.


If you purchase satin braid in the form of a braid, a rose and a ribbon, you will get a magnificent box for handicrafts. Cover the bottom and lid with fabric, and then attach decorations to it.


By the way, adults can make an express box from an iron box. Simply mark points at a distance corresponding to the thickness of the bobbins. Next, drill the bottom of the box, insert screws, which you tighten from the inside with nuts. Paint the box, decorate and arrange your sewing supplies.


 |
sewcity.ru | 120 R | |
 |
Shveiburg | 170 R | |
 |
Shveymarket | 123 R | |
 |
Shveiburg | 215 R |
Travel box made of fabric for needlework
For a travel box you will need thick cardboard, fabric, synthetic padding, and elastic bands. Measure out 5 squares with a side of 9 cm on cardboard in the form of a cross. Cover the workpiece with fabric completely from the outside and the middle from the inside.


Now cut out squares with a side of 8.5 cm from cardboard. Glue the padding polyester and cover it with fabric. In the middle, fasten the elastic band slightly taut. Attach the finished pads to the inside of the box.
Next, again draw 4 rectangles and 1 square in the form of a cross on the cardboard with sides of 4 cm and 7 cm. Also cover the workpiece with fabric and synthetic pads. Glue the part to the box by the middle, leaving the side parts free.


Now you make the middle. You can make a ball pincushion or a box for small handicraft items. For the second option, draw a rectangle on cardboard with sides of 5.5 cm and 14 cm. Divide it into five parts (you get 5 rectangles in a row). Cover the workpiece with fabric, make a box and attach it to the box.


The last step is to put the lid on the box. Cover with fabric and decorate with braid. It turns out to be a small but capacious box for needlework, which will come in handy on any trip.
 |
Shveymarket | 85 R | |
 |
Shveymarket | RUB 3,190 | |
 |
Shveymarket | 655 R | |
 |
Shveymarket | 85 R |
Unusual boxes for needlework
Unusual organizers can become a great gift women. For example, for a saucepan box you will need fabric, padding polyester and cardboard. Draw a circle with 16 sectors, marking the bottom of the product with a line.


Glue a cardboard bottom between two patterns and stitch each sector, creating a “bag”. You stuff them with padding polyester and sew them together. Decorate the top with a strip of fabric matching the color of the product, sewing in braided handles. Make the lid of the pan from cardboard and fabric. Decorate the top with a “bump”.


The lined plastic cylinder with fabric pockets looks original. This box can also be used for other purposes than needlework. And you do it in two stages: first you measure the fabric according to the size of the cylinder, taking into account the seam, and then sew pockets from the folds of long material. Sew on the bottom and decorate the box.


 |


We also recommend
 Graphite hair color is a fashionable gray hair color for those in love with the extraordinary!
 Spanish phrases for tattoos
 Elos rejuvenation technology: what it is and how it can help
 Mobius strip - an amazing discovery
 Congratulations to parents on their son's birthday Congratulations on the birth of their 7 year old son
 Scenarios for themed parties