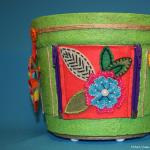
Felt cactus in a pot. Tulips and felt roses
Photo after:

Well, now the story itself about reincarnation. I really wanted to use felt or felt decorations to decorate the pot. But I understood that this was not entirely practical (felt can accidentally get dirty when watering or spraying a plant, and it can also lose its appearance due to moisture getting on it). How to be? I didn’t want to give up the idea with felt. I started thinking and decided to make felt decorative inserts with a zipper. This way, they can be removed when watering or spraying and keep the felt from being damaged. Frankly, I was really fascinated by the idea of this kind of “clothes” for the potty. It sounds strange, but why not try it?
I bought 6 zippers in three colors (the main thing is that they were double-sided!), measured the diameter of the pot, and marked with a marker where the felt inserts would be and where the main decor would be. I cut the zippers to the required size, sewed up the cut area (so that the dog would not jump off) and glued one part of the zippers to the pot (the second will be sewn onto felt). I used Titan glue. A day later, after the glue had “set,” the husband “welded” the gluing areas that were most exposed to stress (he heated a metal tool on a fire and used it to burn the zipper, soldering it into the plastic).

I was working on two projects at the same time and preparing felt decorations for a house on the wall in the baby’s room and for decorating a pot, so the photographs are used in two sections. I had the pleasure of sewing felt flowers and leaves and embroidering them with beads and floss.


I cut out inserts of the required size from felt, sewed the second part of the zippers to them and glued flowers and leaves.

Using the patchwork technique, I sewed 3 identical Tilda hearts.

Now it was necessary to decorate the plastic and especially the places where the zippers were glued together. I used a proven method - I degreased the pot, coated the surface with PVA glue and sprinkled it with semolina. After the first layer had dried, I applied the second. When the semolina had completely dried, I diluted light green paint in the palette and covered the entire surface with the semolina. I carefully varnished the pot and fastened the decorative inserts into place.
I glued twine around the circumference of the pot, having previously sewn buttons into the marked places. Felt Tilda hearts are hung on buttons, which make the pot even more elegant and original.

(First insert)

(Second insert)

(Third insert)

(Pot with decor - heart)

(Or maybe without hearts)
The money tree has found a new home, and I hope that in such an elegant and positive pot it will grow freely and well. I am very pleased to look at an unusual pot, not only because of its bright colors, but also because I was able to overcome a lot of difficulties when creating it, trying to combine the incompatible. This is one of my most unusual projects from an engineering point of view.
Time will tell how practical my decision to create removable decorative elements will be, but for now I look at it and smile, I like it!


A big and warm hello to everyone! I really like handicrafts, and for quite a long time felt has been on the list of my favorite materials for creativity. The material is truly wonderful, amazing and easy to use. I have already shared my work with you and published several articles with ideas. And today there will be another piece of inspiration, which I hope will encourage you to try to make something with your own hands, for example, flowers from felt.
Flowers don't do anything for them. These include ribbons, fabric, foamiran and polymer clay. Each technique has its own highlights and its own beauty. But the easiest one, in my opinion, is the one in which felt is used during the manufacturing process. Even a novice craftswoman can easily and simply make a charming decoration in 10-15 minutes.
By the way, the buds can also be used to decorate pillows, clothes, make bouquets or. In general, their use is not limited to lying in a box. Even photo frames will look a hundred times better if you decorate them with felt flowers. And what kind of hairpins they make for girls – beautiful!
Felt flowers
What is women's favorite flower? That's right, roses! And they are quite easy to make from felt. To do this, draw a circle, a spiral on it and cut it out, and to give the bud relief and naturalness, you can cut out the blank, making small waves.


Flowers - poppies can also be made in various ways. But both the first and second options deserve high praise.


Charming chrysanthemums look very beautiful, and are quite easy to make: cut out a strip of felt, fold it in half lengthwise and cut it with scissors every 3-5 millimeters. Then the workpiece must be rounded and secured with glue. In the middle, if you go, you can glue a bead or another center.


And the next felt flower of extraordinary beauty is made from petals, which are folded in a special way and glued to a circle - a blank.


As you can see, you can make not only voluminous flowers from felt, but also flat ones. They are easy to make and can be used for home decoration, arranging bouquets and making accessories.


Very delicate buds, and their composition is simply breathtaking.


Here is another selection of photographs of felt flowers, look and be inspired.


Felt jewelry
Every woman wants to look attractive. To do this, we follow fashion, take care of ourselves, and dress up. Decorations occupy a special place. Some people prefer jewelry, such as gold, silver, stones, and so on. And some people don’t mind wearing jewelry. But you can make a beautiful necklace, bracelet, earrings or headband with your own hands and decorate it with felt flowers.
Handmade is in fashion now more than ever, so don't miss the opportunity to show off your creation. After all, you will have an absolutely exclusive item that has no analogues, which means it costs more than any diamond. Here are some ideas for inspiration.


Felt bouquets
When I first saw such bouquets, my delight knew no bounds. It turns out that even such material can be used to make flower arrangements, and they are quite capable of competing with ribbons and foamiran. The main thing in this matter is to show imagination and know the basics of floristry. Much depends on the color combination, the theme of the bouquet and the technique of making buds. This is such beauty!


Which felt is best to use for making flowers?
In order for the products to be of high quality and look “expensive”, it is best to choose felt made in Korea or Spain. From my own experience I can say for sure that Chinese felt is not durable; it rolls up very quickly and loses its appearance. The only thing it is suitable for is “training” - although it wouldn’t be a shame to throw it away.
Depending on what kind of flower you are going to make, hard or soft felt will suit you. If the bud contains many petals and you need to crush them somewhere into an accordion or bend them, then most likely the second option will suit you; for the rest, the first option will be suitable.
I often buy felt and recommend this: this shop. There you can buy different types of felt, different colors and shades. You might like sets or individual sheets. And the prices are loyal and even lower than those of other sellers.
That's all for today! Create beauty! See you again!
An original decorative decoration in Handmade style – felt flowers. It’s easy and fairly quick to do, but it turns out very unusual and beautiful.
Felt, it should be noted, is the favorite material of handicraft masters. How many possibilities it opens up for creating a designer item. Judge for yourself how original a flower brooch on a black dress will look. And in general, on a dress of any solid color. After all, sometimes a small accessory is enough to make the same outfit look fresh and new. You can also use felt decorations to complement the appearance of the box, decorate a postcard or photo album. Felt flowers look original on handbags, hairpins, as decoration for hairbands, as well as in the design of any gift souvenirs.

A few words about what felt is and the reasons for its popularity. Felt is nothing more than felt made from rabbit or goat hair. Felt, in turn, is a non-woven textile. Wool or synthetic fibers can be used as a base. The choice of wool is determined by the peculiarity of its structure. The fact is that the edges of its fibers have so-called “notches”. This ensures good adhesion of the fibers to each other.

Making felt flowers with your own hands is a fun and not difficult activity. And all this thanks to the pliability of the material. It differs in its density and thickness. Felt can be bought at almost any craft store or ordered online. More often on sale there are felt sheets with a thickness of 2-2.5 mm and a size of 30*40 cm, as well as a thickness of 4 mm with a size of 20*30 cm.
At the stage of choosing shades, you can show all the richness of your own imagination. The creative process fully corresponds to the author's concept and imagination, and therefore products can be created in any color scheme. Fortunately, the modern market for handicrafts makes it easy to realize even the most daring ideas. Some people use ready-made felt sheets with floral prints. Others prefer to combine the original contrasting colors. The boundaries of this process are determined solely by the taste of the master.
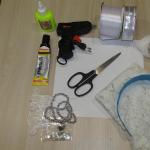
Materials for felt flowers
- scissors
- glue for working with fabric
- pins
- thread and needle
- all kinds of beads, beads and buttons of different sizes for decorating flower cores;
- floss threads, the shades of which should differ by several tones in one direction or another from the original felt color. They are used to decorate the edges of future flowers.
Felt flowers, patterns of which can be found in large quantities in catalogs of online magazines, are usually very simply designed. A regular chamomile template can be used as a base. But the work, made in several layers of contrasting or monochrome colors, takes on a completely different concept. Cut out paper petals. This will be the template. Here are some ready-made patterns for felt flowers:


Let's look at the assembly process using the example of a flower made using this pattern:

First you need to recreate the pattern design directly on the fabric.


Then the edge of each petal is trimmed with a skillful seam using floss or not processed at all.
We place the petals on top of each other from largest to smallest (or vice versa) and sew them in the center to form a recess for the future flower (you need to sew it tightly). And let's move on to creating the core. Place a circle cut out of felt on glue and place it in the middle of the flower.

Sequins, pre-prepared beads, beautiful beads will add originality to the resulting work of art.
Depending on the intended purpose of the product, we attach a pin or sew an elastic band to its reverse side.

We are posting a few more photos of flowers that inspire new creations. Each of these flowers uses French knots as an additional decoration:


The felt flowers presented below are master classes from handicraft masters. These works will help beginners master the simple creativity of creating decorative floral elements.
Felt rose (master class)
This amazing accessory is ready to “settle” on the evening dress or coat of its resourceful owner.


Let's start from the base of the flower. To do this, we will prepare a circle whose diameter will be 10 cm. We cut out semicircular petals along the edges of the circle, gradually moving from the outer edge inward.

The central part is rolled up, thereby forming the core of the future rose.

It needs to be secured with a pin and filled with a layer of glue. After the glue has dried, you need to wrap the rest of the felt around the resulting bud and close the cut from the bottom side.


This is such a wonderful rose that you will end up with!

If you make several roses, glue them to a piece of fabric and sew on a metal clasp, you will get a wonderful brooch!

For clarity, a few more roses made according to a similar principle:


Tsvoric shows how to decorate with felt (music by Key.peter):


Felt violet (master class)

Materials for work:
- felt (sheets of two different colors: lilac - for petals, green - for leaves)
- scissors
- threads, the color of which should match the color of the violet

Let's prepare 5 templates for future petals (diameter - 4 cm):

We take one of the petals in our hands and fold it in half twice. We get a petal in the form of a corner:

Using a couple of stitches we attach the corner to one of the blanks:

We repeat the steps for the remaining petal corners. To achieve the desired neat effect, carefully monitor the direction of the petals (they should be directed in one direction):


At the end of the work, the flower should be thoroughly straightened:

Let's move on to cutting out the leaves:

Sew them together:

Lifting the petal, we fasten the leaves to the base:

We enjoy the result!
For example, you can decorate a headband with such flowers:

Felt chrysanthemum (master class)

The felt strip must be folded in half (widthwise). For reliability, fasten with sewing pins.

On the side where the fold was made, we form identical cuts.

Using matching threads, we sew the strip with large stitches and roll it into a roll, forming petals. We secure it by sewing the layers together in several places.

All that remains is to straighten the felt and form a beautiful flower!
This flower will consist of a large number of petals.

Having cut out rectangles from felt, make a fringe on one edge and round the other. There should be about 20 petals. They should all be different sizes.

We pinch the edge that was rounded and fix the petal with glue.

Forming a flower:

Cut out a yellow strip. We cut it on one side. Then we roll it up and fix it with glue. We get the finished core.

To use a flower as a flower, you need to attach a small piece of felt to the base from the wrong side, and then pin the whole thing together with a pin or metal fastener.
Felt hydrangea (master class)

Materials for the flower:
- scissors
- glue gun
It is necessary to cut out 13 felt circles of the following sizes: 1 piece - with a diameter of 3 cm, 12 pieces - with a diameter of 2 cm.

We apply hot glue to the center of each circle and thus form future petals.

We take a large circle and, using a glue gun, distribute 4 prepared petals along its perimeter.

Between these petals we glue the next four. Repeat until the circle is filled.

Pillow with felt flowers

First, cut out the petals from felt:

Using the template, prepare 6 felt circles (diameter - 12cm)

Glue the petals to one of the circles using hot glue.

Gradually add the next row (4 in total)

We create the middle. Fold the circle twice:

Fold in half again:

Trim the end:

Lubricated with glue, we attach the future flower to the blank.

It takes 5 circles to go to the middle.

The result should be such a charming flower:

We decorate the pillow with the resulting flower.
Now comes the fun part! When creating flowers from felt with your own hands, you should take a close look at the various options for their inflorescences and the shape of the petals in nature. It is this observation that will tell the needlewoman the outlines and size ratios of the required blanks.
The beauty of this creativity lies in the fact that absolutely any of the colors existing in nature can be reproduced in felt: delicate, contrasting, and lush multi-colored... You will just need to choose the color of felt that matches the future shade of the product. Then cut out blanks in shape and circles for the future core, first from paper and then from fabric.
At the last stage, you need to assemble all the prepared elements using glue or stitches so that you get a flower. And then, based on our own ideas about ways to reflect images of living nature in art and creativity, we decorate our work with all kinds of available means. This could be embroidery or glass beads or shiny sequins. Everything your heart desires.
For an example of decor, see the master class on creating a “Felt poppy” from Lucky Fox:
This decorative felt cactus with a bright flower can be a wonderful decoration for your table. It can also be used as a pincushion. Making a cactus in a pot requires minimal sewing skills.
Here's what you'll need:
- Felt material with a soft structure in dark green, black, sand colors.
- Small pieces of felt in rich colors (bright yellow and pink) for the flower.
- Threads in beige, black, marsh shades.
- Needle for sewing or embroidery.
- Scissors.
- Simple pencil, chalk marker.
- A piece of cardboard.
- A small amount of holofiber.

2. From beige felt, cut out one piece for the pot: base, bottom and rim. From black felt, cut out a circle with a diameter of about 8-10 cm to imitate the ground.

3. From dark green felt, cut out 5-6 identical parts for the cactus. Make one identical flower piece from pink and yellow felt. Make a stripe for the middle of the inflorescence of any bright color.

4. Take the wide rounded piece (the base of the pot) and connect its short edges. Sew them together with beige thread using a butt or overlap stitch.

5. Take the bottom of the pot, sew it to the base with an overcast stitch (or over the edge).

6. Take a narrow rounded strip and sew its short sections end to end. Then wrap this part around the top of the pot and sew along the inner contour. To do this, lay a finishing stitch in the form of a dotted line.

7. Then join the top edges of the pot and the rim using an overlock stitch or any other stitch you desire. Straighten the pot, give it a beautiful shape.

8. Cut a circle from cardboard the size of the bottom of the pot. It is needed for stability.

9. Place a cardboard circle at the bottom of the pot. Check if it fits well with the bottom in size.

10. Move the black circle towards you and pass a thread along its entire edge.

11. Pull the thread, put holofiber inside.

12. Tighten the thread, secure the tie with several stitches and a knot. Using your fingers, form a rounded piece with a smooth spherical surface.

13. Take out the pot. Place a ball simulating soil into the pot. If it doesn't completely fill the space of the pot, take it out and put some synthetic litter in the bottom.

14. Place the soil in the pot and level it with your fingers so that it is evenly distributed across the top.

15. Take the green cactus elements. Fold them in twos, sew them together in pairs with an overcast stitch.

16. In the middle of the fastened parts, lay a vertical stitch, piercing the material right through with the needle.

17. Then sequentially attach all the cactus parts to each other, sewing their centers together.

18. Sew the main part of the cactus to the soil, capturing all sections of the base.

19. Make sure that the edges of the plant are distributed evenly over the surface of the ground (you can first pin them down with pins). Place the cactus and soil in a pot.
We also recommend
 Tulips and felt roses
 Do-it-yourself kokoshnik for the Snow Maiden: a lightweight children's model with and without a rim
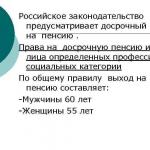 Presentation "Insurance pensions in the Russian Federation" - project, report
 How to deal with one and two?
 Autumn crafts made from natural materials: quickly and beautifully
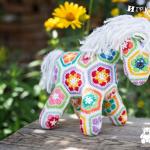 How to crochet a beautiful horse