How to crochet a beautiful horse. Knitted horse

Crocheted horse from African flower motifs. Step-by-step and very detailed master class.
The horse is perhaps one of the most interesting and beautiful animals! Every needlewoman more than once has the idea of making a cute horse for herself or her child. Our masterclass is designed for beginner craftswomen and may also appeal to experienced needlewomen. The advantage of this horse is that it is assembled from identical fragments - the “African Flower” motifs. Knitting them is quite simple, and having learned and honed the skill of knitting a motif, you can create not only horses, but also other animals that you love. Another undeniable advantage of knitting a motif is the possibility of various combinations of colors, sizes and patterns. Each motif can be unique in color, and their combinations create a wide field for imagination.
In total, in our master class you need to make 42 motifs.
triangle - 1 piece,
quadrangle - 3 pieces,
pentagon - 19 pieces,
hexagon - 15 pieces + 2 pieces for ears,
heptagon - 2 pieces.
Materials and tools for knitting.
- Multi-colored bright yarn. In the master class, the horse was knitted from Iris yarn.
- Yarn for mane and tail.
- Hook No. 1.5 (or another corresponding to the yarn you have chosen).
- Filler for a toy (For example, padding polyester or sliver).
- Scissors.
- Needle for stitching parts.
- Sheet of cardboard.
Let's start knitting a hexagonal motif. We will knit according to diagram:

The motive from which we will knit a horse, called "African Flower". It is very often used for knitting blankets, shawls and even bags. They also knit funny toys from it!
So, let's start knitting.
We are recruiting 5 air loops and close them in a ring. Let's start knitting first row: two air loops for lifting, double crochet, air loop. Next we repeat *two double crochets, chain stitch* - 5 times.

Take yarn of a different color.
Second row: We knit two lifting chain stitches again, then into the hole formed by the chain stitch of the previous row, we knit a double crochet, a chain stitch, and two double crochets. Repeat *two double crochets, chain stitch, two double crochets* into the hole formed by the chain stitch of the previous row - 5 times.

To knit the next row, you can change the color of the yarn again, or you can continue knitting the same.
Third row: Using half-stitches, make your way to the hole that was formed by the air loop of the previous row (between two double crochets). We knit two chain stitches for lifting and 6 double crochets. Repeat *7 double crochets* - 5 times.

Change the color of the yarn. It is better if it is yarn in a contrasting color.
Fourth row:*7 single crochet, double crochet* - repeat 6 times.

Change the color of the yarn again and tie the flower with double crochets.

The last row is single crochet with white yarn:

The remaining motifs are knitted similarly. Here's more knitting pattern pentagonal motif:

So, we should have 42 motifs.

Now let's get started assembly. There are several ways to assemble things connected from individual motifs. You can find out more about these methods here:
Connecting motifs with crochetIn this master class, the parts are sewn together, but you can choose the method of joining the parts that you prefer.
Let's start assembling the horse from the muzzle. Take the following parts: 1 triangular motif and 3 pentagonal ones.

We sew them together as shown in the photo:

Now we take 3 more pentagons.

We sew them to the muzzle.

Let's take another pentagonal motif:

Sew it to the back of the head.

We sew two hexagons - on one side and on the other. This will be the horse's neck.


We continue to connect the parts. The diagram shows how to do this. In those places where the number “4” is located we place quadrangles.

Now we will assemble the legs separately, and then attach them to the body of the horse.
For each leg we will need the following motifs:

We sew the motifs together. The leg is ready.
Thus, at this stage we have three parts left unsewn: a heptagonal motif (sewn last on the tummy) and two hexagonal motifs for the ears.

We sew the legs to the body, do not sew the heptagon onto the tummy yet, through this hole we will stuff the toy.

Stuffing the toy:

Sew the heptagonal motif onto the tummy, thereby closing the hole.

This is the kind of horse we got. True, so far without a mane, tail and ears.

Side view:

Back view:

Let's start creating the mane. For this we need fluffier and softer yarn. And in order to make the mane even, we will use one clever device. In principle, if you trust your eye, then you can simply attach the threads.
In order for the hairs of the mane to be the same length, we will make a blank from cardboard. Outline the horse's neck.

Draw the mane on the cardboard.

Cut out the part and try it on.

We begin to wrap the cardboard with thread. You can use a needle for this (if the yarn you choose is not too thick and will fit into the eye of the needle) or pull the threads out with a hook.

We wrap yarn around the entire cardboard mane.

Cut the top and let go of the “hair”:

You can trim your bangs a little :)
From the same yarn we make a tail for a horse:

Let's start attaching the ears. The eyelet is a hexagonal motif folded in half and tied with single crochets.

Fold the eyelet in half and secure it with a needle. There is no need to cut the thread, since next we will sew the ears to the horse’s head.

Sew on the ears.
The horse is ready! :)

Happy knitting! With best wishes in your creativity, the author of the toy, Anna Lavrentieva.
This master class was written specifically for the site, so copying the entire material is PROHIBITED!
When partially copying, be sure to include a link to the source.

If you want to place such a cute foal Vityusha in your home, then carefully study our master class and start making it, especially in 2014, the Horse is the mascot of the year.
The height of the finished toy is 22 cm
Crocheted horse. Master Class
Required materials and tools
Acrylic (300 m/100 g): beige - 35 g, brown - 25 g, dark gray - 10 g, light pink - 5 g, blue - 5 g, a little white, black
Hook No. 1.25
Filler
Stitching needle
2 black beads
Thick cardboard
Legend:
p - air loop
sc - single crochet
inc - increase (knit 2 sc in 1 loop)
uyu - decrease (knit 2 sc together)
ss - connecting post
с1н - double crochet
s2n - double crochet stitch
psn double crochet
* repeat the specified number of times
The number in parentheses at the end of each description row shows how many stitches there should be in that row.
1. Use one weight of yarn unless otherwise stated in the description.
2. Knit the parts of the toy in the round without interrupting the row, unless otherwise indicated in the description.
3. For maximum density, knit stitches on both halves of the loop, unless otherwise indicated in the description.
4. Do not use cotton wool as a filler, as when wet it clumps and the toy loses its original shape. Holofiber is best suited.
The process of knitting a horse
.jpg)
HEAD
Beige thread
➣ Continue knitting in the round.
2nd row:pr*6 (12)
3rd row: (sc, inc)*6 (18)
4th row: (2 sc, inc)*6 (24)
Row 5: (3 sc, inc)*6 (30)
Row 6: (4 sc, inc)*6 (36)
7th row: 36 sc in a circle
Row 8: (11 sc, inc)*3 (39)
9th row: 39 sc in a circle
Row 10: (12 sc, inc)*3 (42)
Rows 11-19: 42 sc in circles
Row 20: (5 sc, dec)*6 (36)
21 row: (4 sc, dec) * 6 (30)
Row 22: (3 sc, dec)*6 (24)
23rd row: (2 sc, dec)*6 (18)
Rows 24-28: 18 sc in circles
➣ Finish ss. Leave the thread for sewing. Stuff your head.
.jpg)
MUZZLE
Light pink thread
1st row: cast on 13 ch and knit 11 sc, starting from the 2nd loop from the hook, 3 sc in 1 loop, continue knitting 10 sc on the other side of the chain, inc (26)
➣ Continue knitting in the round.
2nd row: inc, 4 sbn, inc*2, 4 sbn, inc*3, 10 sbn, inc*2 (34)
3rd row: sbn, inc, 4 sbn, hdc, 2 dc, pen,
4 sc, (sc, inc)*3, 10 sc, (sc, inc)*2 (40)
4th row: sbn, inc, 4 sbn, 2 hdc, (2 sbn in 1 loop)*2, 2 hdc, 4 sbn, (sbn, inc)*3, 14 sbn, (sbn, inc)*2 (48)
5th row: 7 sbn, 3 hdc, (2 dc in 1 loop) * 2, 3 hdc, 33 sbn (50)
Rows 6-9: 50 sc in circles
10th row: 7 hdc, 3 hdc, (2 hdc together) * 2, 3 hdc, 33 hdc (48)
11th row: 1 sbn, dec, 4 sbn, 2 hdc, (2 sbn together)*2, 2 sbn, 4 sbn, (1 sbn, dec)*3, 14 sbn, (1 sbn, dec)*2 (40 )
12th row: 1 sbn, dec, 4 sbn, (2 sbn together, 4 sbn, (1 sbn, dec) * 3, 10 sbn,
(1 sc, dec)*2 (32)
➣ Change the thread to beige.
13th row: 8 sbn, 3 sbn in 1 loop, 8 sbn, dec, 2 sbn, dec, 3 sbn, dec, 2 sbn, dec (30)
14th row: 30 sc in a circle
➣ Finish ss. Leave the thread for sewing. Fill with filler.
.jpg)
NOSRALS (2 pcs.)
Light pink thread
1st row: cast on 2 ch and knit 6 sc into the second loop, turn
2nd row: ch, 6 sc, turn
3rd row: ch, 6 sc
EYES
White thread
1st row: cast on 2 ch and knit into the second loop from the hook 6 sc
2nd row: (3 sc in 1 loop, sc)*3 (12)
3rd row: sc, 3 sc in 1 loop, (3 sc, 3 sc in 1 loop)*2, 2 sc (18), ss
➣ Change the thread to black.
4th row: behind the back half of the loop 18 ss.
➣ Finish. Leave the thread for sewing.
EARS (2 pcs.)
Beige thread
1st row: cast on 2 ch and knit into the second loop from the hook 6 sc
➣ Continue knitting in the round.
2nd row: (sc, inc)*3 (9)
3rd row: (2 sbn, inc)*3(12)
4th row: (3 sc, inc)*3 (15)
Row 5: (4 sc, inc)*3 (18)
6th row: (5 sbn, inc) * 3 (21) 7-8 rows: 21 sbn in a circle
Row 9: (5 sc, dec)*3 (18)
10th row: 18 sc in a circle
Row 11: (4 sc, dec)*3 (15)
➣ Finish ss. Leave the thread for sewing. Don't stuff.
.jpg)
➣ Sew on the eyes, use a black thread to make a stitch, separating the eyes. Sew black beads in place of the pupils. Embroider eyebrows.
.jpg)
➣ Sew on the muzzle.
.jpg)
➣ Sew on the nostrils, embroider a smile with brown thread, sew on the ears.
.jpg)
TORSO
Beige thread
1st row: cast on 2 ch and knit into the second loop from the hook 6 sc
➣ Continue knitting in the round.
2nd row: cr*6(12)
3rd row: (sc, inc)*6 (18)
4th row: (2 sc, inc)*6 (24)
Row 5: (3 sc, inc)*6 (30)
Row 6: (4 sc, inc)*6 (36)
Row 7: (5 sc, inc)*6 (42)
Row 8: (6 sc, inc)*6 (48)
Row 9: (7 sc, inc)*6 (54)
Rows 10-22: 54 sc in circles
23rd row: (7 sc, dec)*6 (48)
Row 24: (6 sc, dec)*6 (42)
Row 25: (5 sc, dec)*6 (36)
26 row: (4 sc, dec) * 6 (30)
Row 27: (3 sc, dec)*6 (24)
Row 28: (2 sc, dec)*6 (18)
➣ Stuff the torso.
Row 29: (sc, dec)*6 (12)
Row 30: dec to end.
➣ Finish. Hide the thread.
.jpg)
LEGS (4 pcs.)
➣ Knit 2 legs with beige thread, 2 with brown thread.
Hoof:
Dark gray thread
1st row: cast on 2 ch and knit into the second loop from the hook 6 sc
➣ Continue knitting in the round.
2nd row: cr*6 (12)
3rd row: (sc, inc)*6 (18)
4th row: (2 sc, inc)*6 (24)
➣ Trace the resulting part on cardboard and cut out (4 pieces) - for the legs.
.jpg)
Row 5: (3 sc, inc)*6 (30)
➣ Trace the resulting part on cardboard and cut it out (4 pcs.) - for hooves.
Row 6: (4 sc, inc)*6 (36)
7th row: for the back half of the loop 36 sc in a circle
8th row: (10sc, dec)*3 (33)
Row 9: (9 sc, dec)*3 (30)
Row 10: (8 sc, dec)*3 (27)
➣ Insert the cut cardboard.
11th row: (7 sc, dec)*3 (24)
Row 12: (6 sc, dec)*3 (21)
Row 13: (5 sc, dec)*3 (18)
Row 14: (sc, dec)*6 (12)
➣ Fill with filler.
Row 15: behind the back half of the loop, dec * 6 (6)
➣ Finish. Hide the thread.
.jpg)
➣ Attach a beige (brown) thread to the 15th row of the hoof, continue knitting the leg.
Row 16: 12 sc for the remaining half stitches (photo No. 10)
Row 17: (sc, inc)*6 (18)
Row 18: (2 sc, inc)*6 (24)
.jpg)
DIY openwork horse. Master class on knitting Horse toys with step-by-step photos
Tugusheva Yulia Ivanovna-teacher at MDOU No. 14 “Solnyshko”, Rtishchevo, Saratov region.Goals: to get interested in making toys with your own hands, to show one of the possibilities of creating beautiful patterns using knitting needles; develop creative abilities.
Purpose: This master class is intended for those who like to make beautiful, original things with their own hands;
for those who like to give unusual gifts;
for those who strive to develop their creative abilities and learn something new;
for parents who want their children to receive something special as a gift on New Year's holiday, something that cannot be bought in a store, that will always keep the warmth of mother's hands.
Materials and tools used:
blue acrylic metallic yarn, white yarn, cotton wool, red yarn (mouth), black yarn (nostrils), blue ribbon, eyes, knitting needles, hook, scissors, needle, “Instant” glue, strip of cardboard.


Soon, soon New Year
He will come to us with a horse.
Loaded up the horses
Dear Grandfather Frost,
Dresses up his three horses at the door
Only the Snow Maiden is alone
She was depressed by the window.
How to cheer her up?
Can I give you a horse?
Dear, pretty,
Similar to a snowflake,
Openwork, beautiful,
With a snow-white mane.
Step-by-step process of making a horse
I bring to your attention the making of just such a horse.
It can be a good toy for a baby or a New Year's decoration for your interior.
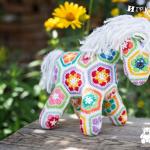
This is the kind of horse we should get
Progress:
For knitting a horse, the openwork pattern “Herringbone” is well suited, which will emphasize the slenderness of the horse, its originality and the purpose of making it according to the game plan (New Year's gift for the Snow Maiden).
Herringbone pattern(10 loops for 1 pattern + 2 edge loops)
1st row: 1n, 3l, double decrease, 3l, 1n, 1l
3rd row: 1l, 1n, 2l, double decrease, 2l, 1n, 2l
5 row: 2l, 1n, 1l, double decrease, 1l, 1n, 3l
Row 7: 3L, 1N, double decrease, 1N, 4L
Even rows are knitted with purl stitches.
Legend:
l- facial
n-yarn over
double decrease - slip 1 loop (thread behind the loop), knit the next 2 loops together, then put the removed loop on the knitted one.
Knitting needs to start with a simple piece in order to see and learn the pattern.
1.1.Knitting the front leg on 2 knitting needles(2 pcs.).
Cast on 22 loops (2 patterns across the width) and knit 6 patterns along the length of the part. Close all loops

1.2 Making the front leg.
We take 1 piece, fold it in half and sew it together, starting from the foot (we place the resulting triangles on top of each other

)
We stuff the leg with cotton wool (do not close the top)

We sew and stuff the second leg in the same way.
2.1 Knitting a head on 2 knitting needles.
Cast on 32 loops (3 patterns across the width), knit 2 patterns in length, then continue knitting, adding loops:
in pattern 3 - in row 1, 1 loop between patterns;
in pattern 5 - in each row, 1 loop at the beginning and 1 loop at the end of the row.
Knit 6 patterns in length and bind off all loops

2.2 Making the head.
We take the head part, fold it in half and sew it together, starting from the muzzle (we place the triangles resulting from knitting on top of each other). The head needs to be sewn completely, so you need to stuff it with cotton gradually.
3.1 Knitting an ear
(4 parts).
To knit 1 piece, you need to cast on 7 loops and knit 8 rows (knit odd rows with knit stitches, even rows with purl stitches), making decreases in rows 5 and 7, 1 loop each at the beginning and end of the row. In row 8 cast off 1 stitch

3.2 Making ears.
For 1 ear, take 2 parts, place them on top of each other (wrong side inward) and crochet along the edge of the parts, simultaneously connecting them together

We also do the second ear. Sew them to the head

4. Knitting and making the body with hind limbs.
First we knit the hind limbs on 2 knitting needles (2 pcs.)
Cast on 22 loops, knit 6 patterns in length, adding loops in pattern 5, 1 loop at the beginning and end of the 3rd and 5th rows. Makes 26 loops

Now you need to connect 2 limbs, distributing 52 loops on 4 knitting needles (abdomen, 2 sides and back)

Loops on the knitting needle - we don’t knit the belly yet.
We knit 1 pattern on 3 knitting needles, starting with “Double Decrease” (1 loop will be knitted in it and 1 will be put on the knitted one); and removing 1 loop in the middle on the middle knitting needle in each odd row (4 loops will be removed). We knit 2 more patterns, pick up loops on the resulting sides and switch to knitting on 4 knitting needles (when knitting in the round, even rows are knitted). On each 12 loops per knitting needle (remove extra loops at the beginning of each knitting needle). Next, on the side and belly needles we knit a pattern + the first and last knit stitches, and the pattern on the back needle begins and ends with “Double Decrease”. We knit 4 patterns

At this stage of the work, you need to sew and stuff the hind legs (as well as the front ones) with cotton and stuff the resulting part of the body with cotton (this will be more convenient)

Now the middle of the back = 7 loops are left on knitting needle No. 1.
We begin to knit on the other 3 knitting needles, making decreases like this: on knitting needle No. 2 in each row we knit the last 2 loops in 1, on knitting needle No. 3 we knit the first 2 and last 2 loops in 1, until the loops on knitting needle No. 3 run out (the middle of the chest has been determined )Now we knit, removing 5 loops from the remaining knitting needles in this place. There are 7 loops left, we collect them on 1 knitting needle.
We form the throat: on knitting needles No. 1 and No. 3 there are 7 loops each, on the other 2 knitting needles we cast on 4 loops from the resulting sides and knit 6 rows in a circle, closing the loops.
We completely stuff the body with cotton wool.
All knitted parts are ready, it's time to proceed to the next stage of work.
5. Stitching a horse.
We need to sew all parts of the body with a needle, that is, make a horse.

6. Making the tail.
Take white yarn and a strip of cardboard. Wrap several circles of thread on cardboard

We connect all the threads in the upper part of the cardboard, tying a knot (this place will be sewn to the horse), and in the lower part we cut all the threads with scissors

The result is a brush - a tail. Sew it to the horse

7. Making the mane.
We will also take white yarn and a strip of cardboard. We wind several circles of thread on cardboard (2 times more than on the tail)

Now take a hook and tie a strip along the top of the cardboard, simultaneously securing all the threads and connecting them together.
Now you can cut the threads with scissors along the bottom edge of the cardboard

It turned out to be a mane

We sew it with a needle to the back and head of the horse. Forming bangs and mane

8.Design of the horse's face.
The nostrils can be made with a few stitches of black thread or drawn with a marker.
For the eyes, we pierce holes with a knitting needle, coat them with glue and glue the eyes

Now let's make a mouth - we crochet and use a red thread to knit a strip of the required length
Crocheted horse from African flower motifs. Step-by-step and very detailed master class.
The horse is perhaps one of the most interesting and beautiful animals! Every needlewoman more than once has the idea of making a cute horse for herself or her child. Our masterclass is designed for beginner craftswomen and may also appeal to experienced needlewomen. The advantage of this horse is that it is assembled from identical fragments - the “African Flower” motifs. Knitting them is quite simple, and having learned and honed the skill of knitting a motif, you can create not only horses, but also other animals that you love. Another undeniable advantage of knitting a motif is the possibility of various combinations of colors, sizes and patterns. Each motif can be unique in color, and their combinations create a wide field for imagination.
In total, in our master class you need to make 42 motifs.
triangle - 1 piece,
quadrangle - 3 pieces,
pentagon - 19 pieces,
hexagon - 15 pieces + 2 pieces for ears,
heptagon - 2 pieces.
Materials and tools for knitting.
- Multi-colored bright yarn. In the master class, the horse was knitted from Iris yarn.
- Yarn for mane and tail.
- Hook No. 1.5 (or another corresponding to the yarn you have chosen).
- Filler for a toy (For example, padding polyester or sliver).
- Scissors.
- Needle for stitching parts.
- Sheet of cardboard.
Let's start knitting a hexagonal motif. We will knit according to diagram:
The motive from which we will knit a horse, called "African Flower". It is very often used for knitting blankets, shawls and even bags. They also knit funny toys from it!
So, let's start knitting.
We are recruiting 5 air loops and close them in a ring. Let's start knitting first row: two air loops for lifting, double crochet, air loop. Next we repeat *two double crochets, chain stitch* - 5 times.

Take yarn of a different color.
Second row: We knit two lifting chain stitches again, then into the hole formed by the chain stitch of the previous row, we knit a double crochet, a chain stitch, and two double crochets. Repeat *two double crochets, chain stitch, two double crochets* into the hole formed by the chain stitch of the previous row - 5 times.

To knit the next row, you can change the color of the yarn again, or you can continue knitting the same.
Third row: Using half-stitches, make your way to the hole that was formed by the air loop of the previous row (between two double crochets). We knit two chain stitches for lifting and 6 double crochets. Repeat *7 double crochets* - 5 times.
Change the color of the yarn. It is better if it is yarn in a contrasting color.
Fourth row:*7 single crochet, double crochet* - repeat 6 times.

Change the color of the yarn again and tie the flower with double crochets.

The last row is single crochet with white yarn:

The remaining motifs are knitted similarly. Here's more knitting pattern pentagonal motif:

So, we should have 42 motifs.

Now let's get started assembly. There are several ways to assemble things connected from individual motifs. You can find out more about these methods here:
Connecting motifs with crochetIn this master class, the parts are sewn together, but you can choose the method of joining the parts that you prefer.
Let's start assembling the horse from the muzzle. Take the following parts: 1 triangular motif and 3 pentagonal ones.
We sew them together as shown in the photo:

Now we take 3 more pentagons.

We sew them to the muzzle.
Let's take another pentagonal motif:

Sew it to the back of the head.
We sew two hexagons - on one side and on the other. This will be the horse's neck.


We continue to connect the parts. The diagram shows how to do this. In those places where the number “4” is located we place quadrangles.

Now we will assemble the legs separately, and then attach them to the body of the horse.
For each leg we will need the following motifs:
We sew the motifs together. The leg is ready.
Thus, at this stage we have three parts left unsewn: a heptagonal motif (sewn last on the tummy) and two hexagonal motifs for the ears.

We sew the legs to the body, do not sew the heptagon onto the tummy yet, through this hole we will stuff the toy.

Stuffing the toy:
Sew the heptagonal motif onto the tummy, thereby closing the hole.

This is the kind of horse we got. True, so far without a mane, tail and ears.

Side view:

Back view:

Let's start creating the mane. For this we need fluffier and softer yarn. And in order to make the mane even, we will use one clever device. In principle, if you trust your eye, then you can simply attach the threads.
In order for the hairs of the mane to be the same length, we will make a blank from cardboard. Outline the horse's neck.
Draw the mane on the cardboard.

Cut out the part and try it on.
We begin to wrap the cardboard with thread. You can use a needle for this (if the yarn you choose is not too thick and will fit into the eye of the needle) or pull the threads out with a hook.

We wrap yarn around the entire cardboard mane.

Cut the top and let go of the “hair”:

You can trim your bangs a little :)
From the same yarn we make a tail for a horse:

Let's start attaching the ears. The eyelet is a hexagonal motif folded in half and tied with single crochets.
Fold the eyelet in half and secure it with a needle. There is no need to cut the thread, since next we will sew the ears to the horse’s head.
Sew on the ears.
The horse is ready! :)

Happy knitting! With best wishes in your creativity, the author of the toy, Anna Lavrentieva.
This master class was written specifically for the site, so copying the entire material is PROHIBITED!
When partially copying, be sure to include a link to the source.

Using a regular hook and a ball of thread, you can make a toy for every taste. If among your friends and acquaintances there are horse lovers and you want to please them with an original gift, then the next master class is for you.
The author of the description, Kristel Droog, suggests tying three amigurumi toys in one pattern. From brown shades of yarn you will get a charming horse called Pius. Emmy the unicorn and Betche the zebra are knitted using the same principle, only with threads of the corresponding colors. The most difficult thing in this master class is choosing which amigurumi toy to knit!
Patterns for crocheting amigurumi toys:
horses, zebras and unicorns
Legend:
Vk - air ring
P - loop (sc)
VP - air loop
pbn - half crochet
sc - single crochet
psn - half double crochet
dc - double crochet
pc - popcorn
gain-increase
dec - decrease
ss - connecting post
Hook: 2- 2.5 mm
Eyes: 7mm
Required colors:
brown (for head, arms, legs, body, ears), white (for head, arms, legs), beige (for arms and legs), gray (for horseshoes), pink (for buckle)
Horse Pius
Head:
brown
1. 6 p. vk
2. 6 approx. (12p)
3. 6x (18 p)
4. 6x (24 p)
5. 6x (30 p)
6. 30 p.
7. 6x (36 p)
8. 36 p.
9. 6x (42 p)
10.-11. 42 sts (2 rows)
12. 15 p, pk, ch, 10 p, pk, ch, 15 p (44 p)
13. 16 p, dec, 10 p, dec, 14 p (42 p)
14. 42 p
15. 6x (36 p)
16.-18. 36 sts (3 rows)
19. 6x (42 p)
20. 42 p.
21. 6x (48p)
22. 48 p.
23. 6x (54 p)
24. 54 p
25. 6x (60 p)
26.-30. 60 p. (5 rows)
Insert eyes between rows 21-22 at 10 stitch intervals.
31. 6x (54 p)
32. 54 p
33. 6x (48 p)
34. 48 p
35. 6x (42 p)
36. 42 p
37. 6x (36 p)
Fill your head
38. 6x (30 p)
39. 6x (24 p)
40. 6x (18 p)
41. 6x (12 p)
42. [dec] 6x (6 p)
Close the loops
Body:
Brown color
1. 6p. VC
2. 6 approx. (12 p)
3. 6x (18 p)
4. 6x (24 p)
5. 6x (30 p)
6. 6x (36 p)
7. 6x (42 p)
8. 6x (48 p)
9. 6x (54 p)
10. 6x (60 p)
11.-22. 60 sts (12 rows)
23. 6x (54 p)
24. 54 p
25. 6x (48 p)
26.-27. 48 sts (2 rows)
28. 6x (42 p)
29.-30. 42 sts (2 rows)
31. 6x (36 p)
32.-33. 36 sts (2 rows)
34. 6x (30 p)
35.-36. 30 p (2 rows)
37. 6x (24 p)
38.-41. 24 sts (4 rows)
42. 16 p, sc + hdc in next. n. psn. 3 dc. 2 dc inc. 2dc (26p)
43. dc, 2 dc inc., 3 dc, hdc, hdc + sc in next. p., sbn. SS.
Leave 17 p.
Legs:
Beige color
1. 6 p. vk
2. 6 approx. (12 p)
3. 6x (18 p)
4. 6x (24 p)
5. 6x (30 p)
6. 6x (36 p)
7.-9. 36 p. (3 rows)
10. 6x (30 p)
White
11. 6x (24 sts)
12.-13. 24 sts (2 rows)
14. 3x (21 p)
15. 21 p
Brown thread
16. 21 p
17. 3x (18 p)
18.-24. 18 p. (7 rows)
Stuff your feet tightly
Connect in half and knit a sc (9 stitches each)
Sew between 5-7 rows of the body.
Horseshoes:
In grey, cast on 15 chains, in the second stitch from the hook: 2 sc, (3 inc. sc), sc + hdc in the next one. p., (2 inc. hdc) hdc+sbn. next p., (3 approx. Sat.) 2 sbn.
Hands:
Beige color
1. 6 p. vk
2. 6 approx. (12 p)
3. 6x (18 p)
4. 6x (24 p)
5.-7. 24 sts (3 rows)
8. 6x (18 p)
White
9.-12. 18 sts (4 rows)
13.ub., 16p. (17 p)
Brown color
14.-15. 17 p. (2 rows)
16. ub., 15 p. (16 p.)
17.-18. 16 p. (2 rows)
19. ub., 14 p. (15 p.)
20.-21. 15 p (2 rows)
22. ub., 13 p. (14 p.)
23.-24. 14 p (2 rows)
25. dec, 12 p. (13 p)
26.-34. 13 p (9 rows)
Connect two sides together (6 stitches each)
Sew to the body above the head, stuff the tassels tightly.
Ears:
Brown color
1. 6 p. vk.
2. 3x (9 p)
3. 3x (12 p)
4. 12 p
5. 3x (15 p)
6.-8. 15 p (3 rows)
9. 3x (12 p)
10. 12 p
Connect two sides together (6 stitches each) and sew to the head (34 rows, 4 stitches in between).
A spot on the face:
1. Ch 2, in the second stitch, inc. V. n. turn knitting
2. 2 inc, ch, turn knitting (4 sts)
3. inc, 2 sts, inc, ch, turn knitting (6 sts)
4. 6 p, ch, turn knitting
5. dec, 2 sts, dec, ch, turn knitting (4 sts)
6.-10. 4 sts, ch, turn knitting (5 rows)
11. p., dec, p, ch, turn knitting (3 p)
12. dec, p, ch, turn knitting (2 p)
13. ub.
Sew between 12 and 26 rows.
Head buckle:
(consists of two parts)
Part around the muzzle: cast on 35 stitches in pink. start from the 2nd p. (34 hdc)
Part around the head: cast on 41 sts in pink. Start with the 2nd st (40 hdc)

Unicorn Emmy
Colors:
White, red, orange, yellow, green, blue, purple and pink
Knit in the same way as the horse Pius.
Horn:
Yellow, I knitted in beige
1. 6 sts in a magic ring
2. 6 sc.
3. 3x (9 p)
4. 9 sc
5. 9 sc for the front wall of the loop
6. 3x (12 p)
7. 12 sc for the front wall of the loop
8. 12 sc
9. 3x (15 p)
10. 15 sc
11. 15 sc for the front wall of the loop
Star:
In yellow according to the scheme:


Zebra Betche
The zebra amigurumi is crocheted using the same pattern as the other two toys. The thickness of the strips is 2 rows.

We also recommend
 Presentation "Insurance pensions in the Russian Federation" - project, report
 How to deal with one and two?
 Autumn crafts made from natural materials: quickly and beautifully
 How to crochet a beautiful horse
 Details about knitting jacquard patterns using knitting needles according to patterns How to knit jacquard without broaches
 When is the best time to bathe an infant?