The simplest autumn crafts for kids. Autumn crafts made from natural materials: quickly and beautifully
Children love to do something creative, they just need to be shown what can be made from certain materials.
Here you will find many interesting crafts made from colored paper or natural materials that you can make with your children.
All crafts are not at all complicated and making them will be a pleasure.
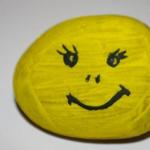
Crafts for kindergartens: coloring pebbles
If you have collected stones at sea, you should not throw them away. Arm yourself with acrylic paints or gouache and start painting them.
Such pebbles can be found in many places, then brought home or to the kindergarten and painted in all the colors of the rainbow. You can also draw different characters - the possibilities are endless.


DIY crafts for kindergarten from plastic caps
If you have plastic bottles lying around, don't throw them away. You can make a huge number of crafts from them.

Moreover, crafts can be made not only from bottles, but from their caps. These are some interesting crafts you can make with your children. Arm yourself with colored paper, colored cardboard, glue and various decorations.


Autumn crafts from pine cones for kindergarten
Cones are a natural material from which you can make many interesting crafts.

You can connect several cones, for example. This can be done in several ways: using thread, wire or elastic; using glue or simply placing the pine cones on a stick.
There are many other natural materials that can be attached to the pine cones, such as various branches, acorns and grains.
If the buds are hard, you can soak them in water and after a couple of days they will become soft, which will make it easier for you to cut and pierce them (with an awl or nail).

Opened cones can be used to make the body of a camel or turkey, and closed ones can be used for limbs (legs, arms).
* First, you can make a bird - this is perhaps the simplest craft from pine cones.

* The “camel”, “deer” or “swan” craft will be a little more difficult. You will need to make a neck - use caps of acorns, which should be strung on bent wire. The head consists of an acorn.

* Also try making a forest tree with your children. It is made using green and ripe pine cones. Use wire to attach the arms and legs.

Attach the forest man's head to the body using glue.
Use the needles to make the whiskers, and use the scales from the pine cone to create the eyes.
What craft to make for kindergarten: “Apple”
You can make an incredible number of bright crafts from colored paper with your children. One of them is a three-dimensional “apple” craft.

Children will do this simple work with great interest.
For it you will need: colored paper, glue, cardboard (colored cardboard).
Prepare a template and cut out a certain number of parts according to it.


Start gluing all the pieces together.
Glue the blank onto some kind of rod (ice cream stick).


Make a ponytail by cutting out an additional piece from paper.


Crafts for children in kindergarten: "Cloud and bright rain"
This craft also uses colored paper and glue.

You will need:
Colored paper
Scissors
1. First, cut out the outline of a cloud from white or blue paper.
2. Follow the pictures to understand how to make a raindrop.

3. By putting everything together, the baby will get a very beautiful picture.


Paper crafts in kindergarten: "Autumn leaves"
From colored paper you can make very beautiful leaves that take on the rich colors of autumn.

Look at the pictures to see how you can make these leaves. The craft is actually quite simple and kids will love working on it.


Autumn crafts for kindergarten: "Mushrooms - fly agarics"
You can make these beautiful mushrooms from old egg packaging. Although fly agarics are poisonous mushrooms, they can boast of a very beautiful color, which you will convey in your crafts.


Crafts for the kindergarten area: "Bull"
But what a beautiful bull you can make from an old plastic bottle or container.

You will need:
2 cardboard toilet paper cylinders
Plastic bottle (not rounded)
Follow the photo instructions to make a beautiful animal.


Crafts for kindergarten (photo): “Sheep”
If you don’t mind cotton swabs, then you can make such a beautiful and fluffy sheep with your children.

You will need:
White cardboard
Cotton buds
Scissors
Clothespins
Black marker
Pink marker
1. Prepare a sheet of cardboard and cut out two elliptical shapes from it - one part will serve as the body, and the other as the head. Temporarily set aside the part for the torso.
2. Prepare cotton buds and cut off the tops of them, about 1.5 cm long.
3. Start gluing these tops to the body.


4. Take two cotton tops and glue them on both sides of the sheep's head. For bangs, you can glue 3 cotton swab tips on top.
5. Draw eyes with a marker. You can also add some color part.


6. Prepare the ribbon and make a bow out of it. This bow needs to be attached to the sheep’s head.
7. Now glue the sheep's head to the body.
8. Take the body of the sheep and attach clothespins to it - they will act as legs. If necessary, you can apply glue to these clothespins.

Crafts on the theme "Autumn": "Spider"
You can make such a beautiful craft from natural materials. Using autumn leaves, chestnuts and string, try making a spider on a web with your children.

From the image you can understand how to do this. The craft is quite simple, but very interesting and original.


DIY autumn crafts: "Tree made of leaves"

You will need:
Leaves (red, yellow, green)
*you can choose leaves of different shapes
*do not choose leaves that are too dry
Several thin branches and one thicker branch
* a large branch may be of an unusual shape, with knots
Rowan (if desired)
Glue gun or superglue
Tree base container
In contact with
Classmates
With the arrival of autumn, not only is it time for rain, but it is also time to create beautiful autumn crafts. It’s good that autumn is no less generous than summer and we have plenty to use for making autumn crafts for kindergarten.
Additionally, to work with natural materials you will need paints, brushes, a glue gun, small colored pompoms, feathers, leftover felt or fabric, beads, and other various decorative options.
Now, knowing what to make autumn crafts from, let’s quickly start creating them. For example, pine cones make these cute chickens. For them you will need cones, yellow gouache, a brush, a foam ball or large bead, a glue gun, plastic eyes, a piece of orange felt and scissors. Paint both the cone and the ball yellow, glue them together, glue a felt beak and eyes to the head, and a pair of legs to the bottom of the cone. If you have a couple of real feathers, you can glue them to the sides of the chicken.

A hedgehog from a pine cone can be made in two versions. In the first case, you will need a pine cone, a piece of light brown or beige felt, eyes, a small black pompom, and a glue gun. Cut out a piece for the hedgehog's face from felt, decorate it appropriately and glue it to the pine cone.

The second option involves having a large number of fir cones, a small plastic bottle with a black cap, a glue gun, jute rope, ready-made large eyes or leftover black and white felt. Wrap jute rope around the neck of the bottle and glue the pine cones over the entire surface of the bottle. Cut out the eyes from felt and decorate the muzzle.

You can make a wonderful owl if, after a trip to the forest, you have acorn caps, a piece of bark and a pumpkin seed. Just glue all the parts and secure the owl to the tree branch.

To make a snail, you will need chestnuts, plasticine and a pair of matches for the horns. If there are no matches, then you can replace them with toothpicks, however, it is worth protecting the child from injury and gluing a bead to the tips of the horns.

You can also turn a chestnut into an incomprehensible but funny animal by gluing huge paper eyes, a pair of paper legs and a braided hat to the chestnut.

Everyone's favorite bright bug, a ladybug, you'll definitely succeed if you find a chestnut, a pair of eyes, paints and two push pins. You can read more in our master class.

Young fans of the cartoon “My Neighbor Totoro” can create their favorite character from an acorn and paper. Paint the acorn with gouache, and make the ears from tiny leaves or paper and glue them to the acorn.

A nut shell will turn into a boat in a matter of minutes if you glue a tree branch inside each shell and attach a sail made of a leaf.

The variety of autumn leaves stimulates children's imagination and as a result we can see completely unusual things.
For example, these funny little people made from leaves. Just glue the maple leaves to the paper, draw the arms, legs and glue the eyes and nose.

Every baby can make hedgehogs from leaves if the mother draws a hedgehog’s face on paper and trusts the child to glue leaves and needles to it.


Another forest dweller, red-haired and cunning, can become your autumn craft. To create it you will need a maple leaf, paper eyes and ears, a small pompom for the nose and PVA glue.

Another version of forest animals made from leaves and paper. To give your craft the features of the desired animal, simply draw a face on paper and glue on appropriately sized ears made from leaves.

With the help of leaves you can make not only animals, but also people. Cut out a head from felt, paper or foamiran, glue on eyes and a nose and make a fluffy hairstyle from maple leaves.

Woodsmen, the indigenous inhabitants of the forest, will be made from cardboard tubes, leaves, buttons, small stones and pieces of chenille. It is best to fasten all the parts with a glue gun.

You can also turn cardboard sleeves into fall trees by painting them brown, gluing one edge to the cardboard, and attaching fall foliage to the other edge.
No paper? This means you can make leaves from cardboard and knitting threads. Cut out leaves from thick cardboard and wrap with thick, bright threads. Glue the end of the thread and hide it between the thread layers.

Don’t forget about buttons, another universal material for crafts.

If you repaint old and unwanted puzzles, you can end up with a beautiful autumn tree. Make a tree trunk from leftover fabric, folded into a pigtail and glued to a thick base.
But, if, nevertheless, you managed to collect large stocks of autumn herbarium, then you can make such beautiful candlesticks. You will only need small leaves, PVA glue, a brush and a glass jar.


And you can decorate a photo frame with acorns, where you will place a photograph taken during your last trip to the forest.

As you can see, there are a lot of options for autumn crafts for kindergarten and school. All you need is just to stock up on natural materials for crafts in time and open our website.
In contact with
What is autumn? This is perhaps the most controversial time of the year. On the one hand, this is a sad time, on the other, it’s a charming time. It was not for nothing that great poets sang autumn in their poems. At this time, the warmth, lush foliage of the trees and the lush grass of the fields say goodbye to you, fairly basked in the sun and tanned, giving way to cold, rain and devastation. But is everything so sad? Of course not, because September and October leave a sea of wonderful gifts and provide the opportunity to make beautiful crafts on the theme “Autumn” with your own hands.
What natural materials might be useful?
Crafts on the theme of autumn can be made without natural materials, but with them the work will be much more reminiscent of this time of year. And the collection of such raw materials itself is a separate fascinating ritual. And the smell of natural materials, which immerses you in a special state and brings you closer to nature?
What will be useful? Fallen leaves of yellow, green and red color spectrums, acorns, chestnut fruits, dried (or hard) berries and fruits, birch bark, dried or withered grass and flowers, seeds, tree bark, straw, pine cones, moss, nuts.
The material must be carefully prepared: cleaned of dirt and soil, dried (or brought to a state where the appearance will no longer deteriorate).
What autumn-themed crafts can be like?
DIY crafts on the theme “Autumn” can generally be divided into:
- durable– those that will serve for months and years or will not lose their original appearance for a long time (this includes prints on clothes using leaves, crafts made from hard chestnuts, acorns and seeds);
- temporary– those that are made for temporary exhibitions, kindergartens, schools. Almost always these are autumn crafts with children made from leaves, berries, and plants.

Typically, autumn-themed crafts are joint creativity between an adult and a child. Without children, adults rarely get involved in such things, unless they do it professionally.
Children with their boundless imagination love to create autumn-themed compositions, decorations, accessories and even clothing items. The bright colors of this time of year, plus a truly exciting process, turn joint creativity into a real holiday.
Children's DIY autumn crafts today have such a variety that your eyes run wild. I want to try everything at once. Flowers made of leaves, beads made of rowan, appliques made of seeds, paintings made of straw, candles made of flowers. How to choose? You should pay attention not only to the child’s preferences, but also to his age and his desire to participate in the process. If the baby is extremely independent and wants to do almost everything himself, but is young for years, you need to choose simpler crafts.

Crafts for “Golden Autumn” for the little ones (2-3 years)
Kids can make the following DIY crafts about autumn on their own or with the help of adults:
- applications from leaves and/or seeds;


- liquid candles with preliminary placement of leaves, pine cones, dried flowers and herbs into the container;


- simple coloring pages with an autumn theme;


- beads made of rowan, rose hips, acorns;

- walnut boats with leaf sails;

- little people and animals from fruits, made by attaching eye-caps from acorns, arms and legs-sticks to them (toothpicks are a great help here).


What crafts on the theme “Autumn” can preschoolers make with their own hands?
Older children (4-6 years old) usually already know how to use scissors, so you can safely introduce paper crafts on the theme “Autumn”:
- coloring pages Subsequently, you can not just color the drawing on paper, but try to paint a cutting board or decorative plate.

- simple origami;


Origami maple leaf
- paper applications;


- paper lanterns with curly cutouts in the form of trees and leaves;

- crafts with weaving strips of paper (paper weaving).

As you can see, autumn crafts made from paper can be no less interesting and colorful than those made from natural materials, but it is still necessary to introduce children to the numerous gifts of nature.
Crafts made from natural materials for children 4-6 years old:
- crafts made from pine cones (hedgehogs, goblin, animals, spiders, etc.);


- men and animals made from acorns, chestnuts and matches;


- more complex applications from leaves and seeds. Here you can take leaves of different shapes, different colors and sizes and make a picture that is close to reality. Suitable seeds: pumpkin, sunflower, squash, flax. You can also take hard peas in halves, sesame seeds - in general, the seeds should also be of different shapes, different colors and sizes in order to make the picture more lively and colorful.


What crafts can elementary school children make for the Autumn holiday?
Children of primary school age can be asked to make very complex products (with the participation of adults):
- large compositions from various materials, plasticine. It could be a forest clearing or a house with a vegetable garden, or a swamp with mushrooms and berries, or animals. The limitation is only imagination;


- complex crafts from plasticine, where you need to sculpt a lot of multi-colored parts. If your child likes to sculpt, you can switch to polymer baked or self-hardening modeling clay. Then the product will last for many years;


- flowers made from leaves;

- You can try to start embroidering with your child. Children at this age are quite capable of mastering simple satin stitch techniques or simple patterns for cross stitch;


- simple crafts made from birch bark;


- you can try to make figures and paintings from straw, armed with simple but special knowledge;


- products made of dense fabric (felt works well).


What crafts can adults make for children for the Autumn holiday?
DIY crafts on the theme “Autumn” can be not only the joint creativity of an adult and a child. This can be a pleasant surprise for the baby, carefully made by the parent. Usually these are beads, a flashlight for the children's room, a brooch or bracelet, even a character from your favorite cartoon.
Want to make DIY fall crafts for kids?
Here are some great ideas:
- beads made of berries, chestnuts, acorns, nuts. If you know the technique of threading (otherwise known as beading), you can not just thread materials, but create a real masterpiece;


- brooches, hairpins made of leaves, berries, cones. They can be made from cardboard or cut out from lids for preserves - these are usually found in every home;


- leaf wreaths. Often maple leaves are used for them - they are large and usually have a beautiful color. With skill, wreaths can be supplemented with berries, acorns, and other leaves. What little fashionista wouldn’t want to try on a fiery red maple crown made by her mother’s caring hands?


- bracelets made from gifts of nature (you can use strips cut from preserves or plastic bottles as a basis);

- dresses made of leaves and flowers. Yes, yes, this can be done. There are many master classes on the Internet. The science is not complicated, but it is quite painstaking;


- lanterns for the children's room. From simple paper cylinders with slots in the shape of trees, leaves and animals to complex origami compositions with fine carvings.

- beautiful panels made from natural materials;


- curtains made of cones, acorns, chestnuts;

- lampshades for lamps and chandeliers made from natural materials;

- prints for clothes. Can you imagine how happy a child will be when his worn white T-shirt is given a new life? Now it will be a colorful T-shirt with a chaotic leafy pattern, and no one in the group/class will have a second one like that. This will require special equipment and some knowledge, but in the age of the Internet, getting it is not a problem at all.
Do-it-yourself autumn-themed crafts in Russia have long become something traditional, ritual, and one might say a national feature. This is an opportunity to show your imagination, make something beautiful with your own hands, teach children new skills, have an interesting time, brighten up the autumn melancholy, and decorate the house.

With the advent of social networks at the end of September, photos in maple wreaths, willow skirts, and rowan beads appear in albums. Every year you can see new children's crafts with your own hands and add new ideas for creativity to your piggy bank. Adult craftsmen present knitted, sewn, and woven autumn crafts to the public, using complex techniques of macrame, embroidery, and patchwork. The Internet has not replaced manual labor - on the contrary: it has made ideas and master classes accessible to everyone.
The wonderful autumn season pleases us not only with bright landscapes, but also with numerous gifts. They fall from the trees, and it becomes such a pity that they will just die on earth that you want to give them a second life. How can you do this? There is a huge section of home crafts - autumn crafts from tree leaves. You can make a huge variety of beautiful works with your own hands. From tree leaves you can create panels, appliqués, topiaries, flower bouquets, wreaths and much more.
If you like to engage in creative activities with your child, then you know how boring activities with plasticine, paints, and paper can become over the summer. Then this can be replaced by activities with tree leaves. You must first collect them during a walk. This activity can not only entertain the child, but also teach him new skills. Leaves need to be collected beautiful and whole, and during the collection process you can tell your child the names of trees and interesting information about nature.
Autumn-themed leaf crafts will last much longer if made from dried leaves.

If the leaves are damp, let them air dry a little. You can put them in a spacious box so that the leaves get air. This way you will get rid of possible mold on the leaves.
If it is not important for you that the leaves are smooth and even, then leave them like that in the basket until completely dry.
But if you want even leaves, you can't let them dry out completely. Place them between book pages or sheets of paper/newspaper, but always under pressure.

Thus, the leaves should dry completely for about two weeks.
There is a special herbarium press. It will allow the leaves to dry much faster, and they will be ready for fall crafts in a few days.
But you can also speed up the process by drying with an iron. Turn your iron to the lowest setting and iron a piece of wood sandwiched between two pieces of white paper.

How to make DIY fall crafts from leaves

If you have prepared and dried tree leaves in advance, you can begin to create beautiful and original autumn crafts. They can create a cozy atmosphere in the home or be a suitable piece for display in a school or garden.
If you don’t have enough imagination and imagination to create crafts from leaves, then you can use a selection of works and master classes.
Evaluate your child’s age and skills before you start creating your own autumn crafts from tree leaves.
Related materials for working with leaves:
Colored cardboard and paper. Cardboard usually acts as a background and basis for work. If you glue leaves onto paper, it may bend and curl due to the weight of the leaves, so it is better to use cardboard. You will need colored paper for additional decoration (to make eyes or other parts of the animal’s body).
How to glue leaves: this can be done with regular PVA glue (it glues dry leaves well), but hot glue is also perfect.
DIY autumn crafts from leaves
The simplest crafts made from leaves are appliqués. For them, you can use leaves of different sizes, colors and shapes. The themes of the applications may also differ. These can be pictures of animals, landscapes and human figures.
Owl made from tree leaves

We will need:
- Dark leaves (oak, willow, birch)
- Colored paper
- Cardboard
- Branch of any tree
Draw an owl on a piece of cardboard.
Let's cut it out.
You can use willow leaves for feathers. Glue them in rows onto the owl cut out.
To make the ears and paws of owls, take oak or birch leaves.
Cut out eyes and beak from colored paper. Glue them onto the owl's head.
Glue the owl onto a tree branch as if it were sitting on it.
You can decorate your autumn leaf craft with a sprig of fish or thuja.

Leaves panel
You can decorate your house with an applique of leaves, making it not on paper, but on panel material.

We will use hot glue for this project, but young children can be involved in this work at the stage of collecting leaves. Choose the most beautiful and even leaves for the craft. Dry them first.
We will need:
- Wooden board (plywood, chipboard)
- Leaves
- Twig
- stain
- Brush
- Marker
1.Prepare a sheet of wood by first sanding it and painting it with stain.
The stain dries quite quickly, so you won’t have to wait long.
2.Draw a maple leaf with a marker.
3. Glue the leaves onto the board using the fan method. To make the panel three-dimensional, do not glue the leaves completely. Then the edges will be free and a volume effect will be created.

4.After gluing, place a heavy book or other object on each leaf as a press.

To make your picture clearer, you can trim the leaves a little along the edges of the picture, creating a clear outline.

There can be quite a few types of panels. You can attach leaves and twigs to a wide wooden frame.

A cute fairy can be made from colorful leaves and cardboard.

Crown of tree leaves
For a little princess or an autumn photo shoot, you can make a simple but interesting attribute.

Necessary materials:
- Colored leaves
- Thin branches
- Tape
- Pliers
- Wire

Cuts a wire whose length is equal to the volume of the head + a margin of a few cm for connection. The resulting hoop should sit easily on your head.

Using tape, attach the leaves to the resulting wire hoop

You can alternate leaves with twigs or flowers

Maple leaf wreath
Beautiful large maple leaves can make a gorgeous wreath

The base for the wreath can be made from wire or willow twigs.

Attach the leaves to the base in a circle, twisting the leaf stalk on it.

Leaves should be attached along the entire diameter of the wreath base

This wreath can be worn on your head or hung as a decoration on your door.
You can add other elements to the leaves, such as acorns and flowers

Volumetric crafts from leaves
Autumn leaves that have fallen from trees can be used for more than just appliques. You can make chic bouquets, lamps, compositions on the Golden Autumn theme.
But in order to make voluminous crafts, the leaves must be subjected to special processing, and upon completion the product must be varnished.

When creating home decor, you want the craft to last as long as possible. You can extend the shelf life of autumn crafts made from tree leaves using a special floral spray or acrylic varnish. This method will keep the leaves fresh and beautiful for a long time.
Crafts from maple leaves: mask

We will need:
- Maple leaves of different sizes
- Cardboard
- Thread
- Scissors
1. Make a mask template on cardboard and cut it out
2. Make holes for the eyes

3. We insert an elastic band on the sides to put on the mask
4. Using glue, glue the leaves to the mask.
5. Trim any excess leaves inside the mask so they don't interfere with your eyes.

What gorgeous masks you can make from leaves with your own hands.


If you have beautiful leaves, you can make unusual candlesticks from wax paper.

Instead of paper, you can use a simple glass jar, decorating it with beautiful leaves.

Leaf pendants and garlands:
In order to keep this craft fresh for a long time, take the leaves and cover them with transparent varnish. Next, you should dip them into melted paraffin. Gather them in a bun or hang them on a string. In any case, they can be preserved for a long time and decorate your home.


Autumn crafts from maple leaves
Maple leaves are considered the most beautiful gifts of golden autumn: yellow, red, burgundy and orange. A carpet of maple leaves can be seen in every park in the fall, and by choosing the most beautiful leaves, we get chic crafts on the theme of golden autumn.
Rose from maple leaves: DIY craft

Roses made from autumn leaves remain very popular. For those who love flowers, this craft will be especially relevant. You can create a whole bouquet of roses or make a beautiful composition in a basket.

How to make a rose from maple leaves

1. Fold the top end of the maple leaf
2. Roll it, tucking the top edge to make the flower more voluminous
.
Don't forget to hold the bud down so it doesn't fall apart.
3. To make a large rose, you will need more than one maple leaf. Choose leaves of different sizes and start with the smallest ones.
4. The edge of each leaf can be secured with a stapler or wrapped with thread.
To make a rose from maple leaves, it is better to choose fresh material that has not dried out. Having collected the resulting flowers into a bouquet, spray it with hairspray.
DIY maple leaf plate

Maple leaves are ideal for many crafts due to their size and shape. Making a plate out of leaves is quite simple, but such an unusual decor will take its place in your home or be sent as a gift to your friends.
Necessary materials:
- Leaves
- Brush
- Balloon
- A bowl
- Scissors

1. Prepare the leaves by cutting a stem from them.
2. Inflate the balloon to the required size and place it in a bowl.
3.Spread a thin layer of glue on it.

Place a leaf on top of the glue and spread it with glue. It should soften a little and stick to the ball.

We place the next sheet so that it partially covers the previous one, and apply glue in the same way.
Thus, we cover half of the ball with leaves.

Gently pop the ball to remove the resulting plate
You can decorate your front door in an original way by hanging a wreath of maple leaves on it. It is done simply by analogy with other wreaths

Glue beautiful maple leaves onto the base, complementing them with acorns, chestnuts and everything you find under your feet on an autumn walk.

Children's crafts from maple leaves
Children are especially interested in making crafts from leaves on the theme of autumn with their own hands.
Maple leaf snail

We will need:
- maple leaves
- Scissors
- Plasticine
- Scotch
- Eyes

- To make the base - the body of the snail, take red plasticine and mold it into a sausage, so that one end is slightly thicker than the other.
- Make a cut at the thicker end and shape the halves resulting from the cut so that they look like the antennae of a snail.
- The body must be bent
- To use maple leaves for a snail's house, cut the cuttings with them
- Fold the sheet to make a strip
- Roll the strip starting from the narrow part
- To make the house more voluminous, twist several leaves in this way.
- Attach the house to the plasticine body
- Attach plastic eyes and define a mouth

Turkey made from leaves: DIY children's craft

We will need:
- Cardboard
- Stapler
- Scissors
- Leaves
- Eyes

You need to cut out about 5-6 circles of different diameters from cardboard
Remove stems from the leaves except two leaves. We'll need them for turkey legs.
Attach each leaf to a cardboard circle
Stack the circles on top of each other using glue or a stapler
Glue a brown sheet to the back of the largest circle.
A triangle is cut out of a leaf to make a beak.
It must be glued to the center of the first sheet.
Attach eyes to your turkey.
Using colored paper and leaves you can make a cheerful family of owls.

Flowers from autumn leaves: beautiful DIY crafts
Flowers in any form are considered the most beautiful decoration of the home interior. Therefore, it is not surprising that they are made from all kinds of materials and autumn leaves are no exception.

Previously, we looked at how to make roses from maple leaves. They are most suitable for creating beautiful and lush bouquets. To keep the leaves in shape for a long time and not spoil, you can treat them with glycerin:
- Dilute 300 ml of glycerin in water (about 600 ml).
- Pour this liquid into the bag.
- Carefully place the leaves in the bag.
- The bag must be sealed and left for several days (about 3-5 days) in a dark place.
- Then take out the leaves and let them dry.
How to make flowers from leaves: step-by-step description
We will need:
- Red and yellow leaves
- Twigs
- Scotch tape or green tape
- Scissors
- Threads

Prepare the leaves first.
We begin to collect the flower from the core. To do this, take a leaf and bend it in half, face outward.
Roll the leaf into a loose roll.
In the second sheet, wrap the protruding upper part.

Wrap the leaf around the core of the flower, twisting it. Don't forget to pinch your future flower at the base.

Do the same with other leaves, twisting them onto the bud one by one.

Continue until the flower has a nice shape.

Insert the twig into the base of the flower and begin wrapping the tape.


Autumn crafts from leaves for kindergarten
The simplest crafts for kindergarten are applications. After all, it is easiest for children to cope with this process under the guidance of their parents. You can use ready-made templates.
Leaf craft templates

Lion made of autumn leaves


Turkey made from leaves


Or you can do interesting work that the baby will like.

We will need:
- White cardboard
- Dry leaves
- Black or brown paint
- Pencil
- PVA glue
1. The leaves must be crushed. Entrust this process to your baby.
2. On a white sheet of paper you need to draw a tree trunk. Here you can help your child
3. Help him paint the trunk with paints
4. When the paint is dry, you can proceed to the next step.
5. Apply glue to part of the trunk and branch
6. Sprinkle crushed leaves onto the glue.
Children love making animals, and they will love the idea of making a hedgehog applique from leaves.

And if you have collected brightly colored leaves and flower petals, then thanks to a printed template or a hand-drawn one, you can create beautiful pictures.

Beautiful DIY crafts from leaves
Autumn girl: craft from leaves
Girls from an early age love to dress their dolls. Why not create an outfit for Barbie made from leaves. The result will be an original autumn craft.

Choose for her the most beautiful leaves collected during your walk.

We will need:
- Doll
- Leaves
- Cardboard

1. Dry the leaves with an iron using paper
2. Make a cone out of cardboard that will act as a skirt.


3. Attach the cone to the doll by cutting off the top
4. PVA must be diluted with water 1:1
5. Glue the leaves onto the cone with diluted glue, starting from the bottom.


6. Don't forget about a hat for a fashionista

7. The bottom of the dress can be decorated with rose petals

In a similar way, you can make an applique by first drawing a girl on cardboard, but make the outfit from leaves

Crafts from leaves for school: 2nd grade
What can be offered to children in the second grade for creative development? Of course, we can’t do without applications and crafts made from natural materials. After all, at this age it is important to introduce the child to the world around him and teach him to work with different tools and materials.
It is exciting for schoolchildren of this age to create silhouettes of animals they know.
Moose made of leaves

We will need:
- Leaves
- Maple seeds
- Brush
- PVA glue
- Sheet of white cardboard
- Black felt-tip pen or marker
- Scissors
Place the elk's body on a piece of cardboard. To do this, you will need two leaves: one large with a tail and the second smaller, round.
We will need maple seeds for our feet. Separate them and glue them in the right place to the body.
Using a felt-tip pen, draw the eyes, and the nose will be created from a dark-colored leaf.

Oak leaves and maple seeds are useful to make beautiful antlers.

You can complement the picture with a small tree

Like this moose, you can make many other paintings from leaves depicting animals, birds and insects.
Owl made of leaves

Hedgehog made from leaves

Leaf Butterfly

Leaf fish

Lion made of leaves

Crafts from leaves for 3rd grade
In autumn it is impossible to remain indifferent to the beauty of nature and it is very important to teach children to rejoice and enjoy what it gives us.
Therefore, the topic of autumn crafts for elementary school has been relevant for many years and is unlikely to lose its popularity for many years to come.
There are many options for fall-themed crafts for school.
Applications that look like real paintings


You can get creative with your child and create a beautiful house from leaves and other natural materials, using a cardboard frame as a basis.

By combining a child’s ability to draw and appliqué, real masterpieces can be created.

Corn Leaf Crafts
Another topic of interest for creativity was not covered in the article. Crafts made from corn leaves can be very beautiful and original.
Corn leaf flower
We cut out about 20 leaves from the pointed-shaped talash, and also prepare the substrate. We also need a strip of about 5 cm.

The strip must be folded and glued to the center of the backing. Now you need to attach the cut out petals in a circle. Let's start with the smallest ones

This flower can be used to decorate a gift or create a bouquet of leaves.
Crafts from rowan leaves
Rowan berries are often used in school work to make your work brighter and more beautiful. But you can also use rowan leaves to create autumn-themed crafts.

The golden age inspired poets and artists! She is also ready to help us build crafts for the kindergarten on the theme of autumn. I'm ready to offer you some ideas!
I will try to talk about some of the ideas in as much detail as possible, show photos and describe the manufacturing steps. If you liked these works, write and tell us what happened to you.
Paintings on the theme of golden autumn
Let's put down the brushes and paints. Bright colors and shapes will be given to us by green, red, yellow unusual leaves and seasonal flowers.
Application
In this applique drawing, everything is made using this natural material. 
You and your baby can come up with any pattern from different herbs and petals yourself!


Arts and crafts
And again the leaves will help us “draw” the trees. To do this, you need to apply a layer of paint to simple leaves. And then touch the paper with the side where the paint is. And the picture is ready! Before us is a real autumn forest.

A few strokes along the bottom, and we get fallen leaves.
The Golden Cockerel
Now we will also use scissors to cut out the desired shape from a material such as leaves.

The picture shows the step-by-step construction of the figurine:
- Glue small leaves. One is the body of the cockerel, it should be oval shaped. The second one is round, this is the neck.
- Attach the “tail”. It is worth choosing corrugated material for this. If this is not the case, you can cut out the desired shape.
- The beak and beard are glued under the head.
- The comb is also glued to the head. To make the picture look attractive, you should first make a sketch of what is where.
- The head is applied.
- All that remains is to make the eyes, cut out and attach the legs of the cockerel.
Such children's pictures can be inserted into a frame to make the craft look complete
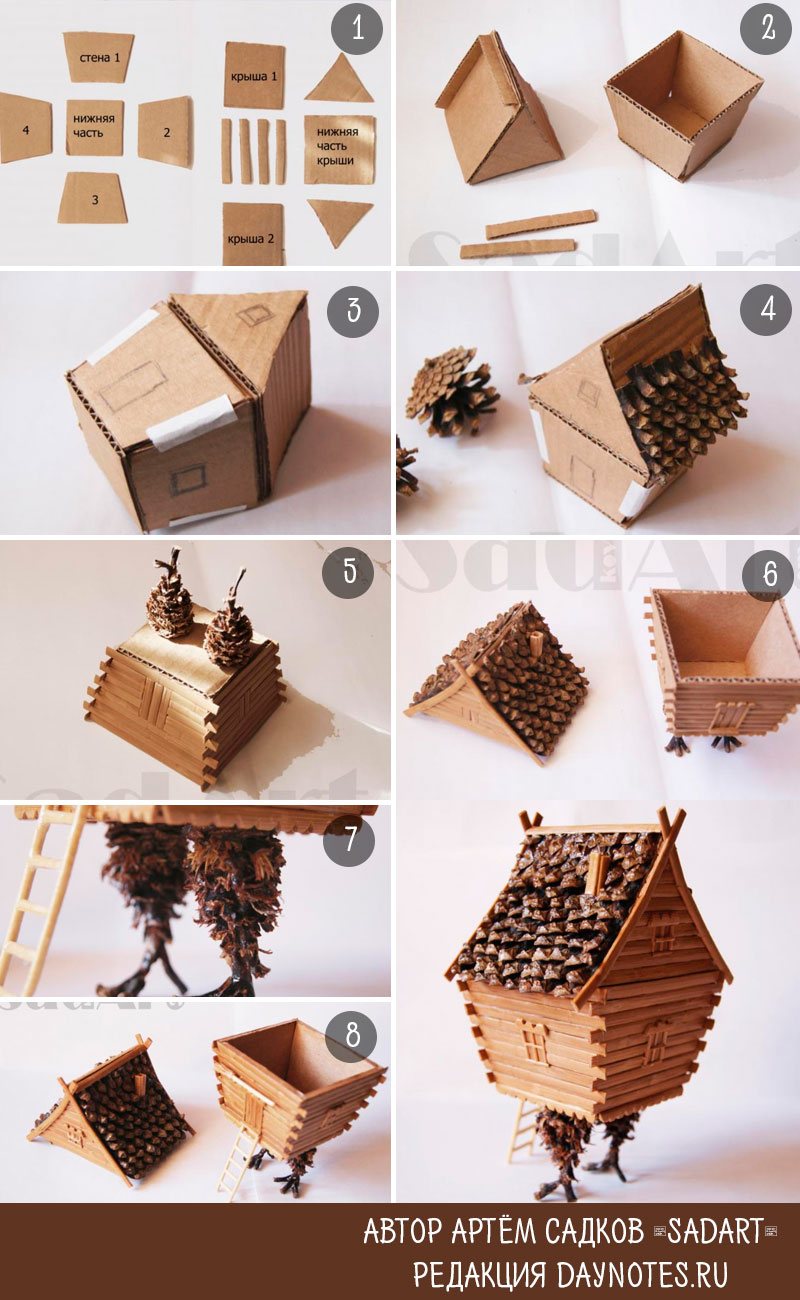
Miniatures
Miniature houses or even entire compositions made of natural materials, plasticine, and beads look incredibly beautiful. The basis for such houses is usually cardboard for clear geometric shapes.


For rounded, uneven volumetric figures, use foil and/or papier-mâché. 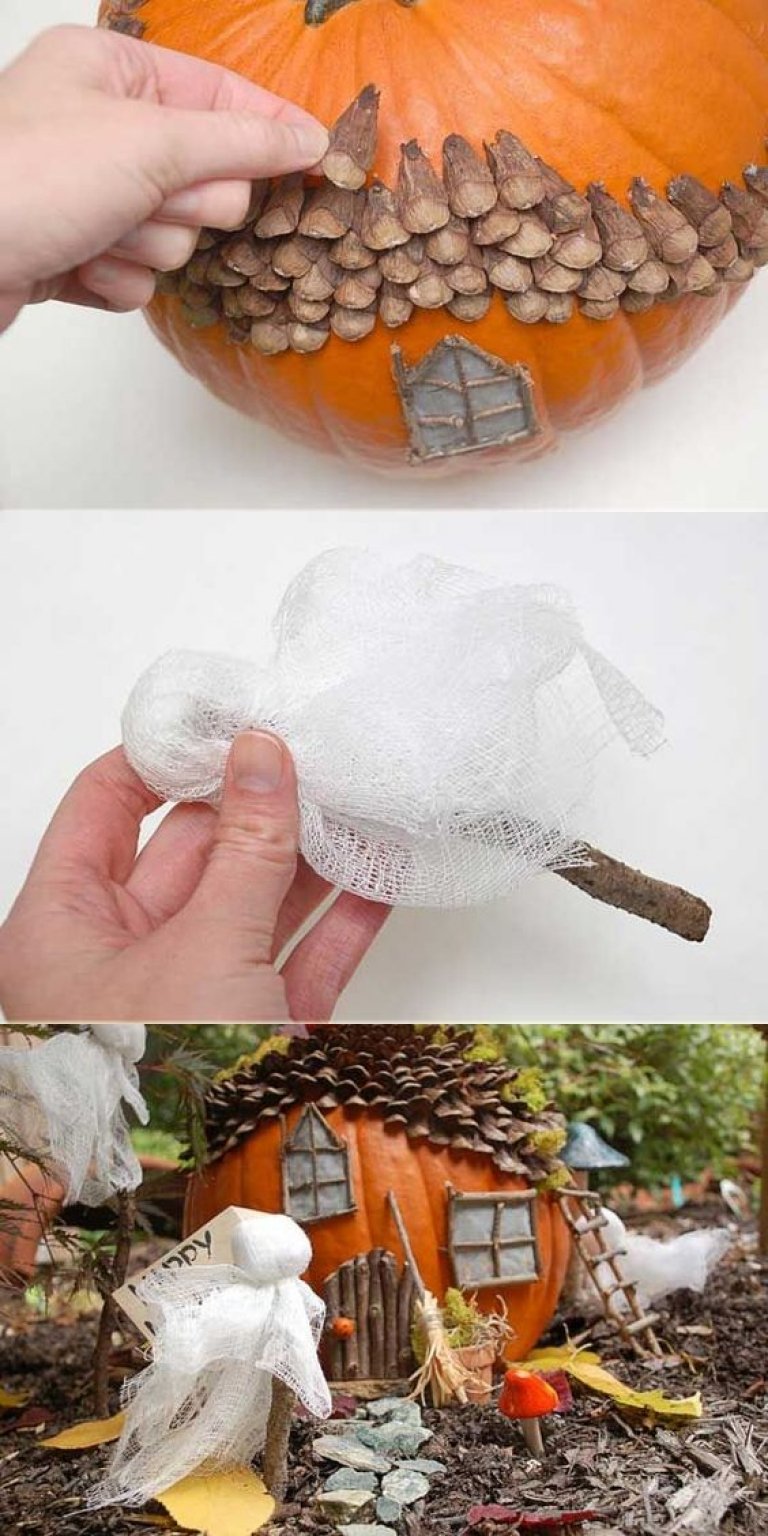
In this case, for the hut on chicken legs, the author uses cardboard and a pine cone. The cones make excellent tiles!
Compositions from the gifts of autumn
Let's start simple again. Our goal is only to help the child so that he himself can work as hard as possible on the product.
floating cup

It looks interesting and unusual. It's easy and quick to do. You just need to stock up on suitable decor. With such a craft you will surprise everyone: children, teachers, and parents. And it’s very easy to do. We fix the cup in the desired position on a wire or a regular fork using hot glue. A fork or wire can be decorated with papier-mâché and painted, or simply completely covered with sisal, fruits (can be bought on the Internet or made from airy plasticine, clay), nuts, cones, chestnuts, leaves, and other autumn decor. The main thing is that at the end the support on which the cup rests is not visible.
Pumpkin vase

All you need is to cut off the top of the pumpkin and take out the middle. And insert the jar inside the fruit. The result is a decorative design that can serve for a long time.
By the way! If you remove all the tender flesh from the pumpkin, you can use it for delicious porridge or make a healthy drink or bake a cupcake. The remaining peel is dense and can be stored for a long time. Such a vase can withstand the whole winter. But if you want it to last even longer, treat it inside and outside with paint. The external design of the pumpkin can be of different colors and you can even draw a small plot.
Of course, you can make not only a vase from a pumpkin, but you can also make other interesting things: a candlestick and even an organizer for pencils and pens.
Wreath on the theme of crimson autumn
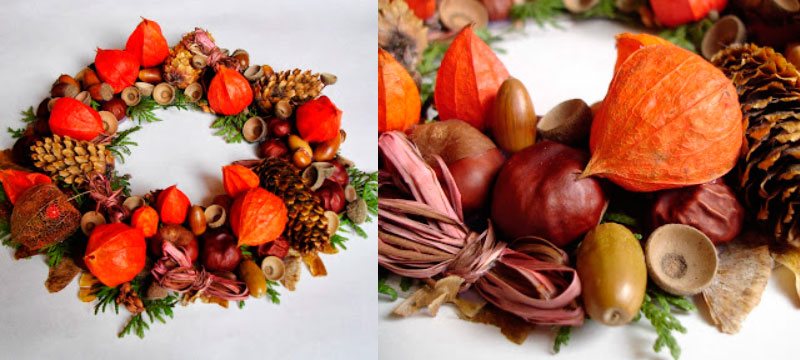
Autumn gives us colorful colors, juicy beautiful fruits and unusual flowers. All this can be included in your wreath variation.
A few words about the design of the wreath:
- The base can be made of thin branches of willow or birch.
- It's worth making a small loop of decorative ribbon to hang the wreath.
- On top of the base are attached:
- beautiful physalis flowers;
- Christmas tree cones;
- acorns;
- thuja twigs.
Of course, this design can be supplemented with what you currently have on hand. Kids can actively participate in the process.
Funny autumn animals
Hedgehog
Snorts when angry Covered with thorns From head to toe This animal (Hedgehog)
It's very easy to do:

Squirrel
I walk around in a fluffy fur coat, I live in a dense forest. In a hollow on an old oak tree I gnaw nuts. (Squirrel)
The kid himself can make such a squirrel.
- 2 cones;
- 2 acorns (smaller and larger);
- Plasticine.
Making:
- We attach 2 cones to the stand using plasticine, with their wide sides facing each other. One is straight vertical (body). The second (tail) is at an angle of 45° to the first.
- We glue a larger acorn to the body (the head).
- We decorate the head with eyes, nose, ears with tassels.
- We make plasticine paws.
- We “put” an acorn into the front paws.
Chestnut freaks
Wonderful animals and monsters made from chestnuts may interest a child, so take note of a couple of ideas.
Pictures enlarge by clicking.


Shell toys
Such toys can also be prepared to decorate a Christmas tree. Moss is sold in craft stores. Mushrooms and baby foxes can be easily made from. When the figures dry, glue them with instant glue.

Owl
A wonderful owl comes from a pine cone. Wings and eyes can be made from felt or foamiran.
It’s dark in the forest, everyone has been sleeping for a long time. One bird does not sleep: it sits on a branch and guards the mice. (Owl)

Fox
They say she is cunning, she takes the chicken out of the yard. But she’s a beauty - all the guys like her! (FOX) In the same way you can make a beautiful fox. Author of the master class 
Candlesticks
I personally associate autumn with quiet, calm, cool evenings. And on such evenings it’s nice to look at a candle and dream about something. Candlesticks in a sweater look incredibly warm and cozy.
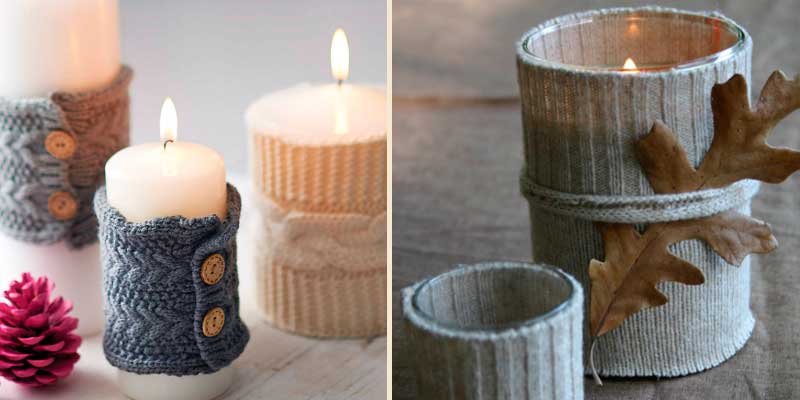
Take an old sweater, cut off the sleeve and put a jar, vase or glass into it. Fix the cover from the bottom with glue or sew it with thread.
If you have your own ideas, write! And don't forget to look here to see how subscribers respond to your offer. By the way, subscribe yourself! Then don't miss anything interesting that I have on my site!
We also recommend
 Presentation "Insurance pensions in the Russian Federation" - project, report
 How to deal with one and two?
 Autumn crafts made from natural materials: quickly and beautifully
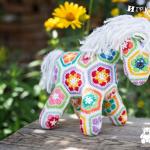 How to crochet a beautiful horse
 Details about knitting jacquard patterns using knitting needles according to patterns How to knit jacquard without broaches
 When is the best time to bathe an infant?