Children's crafts for home. For everyone and about everything
Crafts with two year old child- This is not only a way to occupy a restless toddler for a while, but also an excellent option for educational pastime with parents. Crafts with children at 2 years old help develop fine motor skills, creativity, and also strengthen friendly relations little ones with adults.
We offer you three options for crafts for 2-year-old children, each of which is extremely simple and does not require you or a little genius creativity.
Chickens made of plasticine
A 2-year-old child can handle this kind of craft on his own.
To create chickens you will need:
- plasticine;
- colored feathers;
- Googly eyes.
Progress

Applications “Preparations for the winter”
To create applications you will need:
- paper (cardboard) for background;
- colored paper for applications;
- glue;
- scissors.
Progress

Finger drawings
- This is not only a favorite activity for all kids, but also an excellent option for educational activities. The most important thing is to choose the right paint. It must be environmentally friendly and safe for the baby, because the baby’s skin will be in direct contact with the coloring composition. There are ready-made paints for kids on the market, but you can make your own by making a paste of starch, salt and sugar and coloring it with safe food coloring. If you add a little glycerin to the finished paint, its shine will noticeably increase.
Before you start drawing, prepare workplace, dress the baby so that he does not ruin his clothes (you can use an apron for this). There should also be a container of water nearby (for rinsing your hands when changing paint colors) and a towel. Drawings can be both abstract and narrative. The choice is yours. In the gallery you can see examples of finger drawings.
 |
 |
 |


- a great way to fill walks on the street with delight and emotions. This summer craft is easier to make than it seems. And how much joy there will be!

Most likely, after your vacation at sea you brought with you a lot of “treasures”: shells and sea pebbles. But don’t rush to throw away this treasure, but turn it into children’s toys. - this is a great workout fine motor skills and fantasies of the child. Color, play and even use in your interior.

A glass of lemonade is a great summer craft for kids in kindergarten or summer camp. For children of different ages You can offer applications of varying complexity.


What would summer be without insects? Invite your children to make crafts from paper or plasticine about the life of insects. Invite them to fantasize about what ants drag into the anthill, cut out ladybugs, glue colorful wings to butterflies, leave prints of plastic caterpillars and beetles on plasticine.


Children look forward to summer for the sake of ice cream. A simple craft on the theme “Summer” made from colored paper will make the child happy for the rest of the day, at least.

Strawberries, cherries, watermelons and other berries, vegetables and fruits that summer is so rich in can also become ideas for summer crafts. They can be made from paper and cardboard, buttons or plasticine.


These paper plate summer ones are also unique because you can play with them. Both the octopus and the boat are individual crafts glued to wooden sticks that are threaded through a horizontal slot in a paper plate.

Another idea what can be made from plasticine on marine theme- a jar with plasticine sea inhabitants: fish, jellyfish, sea stars, shells, pebbles and algae.

Now you have 17 wonderful ideas for crafts and applications on the theme “Summer” that children can easily make with their own hands at home, in kindergarten or summer camp and have a lot of fun. We hope you will find something interesting to do with your child to extend his summer a little more. If you have more ideas for summer crafts, share them on our forum.
Header photo source: www.thehousethatlarsbuilt.com
Origami. Crafts from waste materials.
Craft Sheep
Materials and tools
■Paper cup Wat
■ 2 cotton buds
■ Finger paints
■ Volumetric paints or felt-tip pens
■ Black gouache
■ White paper with a sticky backing or plain paper
■ Scissors
■ PVA glue
1. Cut the cotton swabs in half and let the child dip the ends in black gouache. These will be the hooves of a sheep. Lay the sticks out to dry.
2. If the paper cup has a pattern on the outer surface, you can cover it with white paper with a sticky base or just plain paper.
3. Let the baby tear off small pieces of cotton wool and roll them into balls. Show him how to do it.
4. Spread outer half cup with glue, invite the child to place the prepared balls on the adhesive surface, pressing lightly (see figure).
.jpg)
5. Ask your child to draw a sheep’s face using 3D paints or felt-tip pens.
6. Make small holes in the cup in the place where the sheep's legs are and insert the chopsticks. If they don't hold very well, you can secure them with a small piece of plasticine.
What to talk about about the child
Show your child woolen knitted items. Tell us that wool is sheared from sheep, washed, carded and spun into threads. In the old days, threads were twisted by hand using a spindle. This process is called "spinning". In the old days, most women knew how to spin. Remember the fairy tale about how the princess pricked her finger with a spindle and the whole kingdom fell asleep. Threads can be dyed in different colors to create colored clothing. From wool threads they knit things or weave fabric, from which they then sew, for example, suits. Carpets are also woven from such threads.
➙ Try saying the tongue twister:
A weaver weaves fabric for Tanya's dress.
➙ Ask your child to remember what sounds sheep make. We call the babies lambs, their mother a sheep, and their father a ram. Rams usually have horns. In summer, sheep eat grass and in winter, hay. Sheep are domestic animals. If you have already told your child why animals are called “pets,” then ask him to remember this.
➙ Come up with a name for your lamb or ewe.
The sheep may be like this
.jpg)
Fish applique
Materials and tools
■ Cardboard
■ A plate the size of a piece of cardboard
■ Colored paper or ready-made plastic eye
■ Glue with glitter, cereal, confetti (for decorating the fish)
■ Ruler
■ Scissors
■ Pencil
.jpg)
Step-by-step work process
1. To cut out a circle, turn the plate over onto a piece of cardboard and ask your child to trace its outline.
2. Mark one sector of the resulting circle, which is approximately 1/6 of the circle.
3. Hold the ruler and let the child trace the segments with a pencil. Cut out the resulting sector (see figure).

4. Let the child glue this sector as the tail of the fish, and also draw or glue an eye.
5. The child can color or decorate the fish at his own discretion. For example, you can smear the fish with glue and cover it with confetti or cereal. Or glue paper circles like scales. You can make scales from pieces of plasticine.
What to talk about with your child
➙ Tell us what a circle is and what a sector is. Some objects (in our case, a plate) are shaped like a circle. What other objects are shaped like a circle? Where can we easily find the sector? Remember, have you ever cut a pie, cake or cheese into sectors?
➙ Talk about where fish live (rivers, lakes, seas). Some fish are predators; they open their mouths wide to swallow prey. The body of the fish is covered with scales, they protect it and allow it to swim easily. Pisces are the most different forms and colors.
➙ Give the fish a name.

Greetings, dear parents!
If your baby is one year old or already one and a half, or maybe already two, then it’s time to get your little one interested creative works. First crafts with 2-year-old children, what could be more touching and exciting?
We will introduce the children to new materials, such as colored paper, cardboard and of course glue.
But many parents are interested in the question: at what age should one start creating?
There is no definite answer here, since each baby is unique and can begin to engage in creativity even at 1.5 years old. Another kid won’t even want to at two.
In any case, over the age of one year, the task of parents is to offer their child this type of activity and not expect great results from him.
Someone says that their child sat down the first time and was interested, but another needs to be taught in small steps every day so that he can at least stay in the chair.
In any case, do not force the child, but interest him, otherwise you will discourage him from engaging in this type of creativity at all.
I suggest simple types crafts with templates that you can play with your little one.
1 point:
Of course, in order to fully engage with the child, the mother needs to prepare materials for classes in advance. Why in advance?
If you sit your baby next to you and cut out pictures that need to be glued, then your baby will either disturb you, or will drag and tear everything from your hands, or will leave the workplace altogether.
You know that children at such a young age cannot stay at the table for a long time, they need to run, run!
And if you have everything prepared in advance: they sat the child down and started playing with him, we take out the ready-made paraphernalia and tell us what should be and where. This course of events would be more suitable for the baby.
Although, if your baby can sit quietly next to you and watch you cut something out, then of course so be it. In general, look at your child.
2nd point:
Then you can complicate the task: you need to place the elements only where they should be:
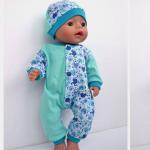
We need to dress Masha. Mom cuts out clothes for Mashenka: a hat, overalls, mittens and boots separately. The baby must glue everything. 
From torn scraps of colored paper
Here the mother does not need to prepare elements for work; it is recommended to tear up the pieces of paper together with the child.
After I cut out various shapes from colored paper, I don’t throw away the scraps. They can also be glued to the applique.
Like these ones:
From torn pieces of colored paper we make the following craft plan:
Little house. Here we use pre-prepared rectangles.
Pyramid. Here we studied geometric figures, pronounced the name and colors. 
Crafts made from paper and plasticine
Here we have a background and complement it with plasticine elements. To make the plasticine softer, you can leave it in the sun in the summer and on a radiator in the winter, but not for long!
Fairytale house. The house is cut out of cardboard and a window is made with a razor. Everything else is decorated with plasticine balls. Teach your child to flatten them. 
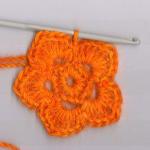
Sunflower

The youngest visitors to the site or their parents will certainly be interested in the numerous children's products that are presented on the site. The manufacturing process of some of them is described in this article. Agree that there is nothing more expensive than making a craft with your child that is original and funny.
Make it fun hedgehog made from seeds and plasticine maybe even a preschooler. You will need a small piece of brown plasticine and a handful of unhulled seeds. Roll (or entrust this to your child) a sausage from plasticine, stretch one side of it and sharpen it - this will be the face of the future craft. Place a black ball made of the same material on the hedgehog’s nose, and make the eyes from dark pieces of plasticine. Now you should fasten the seeds - needles - one thing at a time on the back of the hedgehog. This craft will surely delight your baby.
Since you have plasticine in dark shades for the last craft, then, for sure, there is a more cheerful palette of colors. Original postcard made with your own hands will be a great gift for any holiday. For example, a baby can give such a craft to his beloved mother. First you need to put a drawing on a sheet of paper, which will be laid out from plasticine. Then you need to sculpt parts of the composition from plasticine, observing the required dimensions previously applied to the paper. Now you should color the title page of the card with pencils or felt-tip pens and write a congratulation. The plasticine elements of the design are glued into place, and the excess parts are cut off with a knife. (Naturally, all dangerous work with sharp tools is performed by adults). I am sure that any mother will be happy with such a gift.
Make it funny snowman using cotton wool and fabric ribbon you can even for a short time when you and your child are not busy. Take Blank sheet paper and draw a snowman on it. You can completely entrust this to your baby or help her do it. Now you need to apply PVA glue to the snowman figure, to which you need to glue pieces of cotton wool. Make the eyes and nose of the craft from buttons, and draw the mouth with a felt-tip pen. The final touch to the work will be a glued bow made of fabric ribbon, which will give festive look this original craft made with your own hands.
Several colored feathers a plastic cup, eyes from an old toy, a piece of cardboard - do you think this is trash? No. This is another basic craft for kids that you can easily make with your own hands. Using glue, attach the eyes, nose and feathers to the cup. That's all. The funny man (or someone else) is ready. In the same way, you can gather several friends for him - after all, the material for such a craft is not so difficult to find.
The above crafts were not particularly difficult to make, since every child should be able to make them independently (or with minimal help from adults). The development of creative abilities in children is a very important process that will certainly affect their future. Every child must have a rich imagination in order to assemble an original and unique toy even from ordinary materials.