DIY Easter bunny (hare). Detailed master classes with diagrams and patterns
Kulich for Easter), and the Orthodox rabbit is considered the symbol and hero of the holiday in Western countries.
According to ancient legends, this wonderful animal collects and hides chocolate eggs different colors in their shelter and as soon as the children wake up in Sunday morning, they go to look for the animal’s hole where delicious sweets can lie. But they do not go to everyone, but only to those children who behaved and studied well during the year. In another legend, they were looking for a home and the one of the children who finds eggs in it will be happy and lucky all year.
In our country, there is such an interesting custom. You probably remember when you were still little, your parents would bring some delicious food, and you asked where they got it? Adults say that the bunny brought a gift and you run around the house and rejoice, not knowing how he was able to do it.
So in Russia, too, they know everything about the Easter Bunny, and on this holiday in kindergartens, and in primary school prepare crafts for this delicate animal with your own hands. So I would like to tell you how to make it from different materials and it will not only be a souvenir for Easter, but also a good gift for children.
Making an animal out of paper will not be difficult at all. This will be especially fun for your children.

We will need:
- Pencil;
- Scissors;
- Ruler;
- Paper.
1. To begin, we need to cut out a square of colored paper equal in length and width.
2. Fold this sheet in half.
By the way, all the lines that you bend must be clear and even; our rabbit needs to be folded along them.


4. Unfold the paper, you should get separated lines from the fold. And we begin to bend one section, then another. The photo shows how to do this.

5. Take the middle with your fingers and bend it towards the first section. Now we connect the bottom side with the top.

6. We unfold it again and we should have exactly 8 sections.

7. Fold one side and the other diagonally. See what should happen in the end.

8. We count 3 sections and bend them.

9. Take the lower right corner with your fingers and bend it slightly in the middle.

In this way, we bend it to the end so that the middle of the triangle just barely reaches the corner bend.

10. Turn the hare over to the other side and perform the same operation.

11. All the ears are done, let's move on to the back. We make a corner along the second line from the bottom, first in one direction, then in the other, to make it easier to work inside the hare.

12. Unbend the back part and bring the triangles inward.

13. We wrap the back along the lines that we have.

14. And now we bend the rabbit’s body in the middle, and in the head part we press it to the ears

15. We do the same with the second side.


17. And we begin to form the ears, and to do this we should have 2 folds on each side. How to make them, look at the picture.

18. Now from the nose to the ears, we also bend it a little.

19. We bend all the corners from the bottom of the rabbit inward, just not much, just a little, so that the animal can stand.
20. Then we open the bottom and our wonderful animal is ready.

21. The ears can be painted in a redder color, and the eyes can be painted on, but this is at your discretion.
22. You can easily put an Easter egg in it.
By the way, if you are doing it for the first time, then first practice on an unnecessary sheet of paper, otherwise you might not succeed the first time.
DIY Easter bunny made of fabric
I want to show how easy it is to make this wonderful souvenir, and in the easiest way. With this option, you can sew not only an Easter hare, but also any other toy that you like. Let this cute creature delight your children on this wonderful holiday.

We will need:
- Textile;
- Holofiber balls;
- Thread;
- Needle;
- Beads;
- Satin ribbon 2 pcs;
- Paper cord;
- Block;
- Sisal 2 colors.
1. First, you need to draw the thief on cardboard and carefully cut it out.
2. Take the fabric and fold it in half with the right side facing inward.
3. Place the cut out part on a rag and outline it.

4. Where the hind leg is located in the drawing, we make 2 notches with a pen or pencil, so that this place cannot be stitched.
5. We begin stitching along the contour lines that we drew. The width of the screed is approximately 2.5 mm.

6. We begin to cut out the rabbit, retreating approximately 5 mm from the seam.
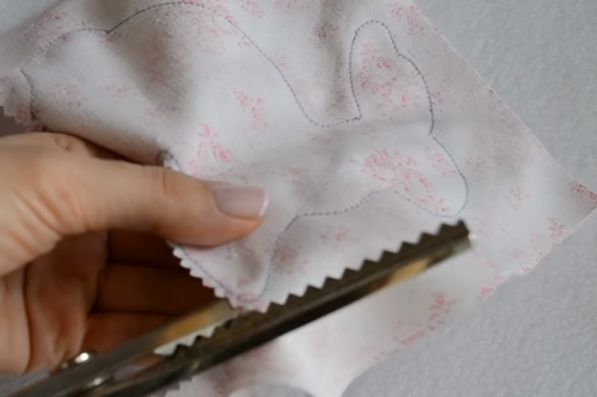
When you cut out the bunny, do not forget to make 3 notches with scissors, on all rounded areas (under the paws, on their tips, on the ears, near the tail, and so on). We make them not reaching the seam 1 mm. so that when turning the part inside out, the seam does not unravel.

8. To prevent it from being wrinkled, it is advisable to iron the bunny.
9. We also stuff the halofiber using a stick. We start pushing from the ears and the most important thing is that there are no empty spaces.

11. We make the eyes, and for them we will need beads and black thread. We sew them on through.

12. We begin to decorate the toy. We make a bow from a satin ribbon and secure it with thread.

13. Sew it to the rabbit’s neck, and do the same with the rest of the ribbons.

14. You can also glue a flower and beads on top.

15. Well, the bunny is ready, if you want you can make a stand for it.
16. Glue the sisal onto the block, and on top of the hare.

Felt rabbit for Easter 2019
It makes a very interesting souvenir, and children especially like it. Imagine if a child helps you make it. I’ll say right away, be patient, because he will be willing to help. But it’s worth it, because this fluffy animal will not only decorate the holiday table, but will also cause great delight in your children.
We will need:
- Felt in three colors (white, beige and yellow);
- Threads to match the color of felt;
- Fabric glue;
- Holofiber;
- Pencil;
- Paper.
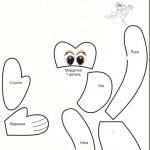
1. First, what you need to do is draw a bunny, cut out all the available details.

2. We also draw an egg and cut it out.
3. It will be made of yellow felt, so you can outline and trim it.

4. This is how we make parts from white felt:
- torsos 2 pcs;
- head 2 pcs;
- ears 4 pcs;
- Rear legs 2 pcs;
- Front legs 2 pcs;
- 2 cheeks need to be made so that they are mirror-like.
By the way, when you draw the contours, you can attach the cut paper with pins so as not to move it.
5. And from beige the same:
- Inner ears 2 pcs;
- Ext. paws 2 pcs;
- Spout;
- mouth
6. We begin to sew. Thread (preferably double) white We connect the body to each other and sew from the edge 2 - 3 mm. passing through the loop from below.

It is advisable to make the distances the same.

We do this in a circle, but not completely, in order to fill our hare.
7. Using glue (moment crystal), glue the front legs and legs to the body. Pink inserts must first be glued to the hind legs.

9. Let's move on to the head part. Glue the inner ones onto the outer ears.

10. We sew the overeating part of the ears from the back. Just like filling the body a little with cotton wool at the end.

11. Form the face. We insert the ears and secure them with pins; we also insert the body.

12. Glue on the mouth, cheeks, nose and eyes.

13. On the cheeks we draw small stripes in the form of antennae.
14. We sew the head in a circle, not forgetting to fill it with halofiber and insert it onto the body.

15. Glue an egg to the Easter bunny and he is ready.

You can give it to your loved ones, relatives, children, or keep this souvenir for yourself as a keepsake.
Video tutorial on how to tie a rabbit?
How to crochet a very interesting animal? I think everyone will like this idea. The fact is that you can not only give it as a gift, but even put it on the neck of a bottle of lemonade or cover an Easter egg with a bunny on the holiday table. It looks very original, so watch the video and you will understand for yourself.
After watching the video, I think it became clear how to make such an unusual animal. A good souvenir and gift for people close to you.
Scheme and pattern of the Easter bunny
The most interesting thing is that easter bunny You can even make it from felt or fabric, as you already understood. But for this you definitely need a pattern. There are people who are not good at drawing, so the animal can be made according to the scheme that will be proposed below. And then, everything is simple, we copy from the monitor onto paper or copy and print, cut it out, put it on the fabric you like and transfer the images. In general, there are no difficulties.
Option 1:
1. First, make a copy, cut out the hare template in duplicate

2. We do the same with additional details.

3. Eyes and fingers, which are small details, can be cut out by eye after you have sewn the hare.
Or you can do this, cut out a hare, draw two copies on the material and cut out all the details from the same paper.
Option 2:
We also cut out hares, transfer them to fabric, sew them, and stuff them with cotton wool.

Option 3:

Option 4:

Well, choose a rabbit that interests you and start sewing.
If you have any ideas about this article, you can write comments.
Good afternoon, dear needlewomen!
Do we love holidays because we expect something good and fun? But a special and bright celebration evokes special awe, this Easter.
On Easter It is customary to give small Easter souvenirs to loved ones: decorated eggs, Easter cakes, Easter baskets, Easter toys, for example, a bunny.
A gift made with your own hands on this bright day will be especially valuable. Your child will surely enjoy making an Easter gift with you. We have selected interesting and simple Easter souvenirs for you that you can make with your own hands.
DIY Easter basket
All believers await Easter with trepidation; it is the brightest and purest holiday. There are many Easter souvenirs in stores, but it will be much nicer to receive a gift made by yourself. We suggest you do a simple Easter basket with your own hands. Master class from the Best video channel.
To make an Easter basket we will need:
- Disposable sauce container
- Tape, braid
- Lace
- Fatin
- Cardboard for pen
So, prepare this disposable container.
Cut off the lid of the container
Cut out the bottom of the container
Lubricate the walls with glue,
Wrap it up satin ribbon.
Now decorate the container with openwork, grease it with glue on the back side,
and glue the lacy ribbon around the circumference of the Easter basket.
To form the handle of the basket, cut a strip of cardboard, wrap it with satin ribbon and place it on glue.
Your beautiful Easter egg basket is ready! Place a piece of tulle and a beautiful egg inside.
Happy Easter!
Also watch the video on how to make your own Easter basket.
Easter basket video
Easter egg made of thread
Easter egg made of thread - fragile and beautiful souvenir for this holiday.
You can put small chickens in them. Master class by Elena Ozhegova.
- Styrofoam egg
- Polyethylene film
- Needles
- Cotton or silk threads
- Glue or liquid glass
- Brush
First, we cover the foam blank with polyethylene, since the threads can stick to the foam, then we stick in the needles, as shown in the photo.
Then we wrap the egg with threads in a chaotic manner.
We get the first half of the Easter egg revealed. For the second one you need one row of needles. Now glue the two halves together.
The junction of the halves can be tied with a beautiful ribbon.
Watch the video on how to make a craft for Easter
Craft for Easter video
DIY Easter bunny
Easter bunny with kinder surprise - great gift child for Easter.
In order to make an interesting and simple Easter bunny from a towel, we will need:
- Towel
- Two rubber bands for money
- Ribbon
- Kinder Surprise
- Toy eyes
Place the towel in front of you
Roll it into a tube on both sides.
Bend the resulting rope and form a muzzle with rubber bands from money.
Tie a ribbon on the bunny's head.
Tie a bow on the ribbon at the back.
Place a Kinder Surprise in your rabbit's tummy.
A beautiful Easter bunny is ready!
Watch the video master class from the Make it easy channel on how to make an Easter Bunny.
Easter bunny video
DIY Easter Bunny
You can also do simple craft for Easter - this is an Easter bunny made from a sock and cereal.
Materials for crafts for Easter:
- Groats
- Threads
- Sock
- Scissors
- Ribbon
- Felt pen
After watching the video below, you can easily make an easy craft for Easter with your own hands.
DIY Easter Bunny video
Text prepared by: Veronica
One of the main Christian holidays is approaching, the symbol of which, along with Easter cake and eggs, is the Easter bunny. It’s clear that no one is asking you to give an animal as a gift, but you can make it with your own hands from various materials. Believe me, such a gift will be appropriate, just like the various Easter eggs discussed in previous articles.
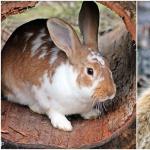
It is worth telling a little about the rabbit symbol itself. This animal, or rather its wild brother the hare, is a symbol of fertility, capable of producing abundant offspring. This is the personification of life itself, just like Easter, a holiday when believers glorify the rebirth of Jesus Christ.
And earlier in these spring days pagans praised the fertility goddess Ostar, presenting her with eggs and hares as manifestations of life. And, like many Christian holidays, Easter has adopted some of the ancient traditions for an easier transition to a new way of life. That's how the bunny magically became an Easter rabbit and suddenly began laying eggs...

Tilde fabric hares (or in our case rabbits) look very cute. To make them yourself you will need:
Fabric, scissors, washable marker, thread, needles, ribbon to match the fabric.

- Fold the fabric in half with the right side inward, transfer the pattern to the fabric

- We pin the fabric with needles to make it easier to sew

- Sew along the outline, leaving room for stuffing.
- Trim off excess fabric at a distance of about a centimeter from the seam

- We make cuts on the folds up to the seam so that there are no folds when stuffing

- We turn the workpiece inside out and stuff it with padding polyester or other material.

- Sew up the hole with a hidden seam

- Decorate the rabbit with ribbon.

Video on crocheting bunnies for Easter
Crochet lovers will find this master class on how to make this Easter animal useful. Cute, original, try knitting an unusual egg case like this!
How to make your own felt Easter Bunny egg packaging
The felt is very soft, delicate, cozy, and even children can make such a case for a painted egg. This is done like this:

- We outline the contours of the workpiece on the fabric with chalk, twice side by side.

- Cut them along the contour

- We sew with a strong thick thread with a beautiful loop seam, without touching the flat part
- We cut out four rounded rectangles, sew them in pairs - these are the ears

- We attach the finished eyes and nose with glue, decorate with a bow if desired, if we do female version a rabbit

- We apply a smile with special glue-paint (here you can come up with your own version).
Salt dough craft for Easter
WITH salt dough Everyone loves to work, even kids, because it is soft and pliable, like good old plasticine. It is also suitable for themed crafts, for example, a cute rabbit in the shape of an egg, so to speak, two in one.
The execution is like this:

- Making a base in the shape of an egg from foil
- Roll out a piece of dough and wrap it around the piece

- We pinch off the excess dough, roll the craft well, leveling all the corners
- Wet your hands in water, smooth out all wrinkles

- We place it on the file and immediately on the surface where the craft will dry, so as not to break the figure

- Now we sculpt a muzzle, divide a small piece in half, roll two balls of the same size
- We moisten the place of attachment with water, carefully attach the “eyes”, pressing them to the base and to each other

- Make a small neat nose from pink dough
- Again we use the pink dough to form two small balls, flatten them, make cheeks, and also glue them onto the water

- Let's take it white dough, make eyes - also divide a piece in half, roll balls of the same diameter, form droplets, try on, glue
- Roll a ball out of a very small piece and glue it under the muzzle - this is underlip a rabbit

- We also divide a larger piece of dough in half, roll it in the shape of a drop, and form ears of the desired size.
- We take a little pink dough, also make droplets, attach them to the ear blanks

- We break the toothpick in half, insert the sharp part halfway into the rabbit, on the other side we attach the ears to this improvised frame, having previously moistened the contact points with water to glue the parts together.

- The green material will become the base for the weed. To do this, we roll a rope out of it, cut it into pieces, roll each one into a long drop, glue it with water, and decorate the perimeter of the craft.

- Roll out the pink dough, cut out flowers using a special shape, and decorate the grass with them

- Use paint to brighten the animal’s eyes (blue, green), draw a black pupil
- You can make holes on your cheeks with a toothpick.

- All that remains is to dry the craft near the battery, and then varnish it.
Making a three-dimensional paper rabbit with your own hands with children
Paper can also be transformed into incredibly beautiful things. So, simple cardboard or even office paper can become the basis of cute, beautiful crafts that a child can do.
For example, it’s easy to make rabbits like this by simply cutting out the material according to this template and gluing it together.

Crafts of different colors look more vibrant - with red or pink ears, paws, and a bow on the neck. How can you pass by such beauty?


For those who are ready for great feats, bulk versions are suitable. For example, a bunny made according to a template in the shape of a cone body.

Well, the most practical would be a stand for Easter eggs, cut out according to a template and glued at the folds. All it takes is to print the template, color it if desired, cut it out, bend it along certain lines, apply a little glue, press it until it dries, and that’s it! Try this handicraft with your children and grandchildren, they will be delighted and will definitely ask you to repeat this experience!

When talking about using paper to create crafts, one cannot fail to mention origami; this technique also allows you to create beautiful things for the holidays. So, it’s fairly quick to make a box for eggs from a thick material (but not cardboard).
All you need is to prepare a square and fold it in a certain sequence, and then decorate it with a drawn or printed (and then cut out) bunny face. This master class will tell you the details of the work.
Easter table decoration made from pompoms
Real rabbits are soft furry creatures, therefore, made from pompoms, the crafts of these animals look realistic and very gentle. The procedure for making them will appeal to children and adults:

- We cut out 2 circles of cardboard with a diameter of 11 cm, an internal hole of 3 cm with a slot on one side for ease of work.

- Winding a thick thread

- Cut the workpiece in the middle
- Using a piece of thread about 30 cm, we tie a pompom, threading it between layers of cardboard

- Remove the base, fluff the ball, and trim the edges with scissors if necessary.

- We take felt 6 by 4 cm, cut out 2 ovals from it - these are the rabbit’s feet, glue them to the pompom with hot glue

- From two pieces of felt 7x2 cm (white or Pink colour) and 6x1.5cm (white) we cut out the ears, sharpening the edges. We place a smaller piece of fabric on top of a larger one, fix it with glue, folding it slightly towards the middle
- Glue the ears to the pompom

- Attach beady eyes
- We take a thick wire, fold the second one, cut it, intertwine it together - these are tendrils, and also attach them with a glue gun

We attach the spout on top - that's all!
How to make a bunny out of towels with your own hands
Even an ordinary small towel can become the basis for the craft, if you show your imagination. So, a cute bunny gnawing on a carrot is easily done this way:
We take a plain one terry towel for hands, soft balls (ready-made), eyes, threads to match the fabric

- We roll the material diagonally into a roll, bending it on both sides
- Tie in the center with thread
- Fold the roll in half and secure it with thread again.
- We attach cheeks to the “muzzle”, a nose made of white and pink balls
- Gluing the eyes
- We decorate the “carrot”.
- So in a couple of minutes we have a cute, soft, fluffy animal ready!
Here are a few more design options for the craft.


Easter bunny made from socks
Real needlewomen do not throw anything away; every little thing becomes the basis or addition to a new masterpiece. They even learned how to make rabbits out of… old socks!
For the craft you need to prepare: small sock, eyes, thin tape, thick elastic band or twine, a small pom-pom for the tail, filler (cereal, padding polyester, cotton wool, but denser material is better for stability), a small piece of light-colored fabric for the belly, glue gun.
Fill the sock (about a glass volume)

- Tie with an elastic band (or coarse thread), forming three elements - body, head, ears
- Next we glue the “tummy”
- We attach movable eyes, a nose, and felt teeth to the “muzzle”
- We make the ears by cutting the free part of the sock and sharply cutting off the corners
- Attach the pompom tail

All that remains is to decorate the rabbit’s neck with a beautiful ribbon.
At the end of this topic, a few more step-by-step photo descriptions of the creation soft toy based on the sock. Nice, right? Not at all not difficult!


Crafts from plastic spoons for decoration
Round plastic spoons are a great base for a holiday craft. It is enough to draw eyes, a nose, a mouth on them with markers, add paper ears - and the animal is ready.
If you want something exotic, you can make a dress, a rainbow bow, and other decorations for the figurine. Another interesting option is to sit him on the “grass” made of paper.

How to cut a rabbit out of plywood
For wood lovers, we suggest cutting out this cute animal from plywood. For this:
Draw a rectangle on a piece of material, mark the height of the head, ears, paws

- Outline the body in the shape of a circle, the rest by eye
- In places where the lines turn sharply, drill through the plywood for ease of cutting

- Cut the workpiece along the contour with a fine saw
- Paint it white or grey colour, draw eyes, nose, mouth, contours of ears, and other decorative elements.

As you can see, it’s possible to make a cute rabbit in just a couple of minutes if you choose a simple technology, although all the proposed options are worthy of attention. Things like this play a role. unusual gift, decorations for festive table, decorative element. Do you have a minute and want to feel the holiday spirit? Create one original craft, it's not as difficult as it seems at first glance!
Easter bunny
The Easter bunny can be made from a round lollipop. For example, like these

To make such an Easter bunny (hare) you will need
- lollipops,
- round balls made of polystyrene foam, or polystyrene foam,
- eyes (moving), beads can be used,
- satin ribbon,
- scissors,
- glue,
- for the legs you can use thick cardboard or other dense material that could hold the rabbit,
- pompoms for the nose, tail and paws,
- bendable tubes for the ears, you can use ordinary cardboard or other material, you can sew the ears from fabric, and then attach them to the head with wire.
The rabbit's body will be a round lollipop. Place a round ball on top of the stick, which will serve as the head. Using liquid glue, attach the eyes, nose, and tail of the paw. You can make a mustache on the muzzle from cotton wool, and you can also make a mustache from wire. Tie a beautiful ribbon in a bow around the hare's neck. Attach the ears to the head.
Cut out the base legs from cardboard, glue together several layers of cardboard to make the bunny more stable. Glue the base legs using glue or double-sided tape.
How to make such a cute rabbit (photo below), see this question.

- gypsum;
- water;
- stirring stick;
- vegetable oil;
- empty tin can or plastic cup;
- brush;
- Kinder surprise egg;
- plasticine;
- colored thick paper;
- white acrylic paint;
- dry grass or moss;
- ribbon;
- small flower pot.
Easter is coming soon and I want to do something with my own hands. Handmade crafts are always more valuable and closer. You can make an Easter bunny or hare, which symbolizes Easter.
This craft decorates a table or interior for Easter, or can be given as a gift to friends and relatives.
I suggest making a delicious hare from cookies - a sweet Easter bunny. These are the Easter bunnies.
Now let’s make our own Easter bunny.

You need the following:
White toilet paper (napkins);
PVA glue;
a needle to pierce holes;
a bowl for diluting glue with water;
hard brush;
gouache or acrylic paints;
decorative materials.
First we make an egg (oval):

We pierce and insert the wire:

Wrap the ears with foil:

We dilute PVA glue in a bowl of water (about a tablespoon, or as much as necessary so that it is not thick, but sticks). We tear the paper into pieces and glue it so that the foil is not visible.

The nose and cheeks could be made in advance in the form of protrusions from foil, or then glued on the outside toilet paper, it will dry and set and stick.
Let it dry. Must dry completely.


Let's tint the hare white with gouache, or acrylic paints, nose is pink.

Glue patterns from napkins:


Plush bunny pattern for an Easter basket.

This soft fleece bunny toy will be an excellent decoration for an Easter basket.

A bunny is sewn from fleece according to a pattern.


All the work on sewing a fleece bunny is in the photographs. This bunny can stay with the owners or be given as a gift. According to the tradition that came to us from European countries, the Easter Bunny leaves his Easter basket with eggs for the guests.


The Easter bunny can be made from paper. To do this, you will need two sheets of paper; choose the format yourself. We do it according to the drawings.


At the bottom inside you need to stick a strip of paper so that the egg does not fly out. The hares are ready.
You can also make a rabbit from plaster.

For this you need the following materials:
Progress:


But I liked the video, it looks very beautiful
Easter bunny or a Tilda style bunny sew with your own hands, here is a detailed diagram-pattern


It is best to sew a Tilda rabbit from cotton fabric, and stuff it with padding poly (sold in any sewing store, costs 70 rubles per meter). Clothes can be made from leftovers or scraps; you don’t have to buy new fabric.
Here's another cute animal, such a wonderful Easter bunny you can sew together with your child. Not much material is required either, you can use fleece, wool, Any will do stretchy material.

Easter Bunny Pattern:

Transfer the pattern to a piece of paper, cut out the parts in pairs
In Russia, Easter is associated with colored eggs and Easter cakes (by the way, here you go). But in Western countries, a hero spring holiday is a rabbit. On the eve of the holiday, young children are told that the rabbit has a nest in which he hides chocolate eggs of different colors. And the children have the opportunity to find such a nest on Sunday morning. But sweets go only to those children who behave well and obey their parents.
Although in Russia this custom remains, when a gift is brought, children ask where it comes from? And the adults say: “ It was the rabbit who gave the gift!“And it has always remained a mystery - what kind of rabbit is so kind and generous, who constantly gives gifts? I don’t know if this happened to you, but in our family, adults always surprised us with the mysterious Easter Bunny.
And on this occasion, an idea arose! What if we reveal the secret for children and make several versions of the rabbit, so that both New Year, there was a certain symbol in the form of Santa Claus, only for Easter - in addition to Easter eggs, make beautiful rabbits in the form of crafts. Moreover, you can also take a prize by making, for example, a basket with Easter eggs inside, and there is a nest where a rabbit sits, which was made with the child the day before. How do you like this idea?
So. Let's begin...
Some traditions of Western countries are taking root in our country. If you want to please children, you can make a souvenir rabbit from various materials. And right now, we are starting...

First, let's look at the simplest version of fabric crafts. To do this, you do not need to have special skills or specific experience. Even children can cope with the task.
You will need to prepare the following materials:
- Faint fabric.
- Synthetic fluff or cotton wool.
- Finished pattern.
- Satin ribbons.
- Rhinestones.
- Thread and needle.
- Knitted flowers.
- Glue.
- Pencil.
- Scissors.

In order to make the Easter bunny, we need a pattern. If you have artistic talents, you can draw the animal yourself. But you can find many printable options on the Internet. Choose the option you like best.

Now all that remains is to cut out the pattern from paper.

Now you need to lay the blank on the fabric, trace the outline with a pencil and cut it out.

Since we decided to make three Easter bunnies, we need to cut out two blanks from three types of fabric.

Now fold the pairs of blanks with the front sides facing inward. Then sew them by hand or by machine. Do not stitch a few centimeters from the bottom. The hole is necessary so that the workpieces can be turned out and filled with cotton wool.

Now you need to turn the rabbit out and stuff it with stuffing. Sew the workpiece from the bottom using a cap seam.

Glue eyes onto the craft; for this you can use black rhinestones or beads.

All that remains is to secure the bow or other decorations.

The Easter bunnies are ready, you can decorate your interior with them.
Easter bunny for Easter 2019 made of paper

A festive bunny can also be made from paper. This is one of the most simple options. This craft can be used as a stand or gift wrapping.
For the craft you will need to prepare a stapler, scissors, glue, colored paper, cardboard, as well as the pattern below. Use a color printer to print.

At the initial stage we will need to make a stand-torso. For the boy and girl bunny, use different colors. For example, cut out a 3.5-16 cm rectangle from green cardboard. Then roll it into a tube and secure it with glue or a stapler, as shown in the image below.

From the printed pattern you need to cut out the legs of our rabbit, glue them to white cardboard, then cut them out and fix them to the body with glue.
At the next stage, in a similar way, we will prepare circles for the girl and a tie for the boy. Now you need to cut out the animal’s face, stick it on cardboard, trim the edges and secure it to the body.

Now all that remains is to glue the nose, ear slits and mouth. Draw the eyes and mustache with a black marker.

Just a few minutes and the original souvenir is ready. You can give eggs to your guests on Christ's Sunday.
DIY felt rabbit

Large and expensive gifts are not given on Easter. It is customary to present Easter cakes, eggs and cute souvenirs. IN Lately, another symbol of Easter Sunday has appeared in our country - the rabbit. We have already considered several options for how to make it, now we will use felt.
For the craft you need to prepare:
- Several pieces of felt in different colors.
- Multi-colored threads.
- Scissors.
- Needle.
- Glue.
- Pencil.
- Pattern
A pattern is required for this craft. To do this, draw an animal on a white sheet of paper and then cut out the silhouette.

For one craft you need to make 4 blanks. Each pair of parts should be different in color. Attach the pattern to a piece of felt, outline it with a pencil, and carefully cut out the rabbit along the contour.

You can cut out all four pieces completely, but if you are using thick material, it will be difficult to sew all the pieces together. Therefore, only the ears can be cut out for the inside.

Now connect all the pieces. Cut out the parts carefully so that the pieces do not stick out.

To prevent the parts from moving out, you need to fix them. To do this, apply a small amount of glue in the area of the ears and head.

Trim edges if necessary.

Now the blanks need to be sewn, use a regular seam. Start with the ears.

Use a decorative stitch at the bottom. Don't forget that there should be a pocket at the bottom, so don't sew all the pieces at the bottom. You should get the same result as in the photo below.

The hare base is ready. Now you need to make the tail. To do this, prepare thick threads and make a tail out of them, similar to a pompom. To do this, wind the threads around your hand so that you get a ring.

Then pull the middle with a thread and tie securely.

Now the threads need to be cut along the edges and fluffed.

Sew the tail to the body.

Eyes can be made from small buttons or from a small piece of black felt. Sew in the appropriate place.

The animal's nose can be sewn with black threads or a triangle can be sewn on from a piece of dark felt.

A cute and simple souvenir is ready. You can decorate your table with it or give it as a gift to your loved ones.
Schemes and pattern of a rabbit for Easter
As you already understood, the Easter Bunny can be made from various materials. But the basis of the craft is the pattern. If you don't know how to draw, you can use ready-made diagrams. They just need to be printed and used for their intended purpose. You can choose the most suitable option. And if you don’t have a printer, you can simply hold a blank white piece of paper to the monitor and simply draw a silhouette.


If you have more interesting options Easter bunny, then please share them in the comments after the article.
Video on how to knit the Easter bunny
If you know how to knit, you can use another way to make a bunny for Easter. To do this, watch the video instructions below:
Here's another option:
If you have enough time, try several crafts made from different materials. Once you gain experience, you will be able to make souvenirs for any occasion.
We also recommend
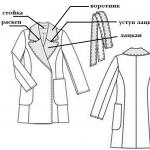 Collars, stoles, fur boas How to cut a fur collar for a coat
 The best DIY monkey making tutorials on the internet!
 Openwork gloves made of white goat down
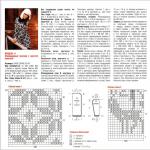 Jacquard knitting patterns Jacquard patterns a, b, c, e, and f
 We make beautiful crafts from satin ribbons
 Logical and entertaining problems (300 problems) Easy riddles for children 5 years old short