How to make a stand out of paper. Paper holder Unusual industrial pencil holders
Useful tips
Cardboard is a universal material from which you can make not only boxes, but also various crafts, as well as quite useful things in everyday life.
This environmentally friendly material is not difficult to find and is also quite easy to work with.
Here we have collected the most interesting and useful things that you can make from cardboard at home or in the country.
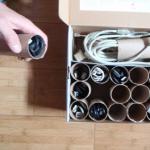
How to make a cable/cord/wire organizer out of cardboard

You will need:
Cardboard toilet paper rolls
Cardboard box (ideal for shoes)
Tape or glue to hold the bushings together (optional)
*The number of bushings depends on the number of cables and space in the box.

*You can fill the box completely or halfway with grommets to leave room for larger items.
* To ensure that the bushings do not dangle in the box and fit tightly to each other, you can fasten them with tape or glue.

Cardboard crafts: laptop stand
You can make a convenient laptop stand out of an ordinary pizza box. This stand was created by Russian designer Ilya Andreev. He cleverly used the folds on the cardboard to create a folding stand.


Another option for a cardboard laptop stand

You will need:
Stationery knife
Ruler (preferably metal)
A place where you can cut (a board or a special mat)
Glue (PVA or hot).

* Please select part sizes according to the size of your computer.
* Make cuts on the parts about 6 cm.
* This stand was designed for 13 and 15-inch laptops.

* Use glue to secure all parts, starting with the bottom ones.


*Allow the glue to dry before testing the stand.


Triangular shoe rack made of cardboard boxes

You will need:
Scissors or utility knife
Ruler and pencil
Wide tape.
*Each module in this shelf is a triangular tube. Its size depends on the shoe size.
First you should make one module.
1. First, cut the cardboard, divide it into 3 parts with a pencil and a ruler, bend it into a triangle and secure with wide tape.


2. Create some more modules in this way.

3. Each row of triangular modules must be glued to a sheet of cardboard for stability.
4. You can put another cardboard on top.

Cardboard organizer (diagram). Option 1: for papers and documents.

You will need:
Cereal boxes
Scissors
Colored tape or colored paper for decoration (optional)
PVA glue.
1. Glue the boxes together.
2. Wrap the boxes with colored cardboard or colored wide tape.
DIY cardboard organizer (diagram). Option 2: for papers and magazines


Cardboard organizer for stationery (photo)

You will need:
Cereal boxes
Scissors
Colored tape or colored paper
PVA glue
Cardboard rolls for toilet paper or paper towels.


DIY cardboard shelves (photo)

1. Prepare cardboard. If you have boxes, straighten them.


2. Now you need to make a hexagon from a sheet of cardboard. To do this, you need to make additional folds, one on each of the two largest sides of the cardboard.

3. Place the box flat and make a couple of cuts (see image) so that the top parts of the shape can be folded towards the center.
Hello everyone! Today I will show you and tell you how to make a tray from a simple box. I already have a similar master class, you can watch it. In my opinion, such a DIY paper stand is very convenient for those who work with documents or simply who like to read newspaper magazines.
Unlike the horizontal holder, the vertical one saves a lot of space and is quite compact. Often this kind of organizer can be seen in offices, on desktops. Trays are mainly made of plastic and wood. In some store I even saw wicker ones made from wicker, but they are more suitable for home use for magazines and books.
By the way, they will be very convenient for schoolchildren to store colored paper, sketchbooks, notebooks and much more.
The good thing about my version of a document stand is that it is very easy to make. So, let's begin….
DIY paper stand
We will need:
- A cardboard box from breakfast cereals or porridge. The denser it is, the better. I don’t recommend taking one that is too thin and soft. In this case, it will need to be strengthened on the sides with additional sheets of cardboard for density.
- Scissors or utility knife.
- Pencil.
- Ruler.
- Self-adhesive film. Wrapping paper will also work, but in addition to it you will need glue or double-sided tape.
First of all, cut off the top of the box so that nothing sticks out. On one edge, from the bottom, measure 11-12 centimeters. Connect this point and the top one on the opposite edge with a line. You should get a bevel like in the picture.
Roll out the roll of self-adhesive and place the blank on top. The figure shows that you need to measure the height of the box and add centimeters at the bottom equal to the width of the bottom + 2 or 3 cm. Bend 4 centimeters of paper and place the blank straight. Carefully glue it around the circle.
Fold the bottom first from the ends and then from the wide part. Cut off the upper protruding part of the film using scissors or a stationery knife. Press all edges well so that it sticks tightly to the tray.
That's basically it. If desired, the product can be decorated with various decors, for example, ribbons, wooden figures or thick colored paper.
If you liked the master class, be sure to share it with your friends on social media. networks, and also subscribe to new blog articles.
I wish everyone creative inspiration and good luck! Kiss! Bye!
It is possible to set up your own workplace using various types of devices. For fans of handicrafts, it will be interesting to create such accessories with your own hands. For example, you can make a pencil stand. This will not require too much effort from you and will not become too complicated, but the result of your work will certainly please you.
What will you need for work?
Take an ordinary square sheet of paper, for example, measuring 21x21 centimeters, as well as rhinestones or other decorative elements that will be needed for decoration, and stationery or PVA glue.

Advice
Before starting work, it is advisable to study the instructions or watch the master class.
How to make a pencil holder with your own hands
First, fold the sheet in half. Thus, its midline was designated. Now you need to bend both sides to it. On the spread you can see that the sheet is divided by folds into 4 equal parts. We repeat the same thing in the other direction. Ultimately, the paper sheet is divided into 16 identical squares. We bend those located in the corners, thus turning them into triangles. We bend the lower edges of the workpiece upward. On the contrary, the upper edge will need to be folded down. All sides will need to be folded towards the center. All that remains is to insert the left edge of the workpiece into its right edge. The result was one of 6 modules of the future paper pencil holder. After this, you will need to make 5 more exactly the same blanks. Each of them will represent a separate element of our stand. When they are all ready, you can start gluing. To do this, apply glue to the side of one of the modules, then connect it to the second module. It will be necessary to glue all the modules together. After successfully completing this stage, all that remains is to decorate the product at your own discretion. Alternatively, this can be done using colored rhinestones or appliqués.

Paper dish stand
Many people at work or at home have a large accumulation of stacks of unnecessary, long-viewed, glossy magazines. In that case, why not give them a second chance to exist? For example, you can make a coaster out of them. Simply put, what you don’t need shouldn’t be thrown away; it’s better to use it in another role. So, we take 6 sheets from the magazine. If the edges are torn, then carefully cut them off. After this, cut all the sheets of paper in half lengthwise. Take one piece of paper and fold it in half lengthwise to get narrow strips. Then we fold it again so that the cut edges are hidden inside the strip. Now the resulting long paper strips need to be folded in half again in the center so that it looks like the letter “G”. Then we place one strip crosswise under the other, then bend it in half. We add strips on each side in turn, intertwining them along the way. When the row is completed, some strips will need to be wrapped on the outside. Simply fold them in the opposite direction, placing them under the nearest cross strip. You need to press all the paper components tightly against each other. Such stands can be painted after weaving is completed, or left in their original form - this is a matter of taste and personal preference.

Making a Paper File Holder
Advice
Shipping boxes make an excellent file holder.

To make such a useful accessory with your own hands, you will need, in fact, the cardboard boxes and scissors themselves, as well as a pencil and PVA or stationery glue. For decoration, white napkins will be useful, as well as 1 napkin with a motif. You will need regular and wide brushes and a container for diluting glue with water. You will also need white acrylic paint, or white gouache previously diluted with PVA glue. It is necessary to stir in equal proportions. You can decorate the box with colored, acrylic paints or gouache, and cover the top with interior acrylic, glossy varnish. You just need to cut out the layout and glue all its components together, decorating them with a pattern from a napkin, and also painting them with paints.

Conclusion:
Paper can be used to make many useful things, including many different coasters for dishes, folders, or pencils. Making these things is a creative process that is sure to be fun without being too difficult.
Paper pencil holder
DIY smartphone stand
Paper vase stand
To maintain order on your home desktop, you need to purchase, or even better, make your own stands for pencils, pens, scissors and other office supplies. A pencil stand will allow you to always keep writing objects at hand, rather than looking for them in the corners of bottomless desk drawers. In addition, you can involve children in making a pencil holder, who will bring something new and interesting to its design. In this review, we will show you various stands for stationery that you can easily make yourself. All you have to do is choose a suitable idea and bring it to life.
1. Pencil stand made from cut wood.
To implement the idea, you need to prepare a low frame of wood, then remove the inner part with a chisel and install pencils inside.

2. Pencil holder made from sewer pipes.
Using a jigsaw or hand saw, we cut sewer pipes of different diameters into small pieces. We glue each of the segments in a row onto a short, thin board (the board, as well as all the pipe segments, can first be spray-painted in shades that match each other).


3. Pencil in a vest.
Cut out a triangular piece of “shirt” from white felt and glue it to a tin of coffee or canned fruit. Then take a layer of gray felt, cut out a rectangle from it along the circumference of the can, in front, cut out a triangle to the size of the pasted white “shirt”, folding the edges and stitching with threads to the collar area. Glue the “vest” onto a tin can, use a blue marker to draw a tie on a white shirt, or cut it out of blue felt.

4. How to make a vintage style pencil holder.
Cover the tin can with pink fabric, then top, bottom and center with a beautiful lace ribbon. On the end part, glue pre-purchased accessories in the form of a flower with pearls (sold in sewing shops).

5. How to decorate a pencil holder with buttons.
Method number 1. We take an ordinary small glass jar of baby puree, then string red and white buttons onto a thin elastic band, tie the ends of the elastic into a knot, and put the resulting composition on the neck of the jar.

Method number 2. Glue buttons of different sizes onto a tin can (the color can also be any), then paint the product from the can in gold or paint it in a brick tone and shade it with gold.

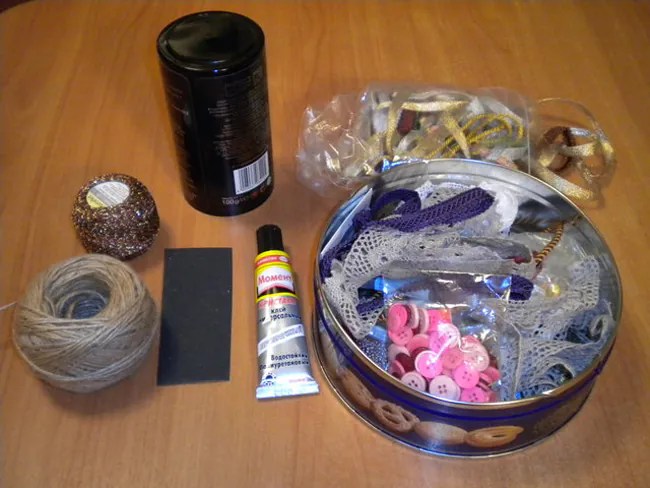
6. DIY pencil stand decorated with twine.
We take a tin can, cover it with a layer of transparent glue, and wrap it around it, tightly joining the threads to each other. Finally, you can stick a bow on the front of the product.

7. Pencil made from tree bark.
Carefully remove the bark from a dry tree and glue it to a glass or metal jar.

8. How to make pencil holders from toilet paper tubes.
We put vertical marks on each tube and cut the fringe along them. We apply PVA glue to each petal of the fringe, and glue all the tubes to a layer of cardboard. Then with a marker we draw faces on the front of the stand.


9. Pencils with decorative primer.
We glue a plain sheet of paper onto a tin can, which we then cover with decorative stones.

10. Marine style pencil.
We take several paper towel tubes and place them on a base cut out of cardboard. We cover each tube with white napkins, forming large folds (you need to glue the napkins with PVA glue). Then we glue the tubes to a cardboard stand and paint them with water-based blue, yellow and orange paint (you can mix white water-based paint with different colors of gouache, in this case you need to mix white with orange, white with blue and white with yellow). Finally, we glue plastic fish, starfish, shells and artificial algae to the stand; all this can be bought at a pet store.


11. Pencil holder made from pencils.
We cut off the sharpened parts of the pencils; you can cut them with a stationery knife or use a jigsaw. We place the bottom row of pencils on the cardboard tightly to each other, and glue each pencil. Then we begin to lay out the walls, place two pencils on the sides and glue them to the base, we also glue pencils in opposite parts, and continue this until the height of the pencil holder is satisfied with its appearance.

12. Pencil box decorated with burlap.
Glue a piece of burlap onto a tin can and glue flowers formed from light linen fabric around the perimeter of the neck.
13. Cover the pencil holder with wallpaper or craft paper.
We cut off a part from the wallpaper or craft paper corresponding to the size of the tin can, and simply glue the resulting part to the can.


14. Pencil holder in a shirt.
From white felt we cut out a rectangle corresponding to the length of the diameter of the tin can, make a cut of about 2 cm in the center, glue the collar to the can, cut in front, join at the back, bend the collar. Cut a rectangle from an unnecessary shirt and glue it onto the jar on top of the collar. Glue buttons to the front and tie a tiny tie from a matching ribbon.

15. How to make a pencil holder from floppy disks.
In four floppy disks, you need to melt holes with a hot awl, in each floppy disk there are 4 holes (two on the sides and two on the bottom), in the bottom, fifth floppy disk we make 8 holes, the awl needs to be heated over a candle (be careful). Then we form a cube from floppy disks without a top part, we connect all the parts to each other with flexible wire, connecting its ends in the inner part of the product.

16. DIY pencil holder made from a shampoo bottle.
We cut the shampoo bottle in half, but not in the middle, but higher; the cut line can be smooth, round or in the form of cones (this will be the hair of the future monster). We cut out handles from the upper unnecessary part and glue them to the lower part. We glue the mouth of the future monster from black paper, and eyes and teeth from white paper. You can glue Velcro to the back and secure the monster pencil holder to the wall.
 17. Vintage style pencil with lace.
We glue satin fabric onto a circle of cardboard and glue lace along the edge of the podium. In the center of the circle we glue paper towel tubes of different lengths. We decorate them with fabric, lace and artificial pearls. Closer to the edge we install a mannequin cut out of cardboard and also decorated with lace, ribbons and beads. We place a figurine of a bird in the center, and on the other edge we place a small photo frame made in a suitable style.

18. Pencil from a catalogue.
We divide the flexible catalog into five identical parts, lay it sideways, bend all five parts to the center, in the form of flower petals, gluing them with transparent glue. Apply a layer of glue along the top of the pages so that the pages do not fall apart. Finally, the product can be painted with spray paint and the unflattering parts can be decorated with beads or lace.

19. Decorate a pencil holder with ice cream sticks.
We glue the ice cream sticks onto two strips, then glue the resulting picket fence to a tin can. We complement the product with a wide ribbon tied on the outer part.

20. Decorate a pencil holder with fabric.
We cut out rectangles from thick fabric corresponding to the size of the selected tin can. Then we decorate each piece with machine stitching and contrasting color threads. We sew the cover along the inside, turn it inside out and put it on the jar.

21. Pencil made from a tree trunk.
We saw off a small part from dry wood with a saw, then use a drill to create many holes in the upper part of the stump, into which we install pencils.

Unusual industrial pencil holders.
We also decided to show various factory-made pencil holders, some of them are really impressive. Below you can see what stylish and unusual stands for stationery there are; they come in the form of: camera lenses, monsters, hedgehogs, balls, Rubik's cubes, imitate stacks of folded paper, garbage containers, etc.


Today we showed you how to make a pencil holder, and even more than one! Such beautiful pencil holders will not only put your workplace in order, but also significantly embellish it. Try making them together with your children; we assure you, the kids will be delighted.
September 1 is just around the corner, the time when all children go to school, and students go to technical schools and higher educational institutions, the time has come to gain knowledge. Students spend most of their time in educational institutions, but they also spend just as much time at home preparing and doing homework.
 In order for the acquired material to be better consolidated in an educational institution, you need a comfortable and beautiful workplace at home. Of course, a desk and a comfortable chair are important, and it is also very important that everything you need is always at hand. A desktop stationery set - a keeper of pens, pencils, erasers, paper clips and other such important little things - should cope with this task.
 In this article, the News Portal “site” has prepared especially for you the best selection of the most original stands for pens and pencils, which you can easily make yourself from scrap materials. You can use this homemade stand for pencils and pens yourself, or you can give it as a gift to your girlfriends or friends, brothers or sisters.
DIY stand for pencils and pens

Necessary materials:

- threads;
- scissors;
- plastic jar;
- wooden popsicle sticks;
- brush and glue.
Manufacturing:
We cut off the top of the plastic jar so that the bottom remains and a few more centimeters up. Using glue, glue the wooden sticks to the plastic jar (see photo).
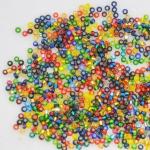
 Now we intertwine wooden sticks with multi-colored threads, filling the voids with threads.
 Use threads of different colors, then the pencil holder will turn out especially bright and unusual.
 You can decorate the finished pencil holder with rhinestones, interesting stripes or buttons.
DIY pencil stand made from a tin can
DIY stand for pencils and pens made from newspaper tubes

Necessary materials:
- newspapers or magazines;
- cardboard toilet paper roll;
- glue;
- cardboard;
- double sided tape;
- threads;
- acrylic paints.
Manufacturing:
Make tubes from newspaper or magazines and coat the ends with glue to prevent them from unraveling.
 Using glue, glue the newspaper tubes vertically onto the cardboard roller. For more security, tie them together using threads.
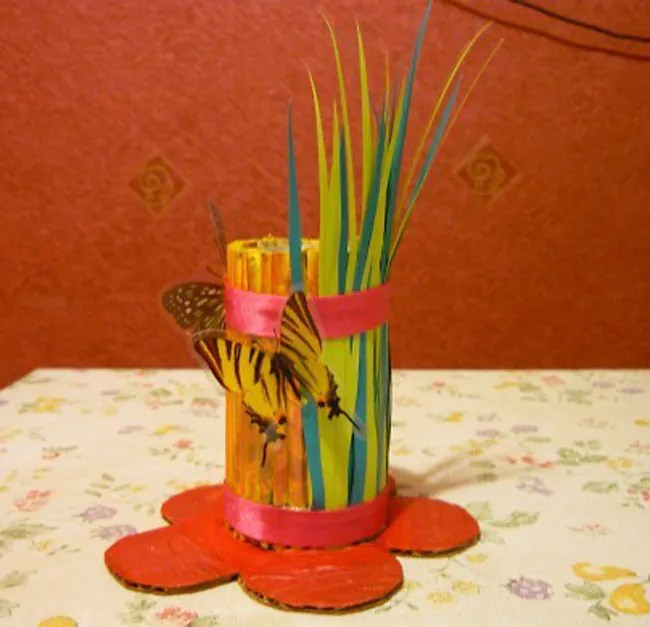
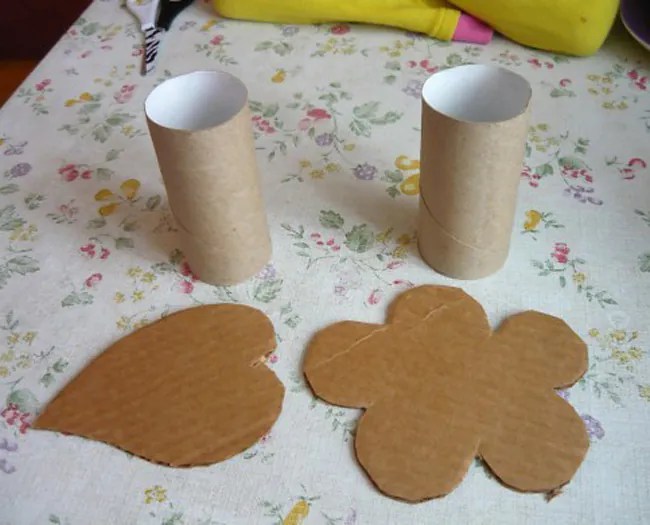 Make a shaped bottom for the pencil holder from a sheet of thick cardboard (it can be a flower, a leaf) and glue the bottom with double-sided tape.
 Now you can decorate the pencil holder and the bottom.
 You can decorate a finished stand for pencils and pens using different elements - grass cut out of paper, leaves, flowers, etc.
Stand for pencils and pens from the telephone directory

Necessary materials:
- thick book (telephone directory);
- glue;
- acrylic paints;
- cardboard toilet paper rolls;
- cardboard;
- scissors or stationery knife.
Manufacturing:
We cut the telephone directory and wrap the pages into cardboard rollers, fixing everything with glue. We cut out a shaped bottom from a sheet of thick cardboard and glue it to the finished structure. Now you can decorate everything with acrylic paints.
 If you cut a telephone directory into pages of different heights (see photo), you can end up with an original and unusual pencil holder, different in height.


DIY gold pencil holder
Stand for pencils and pens from a tin can

Necessary materials:
- tin jar;
- textile,
- glue;
- decorative braid and ribbons.
Manufacturing:
We measure the tin can and sew a cover for it from the scrap of fabric we like. Covers the fabric with beautiful ribbons and braid. We put a cover on the jar.
We tuck the edges of the cover inside and glue them with glue.
Stand for pencils and pens made of mosaic

Necessary materials:
- can;
- a piece of foam;
- primer;
- stationery knife;
- acrylic paints;
- glue
- cement mortar, sealant, or putty.
Manufacturing:
First of all, you need to apply a layer of primer to a previously cleaned tin can of dirt.
 Using a sharp knife, cut out squares from a sheet of foam plastic that need to be decorated with colored acrylic paints.
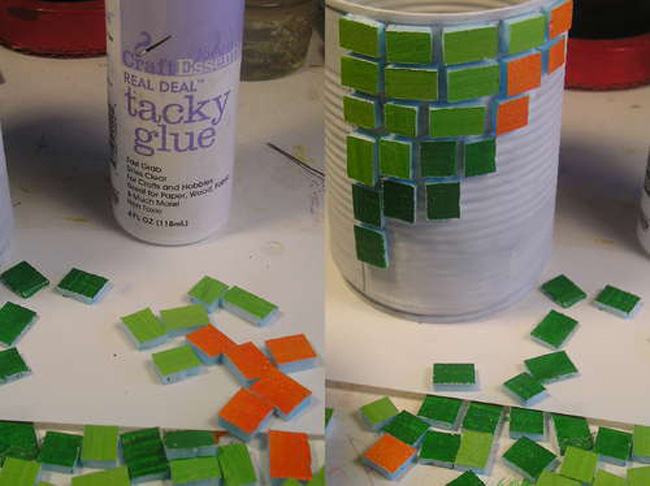 We glue the decorated foam plastic pieces to the tin can using glue, not forgetting to leave gaps between them.
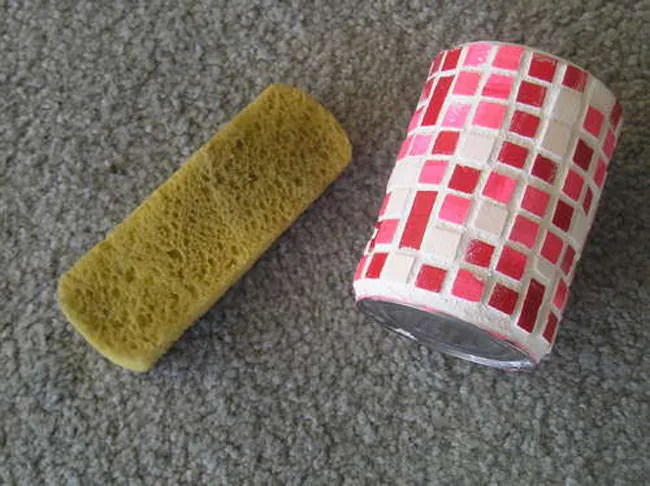 Now fill the cracks with primer using a regular sponge. All excess is wiped off and the pencil holder is ready.

DIY tumbler stand for pencils
Stand for pencils and pens made of thread

Necessary materials:
- can;
- threads;
- glue;
- buttons, braid, ribbons and bows for decoration
Manufacturing:
The tin can must be carefully wrapped with multi-colored threads, periodically coating them with glue so that they do not unwind later.
Now you can start decorating. Decorate the pencil holder with buttons, beads, decorative braid and rhinestones.