Types of homemade birthday cards for mom. How to make a card for mom: original ideas and techniques
DIY birthday cards are a wonderful holiday attribute. It is often used in schools to congratulate students. During craft lessons, many of the readers made their own cards as children. A lot of time has passed since that moment and today, especially on the Internet, you can find a large number of original hand-made congratulation cards.
Relevance of the gift
Especially for children, many lessons have been created to develop fine motor skills. During labor at school, students are offered to perform various exercises related to the creation of paper products. A postcard will be a great solution for this. In addition to this fact, it is also worth considering that the child is trying to make such products and the process itself brings him pleasure.

The article will look at different ways to create postcards in different styles from paper and related materials. Manufacturing methods will be presented to readers:
- three-dimensional pictures;
- with added fabric;
- collected from figures;
- with added confetti;
- and an envelope for money and coins;
- with three-dimensional figures on the main part;
- with the addition of cut-out images of animals.
It is also worth noting that all the postcards described below can be made easily at school or at home. For this purpose, improvised materials can also be used. The main thing is to use your imagination and be smart.
Table of materials used
Before you begin to consider how to make a card from paper and what may be required for this, you need to create a table of commonly used materials and tools that may be useful in the process of creating an original gift.
As can be seen from the objects presented in the table, almost all of them can be found at home or bought at the nearest store.
If the youngest readers will be making postcards at school or at home, you must always follow safety precautions and be careful when using piercing and cutting objects.
You can watch the original solution for making paper birthday cards in the video.
VIDEO: Paper card
Master class DIY Happy Birthday card
General instructions using the example of 3 postcards
In order to move on to more complex paper products, you need to practice on the simplest ones. To do this, three options for creating a paper postcard will be outlined below. After practicing with these examples, you can move on to more complex instructions for making them.
For the first option you will need the following set of tools and materials:
- Colored cardboard.
- Colored paper.
- Scissors or utility knife.
- Regular writing pen.
- PVA glue or glue stick.
Production time is no more than 15 minutes.

The first thing you need to do is cut out the base in the form of a frame. Thick cardboard is used for this. The color can be any depending on the preferences of the master himself. The edges of the postcard frame can be made curly, as in the example, using scissors or a stationery knife.
To create even shaped frames, it is better to use markings made using a pattern or ruler.
A second layer of colored paper is applied on top of the prepared cardboard base. Instead, you can use an image printed on a printer as the main background.
Now the most important task remains - making holiday candles and lights. To do this you need to use a pen. A thin sheet of colored paper must be wrapped around the handle. The edge where the paper joins is glued. In this position, you need to maintain the shape for 30 seconds. After that, remove the handle. Repeat the action depending on how many candles you need to place on the card.
Lights are cut out separately from colored paper and then attached to the candles. The resulting design is glued onto a postcard. After this, you need to sign it and write a wish for the birthday person.
The second card will have an award medal with the age of the hero of the occasion.

To create it you will need:
- Cardboard as a base.
- Set of colored paper.
- Threads.
- Stationery knife or scissors.
- Glue stick.
You can make such a postcard following the instructions in just half an hour. In order to do everything correctly, the instructions will be described step by step.
Instructions
- Preparation of all necessary materials.
- Prepare a base in the form of cardboard of any color at the user's request.
- Decorate the cardboard with different paper elements.
- Take a thin colored sheet of paper and fold it like an accordion.
- Using thread, tie the folded accordion in the middle.
- Spread the accordion so that it has the shape of a circle.
- To fix the edges of the straightened accordion, secure it with glue.
- Cut a circle with a smaller radius than the accordion.
- Draw the age of the birthday person or cut and glue numbers from paper.
- Glue the circle onto the accordion.
- Glue the finished medal onto the base.
Now that's it, the postcard is ready.
The last postcard for training will have three-dimensional elements.

It will also take a maximum of 30 minutes to create. To make a postcard you will need:
- Thick colored cardboard as the main background.
- Colored patterned paper or real gift wrapping paper.
- Ribbons for dressing.
- Scissors.
- Glue stick.
The process of making such a postcard consists of the following steps:
- Prepare a cardboard base. The background can be painted or additional elements can be glued.
- At the top of the cardboard write the word “Congratulations!”
- Take colored paper or gift wrapping paper and cut it into squares in the shape of wrapped gifts.
- Glue the squares at the bottom of the picture.
- Make ribbon bows and ties for each of the stick-on gifts and attach them to them.
Instead of ribbons, you can also use colored threads or twine.
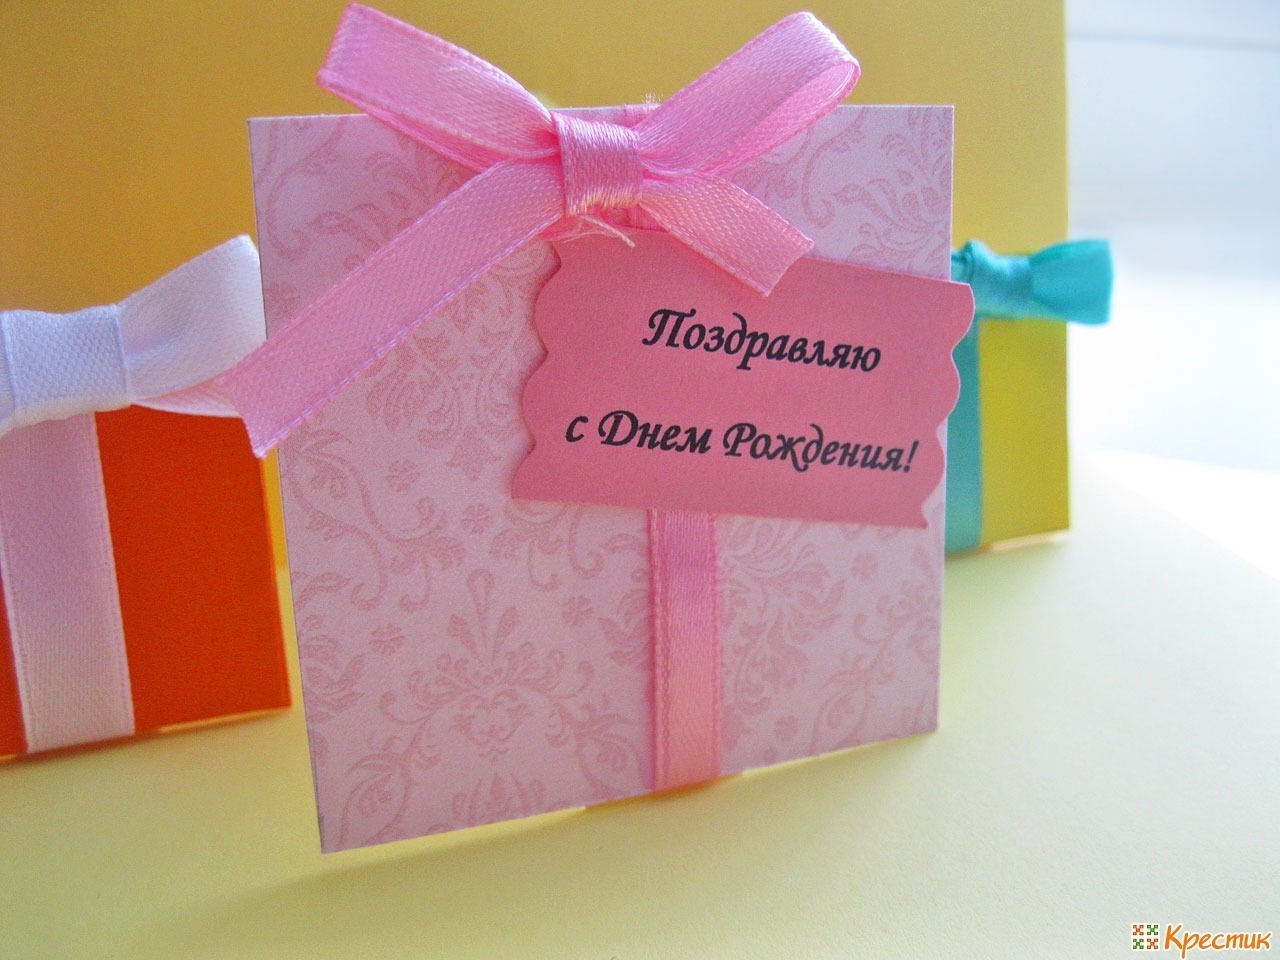
All is ready. The card looks quite bright and interesting and has voluminous elements in the form of gifts and bows.
Volumetric 3D postcard
Now we will consider more complex options for paper postcards. The first to be presented will be postcards containing 3D elements.

To create the product you will need:
- Several sheets of thick colored cardboard.
- Scissors.
- Glue stick.
- Set of colored paper.
The first thing you need to do is make a thick cover for the book. To do this, several cardboard sheets are glued together and folded in half.
On the outside of such a cover you can write congratulations and wishes, as well as place elements cut out of paper.
Now we open the resulting cover, and mark out a pyramid of future gifts in the center of the open cover. The workpiece is split in half so that the corner of the gift boxes begins to protrude forward when opened. Next, the base of the gifts is cut, except for the places where they are attached to the main sheet. Glue the resulting blank to the cover.
There is no need to glue the places where the gifts will stick out when opened.
When the glue dries, you need to decorate the pyramid of gifts that protrudes when you open it and glue a bow at the very top.
Cards made of paper with added fabric
To create a postcard with fabric you will need the same set of tools and accessories. The only thing you need to add is different types of fabric.
In the future postcard, fabric will replace colored paper. It is attached to a base in the form of cardboard. It is noteworthy that such a product looks quite interesting and is pleasant to the touch. To securely fix all elements on cardboard, it is better to use PVA stationery glue.
However, you should be careful. Many types of fabrics absorb moisture well. If you overdo it with glue, after drying there will be traces on the material, which will ruin the overall appearance of the postcard.
From the shape of a heart
For the next type of card you will need an even heart shape. It's better to print it on a printer on colored paper or find a good, large template to trace around it. You need to be careful, if the edges of the heart are not even, the postcard envelope will not work out.

It is also recommended to use gift wrapping instead of colored paper. All actions are designed in 5 steps:
- A template is prepared and the heart is cut out.
- Turns over with its back side facing the user.
- The sides of the heart fold evenly.
- The heart turns over and the part that is at the bottom is folded to half the product.
- The top part becomes the lid of the envelope. The sides are glued for fixation.
You can put a small bow or ribbon on the front of such an envelope.
With added confetti
Confetti is always a holiday. In order to make it, you don’t need to go out and buy special home fireworks. A hole punch and a set of colored paper in all the colors of the rainbow will help solve this problem.

First you need to make a base out of cardboard. It can be any color. It is better to make a postcard in the form of a frame. To do this, a large cardboard sheet is folded into pieces to form an isosceles triangle.
The base is glued to one part of it. To diversify it, you can make an envelope as shown in the picture. It is better to use thick cellophane or transparent paper for this.
By securing an envelope or other transparent object with glue, you need to make confetti. To do this, take a hole punch and a set of paper of different colors. Now the cuts are made using a tool. The shavings have an even circle shape and look like confetti. Parts of the circles are glued to the card, and the other part is placed in an envelope.
Summary: DIY postcards. DIY birthday card. How to make a postcard from paper. DIY children's cards.
A homemade card is the most popular gift that children usually give to adults for the holidays. Making cards is a creative process that has a positive effect on the development of the baby. First of all, it is valuable that the child learns to show attention and care for a loved one. It is also important that in the process of making a postcard with your own hands, the baby trains fine motor skills by working with unruly scissors, paper and glue. The child develops thinking and imagination, trains perseverance, learns to be neat by making children's cards with his own hands. In this article we will share with you interesting ideas for making birthday cards with your own hands.
1. DIY postcards. DIY birthday card
You can make many beautiful DIY cards using colored buttons. We will introduce you to some of our works.
In the photo below, a baby elephant and a sun are cut out of special paper for scrapbooking. This paper is often used to make homemade greeting cards. The grass on the postcard is made from ordinary double-sided green colored paper. To give it volume, it was cut into thin strips and “fluffed”. Balloons are made from colored buttons. The strings on the “balls” are as real as they come. In our opinion, it turned out to be a very cheerful, three-dimensional DIY birthday card for a loved one.
2. How to make a postcard with your own hands. DIY children's cards
Here's another DIY birthday card option, decorated with buttons. This greeting card was also made into balloons using buttons. The base for the DIY postcard is made from scrapbooking paper.

3. Do-it-yourself voluminous postcards. DIY postcards photo
Buttons can be used to make not only balloons, but also almost like real balloons. The clouds are cut out of plain white paper, the baskets and straps of the balloons are completed with a black pen. Look at how original the DIY postcard turned out. This voluminous card can be given to both men and women.

4. DIY postcards made from paper. DIY voluminous postcards
You can make a large number of beautiful postcards with your own hands from ordinary colored paper. In this article we will tell you about what voluminous postcards you can make with your children from paper.
Probably the most popular birthday card made from paper is this one. It depicts three boxes with gifts on top of each other (large, medium and small).

You will understand how to make it if you carefully look at the photographs of the master class on making a postcard from paper with your own hands. For the slow-witted :) readers, we’ll make some small explanations. Take a sheet of thick paper or cardboard. Fold it in half. Draw three squares on the edge with sides of 2, 3 and 4 cm. See photo 2. Make cuts along the red lines. Bend the resulting strips inward. Separately, cut out rectangles 2*4 cm, 3*6 cm and 4*8 cm from special scrapbooking paper. Glue them onto the strips concave inside the card. You've got boxes with gifts. Now all that remains is to glue your card onto a piece of paper or cardboard of a different color and larger size.
5. DIY greeting card. Beautiful DIY cards
Depicting beautiful boxes with gifts is especially appropriate on DIY birthday cards. Here is another successful example of a holiday greeting card. Gift boxes are best made from scrapbooking paper. If you don’t have it, you can get by with wrapping paper or, for example, candy wrappers. Decorate your card with your own hands with satin ribbons or braid.


A homemade postcard decorated with gift boxes made from thermomosaic looks original. If you and your child have not yet tried to work with this unusual creative material, now is the right opportunity for you.

6. DIY postcards. DIY birthday card
You can cut out flags from colored paper and decorate a birthday card with your own hands with a colorful, bright garland.

7. DIY postcards master class. Original do-it-yourself postcards
If you are going to give money to the hero of the occasion, then you can do it beautifully and originally with the help of a card like this. A rectangle is cut out of colored paper with a pattern and glued to the card in the form of a pocket. In the pocket you will put money and pieces of multi-colored paper for beauty. Separately, cut out a hand from light pink (flesh) paper and glue it to the top of the card, but not all the way. Leave part of the hand unglued. Insert a strap from a “handbag” into it, which you make from a thick thread or a narrow ribbon. That's all! Your original DIY postcard is ready!
An ordinary postcard will not surprise anyone. That's why I had the idea to make a 3D card with flowers. It’s not difficult to make, but it looks unusual and interesting. This card will be remembered for a long time.
To make a postcard we will need:
- a sheet of double-sided colored cardboard (card base) of any color;
- double-sided colored paper (for flowers) of any color;
- pencil glue;
- scissors;
- pencil;
- felt-tip pens.
Step 1. Cut out 7 10x10 cm squares from double-sided colored paper.

Step 2. Fold the square 3 times to form a triangle.

Step 3. Draw a petal.

Step 4. Cut and open.


Step 5. In this way we make all 7 flowers.

Step 7. Using a blue and blue felt-tip pen, draw small strokes from the middle, also along the edges of the flower. We leave two petals uncolored!

Step 8. Also color the remaining 7 flowers.

Step 9. Cut out one of the unpainted petals. We do the same with the rest of the flowers.

Step 10. Coat the remaining unpainted petal with glue and connect it to the adjacent petal. It should be voluminous. We do all the other flowers the same way.


Step 11. Take 3 flowers. We bend each flower in half. We mark crosses on one of the flowers. We coat the places marked with a cross with glue and glue the other 2 flowers bent in half there.


Step 12. Coat the places marked with a cross with glue and glue another flower bent in half.

Step 13. Place the crosses again, coat these places with glue and glue 2 more flowers, bent in half.

Step 14. Place the crosses again, coat with glue and glue one flower bent in half.

Gifts are an integral part of any holiday or memorable event; they help to express your feelings and make a magnificent, unforgettable surprise for the hero of the occasion, giving memorable memories and a great mood. Gifts are complemented by bouquets of flowers and cards with congratulations; instead, you can use bright and original greeting cards, offered in a wide variety by manufacturers on the market and produced in huge quantities.
The individuality of each person is emphasized by creative skills; looking at a variety of photos of hand-made postcards, you often want to make a hand-made masterpiece yourself and congratulate a close friend or family member.

To do this, just choose an original sketch, turn on your imagination, and use various materials to realize any ideas, creating a thematic greeting card dedicated to any holiday or special event.


Types and thematic styles of design
Conventionally, all greeting cards can be divided into several categories, choosing from them you can begin the creative process, the most numerous are:
- postcard in collage style. On a decorated base with a congratulatory or ceremonial inscription, you can apply images, flowers and figures of dear people cut out from photos and old postcards;
- voluminous, stylish cards. Inside a pre-prepared card, flowers connected and cut out of paper or soft cardboard are glued in a special way, creating a volume effect when opened;
- craft style postcards. The craft trend of decorating confectionery products, gifts and cards is gaining popularity due to its simplicity and presentable appearance, ease of implementation;
- decorated envelopes for money. Envelopes for money are a special type of greeting cards; they are used as an independent gift and are decorated with pleasant inscriptions or poems.

There are many master classes on how to make a postcard with your own hands, but first you need to decide on the design of this obligatory holiday attribute, which will help you decide on the further manufacturing process and selection of materials.

What you need to make an original postcard
An original and exclusive postcard will be created when you add a bit of imagination to ordinary cardboard or colored paper. The creative process of creation begins with choosing an idea and selecting materials for its implementation:
- It is better to choose thick and high-quality cardboard used as the basis for a postcard;
- basic decorations, strips of paper, cut out flowers or bright pictures, colored foil;
- additional decorations, which can be beads or beads, paper flowers and ribbons;
- paints and colored pencils, felt-tip pens and other coloring agents used for paper.

Having studied in detail the step-by-step instructions on how to make any postcard, it will become clear that for creativity you will need a set of simple tools, which include a needle and thread, scissors and a simple pencil, glue or a glue gun.

Step-by-step process for creating a greeting card
Self-made beautiful cards will delight adults and children and will be a wonderful addition to a pre-selected gift. Having picked up an idea for creating a masterpiece, you can start making it at home:
- preparing the base. To do this, use light cardboard or craft paper, which must be bent into two even halves;
- creating a composition. You can place decorations on the prepared base, creating an elegant and stylish composition according to the idea;
- securing decorations. After adjustment and arrangement, you can begin to attach the selected decorations to the cardboard base.


In the process of making a postcard, you can also decorate the inner surface of the greeting attribute; for this it is better to use elements of the main decorations, in accordance with the overall design idea.

After this, it is worth applying a memorial inscription, selected poems and congratulations that correspond to the theme of the holiday or upcoming celebration, a memorable date to which the presentation of a holiday card can be timed.

When planning to make a postcard at home, you need to carefully prepare, then the exciting creative process will become simple and easy, does not take much time, but will bring a lot of pleasure to everyone who participates in it.

Children of all ages can be involved in this activity; they will enjoy this pastime, and family and friends will be especially pleased with the masterpieces created by the whole family, under the guidance of adults.

Photos of postcards with your own hands


Cardmaking, or the art of making cards with your own hands, arose not so long ago, but, undoubtedly, it has already become a favorite among many lovers of handicrafts and creativity. After all, you can embody the most daring and original ideas in them, transferring your energy to the future gift during creation. It is this warmth of your soul that will be felt in all sincere wishes and kind words of congratulations. A handmade postcard will be a wonderful and very valuable gift.
Moreover, there are plenty of reasons to give it as a gift. With the arrival of spring comes a touching holiday - International Women's Day. On March 8th, you need a lot of gifts to congratulate all women from the bottom of your heart: why not make beautiful cards for them that are perfect for your mother, grandmother, sister, teacher, and girlfriend. In the same way, you can congratulate your loved ones on their birthday, and on Angel’s Day, and on any other holiday (for example, on Mother’s Day or on September 1).
Postcards are different...
First of all, you need to decide what kind of postcard you want to make:
- the product can be ordinary (flat) or three-dimensional (including 3D modeling);
- single-layer or multi-layer;
- made using quilling or scrapbooking techniques;
- made in a specific style (for example, shabby chic);
- have a standard look and shape or be made in the form of a silhouette - a butterfly, a heart, a basket of flowers, a dress, etc.;
- contain a lot of different decorations and decor or not.

Of course, the general appearance, format, color, and theme of the future product will entirely depend on who it is intended for. If you are going to make cards for March 8th with your own hands, then you can focus on spring floral motifs: a bouquet of flowers in a vase or a whole basket of them, decorated with birds and butterflies using the quilling technique, will be suitable for both mother and sister, and to congratulate the teacher on on the afternoon of September 1st you can send a beautiful card in shabby chic style. Any woman will be pleased to receive a luxurious card-dress or a stylish or elegant handbag as a birthday gift.
As you can see, the choice is very large, but the main thing is not to get lost in its diversity and settle on the most optimal option.
Such beautiful curls or good old quilling
If someone close to you has a birthday soon, or urgently needs gifts for March 8th, try making a beautiful and simple spring card using the quilling technique.
To do this, stock up on paper of different colors (take either one designed specifically for quilling, or just colored double-sided paper) and prepare the most necessary tools for the job: good scissors (you can use curly ones, if you have them), glue, tape (preferably double-sided), cardboard for blanks, quilling stick, decorations.


Here's another interesting idea for a postcard using the quilling technique.

Scrapbooking, shabby chic style and other interesting ideas
On your mother's birthday, you can present a beautiful and original dress card. It can be made using the origami technique, or in the shabby chic style using scrapbooking elements. If you chose the first option, then you will simply need to cut out and make a model of the dress according to the template and attach it to the card base, adding additional decorations.
You will have to tinker with the second option a little longer.
- There are several types of such products. You can take a cardboard dress template and decorate it. That is, glue this blank onto the front side of the postcard.
 Then make a fluffy skirt (you can take lace, cut it into small pieces and glue it to the base with an overlap), and corrugated paper folded in several layers is perfect for the top.
  Add a pretty belt and decorate your dress and the area around it with beads, rhinestones and organza ribbon.

- You can also make an original dress from paper napkins. Here, too, you will first need to cut out a blank - a template for the future outfit.
 Then take two types of napkins - regular white and colored. The skirt will be made from them. Cut them into halves, put them together and form a skirt, making it like an accordion.


 Apply the gathered napkins to the waist of the pattern of your dress (only the white background should be facing the dress).
 Then beautifully turn the skirt down and straighten it. Turn over and tie a ribbon at the waist.
  Glue the dress to the card and decorate it to your taste with rhinestones, beads, and sparkles.
- In the same way, you can make a handbag for your mother, and a cute apron for your grandmother for March 8th. It is also easy to cut it out according to a template, decorate it with ruffles, braid and ribbons, and put cardboard kitchen utensils in the pocket.
Paper napkins can also make a very beautiful, elegant umbrella with flowers or butterflies, which can be given to both mother and teacher on September 1st.
We also recommend
 LPR pensioners are waiting for pension increases and...
 Causes of white spots on fingernails and methods of treatment
 Africa's hottest beauty pageant that's making babies
 What to wear with powder-colored ladies' gloves
 How to make a card for mom: original ideas and techniques
 New Year tree according to Feng Shui What you need to decorate a Christmas tree