Decoration of the stand for the Day of the Elderly. What gifts to give grandparents on the day of an elderly person
On October 1, a wonderful holiday is celebrated all over the world, dedicated to the kindest and most caring people on the entire planet, our grandparents. It has been celebrated since 1991. As a rule, people who have reached the age of retirement age. They are so pleased to receive gifts from their children and grandchildren on such a significant day, especially if they are made with their own hands. In our master class we will tell you how to make cards for the Day dedicated to every elderly person, step by step and with high quality, with your own hands. And we’ll start, perhaps, with one not at all complicated postcard with step by step explanation actions, as well as with an attached photo.
Of course, this postcard is not at all like the masterpieces that are produced in printing companies and created on expensive machines, but it is the most beautiful and expensive, because it will be made by the hands of children for their beloved grandparents.
We make beautiful cards for the Day of the Elderly with our own hands
To make this card you will need the following materials and tools:
- colored paper, sheet of colored cardboard, A4 size;
- scissors;
- glue stick;
- simple pencil;
- ruler.
- First we need to decide what size our postcard will be, what color, what text we will write, and only after thinking through all these little things can we start making it. First, let's prepare the elements for decorating the postcard. To do this, you will need to cut 9 circles, but you need them to have different diameters.
- The next step is to make cuts in them, dividing it into 16 equal parts.
- Then we begin to round the edges of the circle so that they remind us of the petals of a flower.
- Now we need to give them volume and to do this we begin to fold each petal in half.
- The result was such wonderful preparations for future flowers. Now we start collecting our flowers. We do this as follows: take the largest circle in size, add a medium-sized circle to it and then the smallest circle. We do this with three flowers. In the end they should look like in the picture.
- We take green paper and start cutting leaves to decorate our flowers.
- Having prepared everything decorative elements, we can start collecting our postcards. We take the prepared sheet of cardboard and begin to attach all the elements one by one. First we attach the flowers, and then the leaves. We arrange them according to your imagination.
- Then we cut several thin strips and, using scissors, try to make a spiral, and then attach it to the card, again to your taste.
- The result is such a colorful and autumnal postcard, now all that’s left to do is to sign it.
- You can also, on the reverse side, write some beautiful verse dedicated to our elderly people or just beautiful and very sincere words, which will not only touch them, but also warm their hearts.
You can easily make such a card with your child at home, or you can offer to make it at school. It is suitable for children in grades 1-2.

Let's look at another master class on creating a postcard, but a little more complicated. It is suitable for older children, approximately 3-4th grade. This card will be made using the scrapbooking technique. To do this we will need the following materials and tools:
- Sheets of colored paper;
- Pictures on the topic;
- Various figured hole punches;
- Scissors, either simple or curly;
- Glue.
Now let's start making the postcard itself:
- First, take a piece of paper, fold it in half, measure 5 cm from the edge of the sheet. Draw a line, then use scissors to cut the sheet exactly along the line.
- Then we take a sheet of a different color and, using curly scissors, cut off a one-centimeter strip from it.
- After we have prepared the base of the card, we proceed to the decoration. Using figured hole punches we cut out flowers, twigs and butterflies. We bend the petals of the resulting flowers in half, and do the same with the leaves.
- Now we take a sheet of white paper and also use a hole punch to make strips, but 1.5 centimeters wide. We will decorate the card around the edges with them.
- After all the decorative elements are ready, you can begin to attach them to the card. You can stir it to your liking. You can first glue a postcard from your grandparents onto this card, and then decorate it with flowers, twigs, stripes and butterflies.

I present to your attention another fairly easy master class. For this we need:
- a sheet of cardboard, preferably white;
- sheets of colored paper;
- pieces of fabric;
- scissors;
- glue.
- First, you need to fold a sheet of cardboard in half, mark a window in one half and cut it out using scissors.
- The next step is to create a spread. Here we can paste a thematic picture or draw something. We can immediately write a congratulation, be it a poem or just words - wishes. Now you need to decorate the window on the back side. Take pieces of fabric and attach them on top so that they look like curtains. They also need to be secured at the bottom with strips of paper.
- Now you can start decorating the title page. To do this, you can embed various flowers, leaves, twigs and decorate it to your liking. The main thing is to do it with your soul.

Video selection on the topic of the article
In addition to our master classes, we will add a video on creating cards for the Day of Elderly People. Which will be useful and interesting in creating postcards on this topic. Happy creative success! And give pleasant emotions to your most beloved and dear grandparents!
Department of Education of the Orenburg City Administration
Municipal state-financed organization additional education
"Multidisciplinary center for additional education of children"
Lesson notes
“Greeting card for the Day of the Elderly”
Methodologist of the highest category. Ermizina G.I.
2017
Lesson notes
Type of activity : Yarn applique
Type of activity : Systematization of knowledge and skills
Children's age : 8 years (1st grade)
Amount of children : 10 people
Lesson topic : Greeting card for the Day of the Elderly
Target : Induce in students an emotionally positive attitude and a desire to make a card for their loved ones.
To promote a sense of respect and compassion for older people.
Tasks:
1. Educational :
Continue to instill in students positive moral qualities: accuracy, independence, perseverance during work
Develop respect for the results of your work and your peers
Cultivate respect for your loved ones.
Bring up aesthetic taste to design a postcard.
2. Developmental :
Develop imaginative thinking and creative imagination when composing a postcard composition
Develop cognitive interest in making postcards through thread appliqué
Develop fine motor skills hands
3. Educational :
Improve skills in working with yarn, cardboard, glue
Practice the skills of making greeting cards yourself according to your own sketch
Promote the application of knowledge in life situations.
Educational program : “Cheerful Ball” (1 year of study)
Predicted result of UUD:
Cognitive UUD:
Develop universal logical actions: - perform analysis,
Build a logical chain of actions and reasoning.
Regulatory UUD :
Learn to determine the purpose of your activities
Make a plan for completing a creative task
Learn to determine the degree of success of your work, evaluate the work.
Personal UUD :
Independently determine and name the simplest rules of behavior common to all people.
Communicative UUD:
Communicate your position to others
Learn to organize educational interaction in a group: negotiate, coordinate.
Visual material:
Glue
White + colored cardboard
Yarn
Tracing paper for drawing transfer
Pencil
Scissors
Various plot pictures.
Visibility:
Presentations: 1. Autumn holiday"Old Person's Day"
2. "Greeting Cards"
TCO: computer, projector, screen
Technologies: ICT, partial search work (searching for illustrations for a greeting card), health-saving (emotionally positive background in class, monitoring posture and vision, creating a situation of success)
Previous work :
Making appliqué from yarn according to the sample
Weaving “braids” from yarn for a frame
Forms of work :
Frontal (joint action of students and teacher)
Individual (children’s independent activities)
Methods:
Explanatory and illustrative
Practical
Gaming
Interdisciplinary connections : the world(conversation “What is old age like?”), literature (poems about grandparents, small forms of folklore)
1. Organizing time. Student motivation1.1. Teacher's greeting
1.2. Emotionally positive mood (calm music sounds)
1.3. Introduction to the topic of the lesson
Poem
Greetings in verse:
Good afternoon, my friends!
Back in the group you and me
I'm very glad to see everyone
Success awaits you today!
Turned right, left
Everyone smiled at each other
Let your smile now
Will illuminate us all!
The teacher hangs out a smiling sun without rays
Reads a poem - a riddle
Greet the teacher and check readiness for class
Children follow the teacher's instructions
Children guess the riddle
2. Updating knowledge
2.1. Conversation about the autumn holiday
2.2. Screening of the presentation “Autumn holiday “Day of the Elderly”
Who is this?(grandmother)
On a bright autumn day
We give them gifts
Kind, sweet and gray
The most, most expensive!
This is a day of kindness and respect
Almost like a birthday!
Asking questions
What holiday am I talking about?
What is it called?
How can you call it “Older Person’s Day” in other words?
Answer questions and express their opinions
Possible answers:
Respect Day
Good day
Help Day
Recognition Day
And etc.
3. Setting a learning task
Leads to the topic of the lesson
This holiday is celebrated all over the world and gifts are given to grandparents.
Have you already thought about how you will congratulate your loved ones?
What gift can we make for our loved ones from what is on your tables? (cardboard, yarn, glue, scissors)
Right, greeting card.
How are we going to accomplish it?
Answer the teacher's questions
4. Discovery of new knowledge
4.1. State the purpose and topic of the lesson.
4.2. Preparation of the workplace
That's right, we will make a postcard using the “thread or yarn applique” technique.
Then we'll have a real get-together.
Are you comfortable?
Can everyone see it?
Can everyone hear?
Was there enough room for everyone?
Well, that's great! To a kind person There is always a red place in the hut!
At get-togethers there are intimate conversations, but your hands are always busy.
What do we need for work? Pick up the cards:
Cardboard
Glue
Scissors
Yarn
Napkin.
Guys! Sit down before working
Look, is everything there?
Prepare everything you need
Help each other if necessary
Sit down more comfortably
Let's get down to business!
It's time to get down to business
There's no point in wasting time.
Answer questions.
Prepare their workplace
5. Expansion of new knowledge.
5.1. Conversation about TB
5.2. Planning the sequence of application execution
5.3. Fizminutka
5.4. Independent activity children
Conducts a conversation on TB
Teacher's additions .
About scissors.
Scissors have a bad temper. If a person takes them in his hands for a task - to cut, cut or carve something - they help him. But if you play around with them, twirl them near your nose and put them in your mouth, they get terribly angry and begin to stab, scratch, cut and tear everything that happens to be nearby - arms, legs, ears, noses, knees, pants, dresses, causing a heap of
troubles.
In general, they are good. If you don't offend them, they will for real will help in any matter.
How should you use glue? ? (Children's answers)
About glue.
White PVA glue is strict but fair. He is very calm, even slow. See how it flows slowly. He really doesn't like to rush. If a person, working with this glue, is in a hurry, trying to do everything quickly, somehow, then the work will work out
sloppy and ugly. But if a person does everything calmly and carefully, the glue helps him. When it dries, all sloppiness and ugliness, if any, disappear.
Here it is - PVA glue.
How should you handle paper? (Children's answers)
About paper.
Paper is very vulnerable. It can wrinkle, tear, get dirty. And yet, there’s always a shortage of it, especially in color. Therefore, it must be handled with care, caution and sparingly.
Offers to lay out the cards sequentially, according to the work algorithm
1. Selecting a colored background
2. Selecting the subject of the drawing
3. Selection of yarn according to color scheme
4. Preparation of yarn of the required length
5. Applying glue to individual segments of the pattern
6. Laying yarn on a segment of the pattern
7. Glue the congratulations to the postcard
8. Design of the work: making a frame for a postcard using a knitted chain
Conducts physical exercises
We don't sit idle
We don’t look out the windows
One here, two there
Turn around yourself
One sat down, two stood up
Hands raised together
Then we quietly lower it
Let's breathe in slowly
Let's sit down quietly and start working
He suggests getting to work and paying attention to the signal cards that you can pick up if it doesn’t work:
Red - “I don’t know - I ask for help!”
Yellow - “I doubt it, I’m not sure”
Green - “I know, I can”
Suitable for those children who need help.
Reads proverbs about work
The skill will find application everywhere
He who has dexterity works deftly
Like the spinner, like the shirt
Praises children for diligence, accuracy, dexterity, etc.
Makes riddles
It’s small, round, but you can’t lift it by the tail (a ball of thread).
I’m fluffy, soft, round, I have a tail, but I’m not a cat, I often jump elastically, I’ll sway and under the chest of drawers (a ball of thread)
On one finger the bucket is upside down (thimble).
An iron bug with a worm (pin) on its tail.
Two rings, two ends, and in the middle there are nails (scissors).
I don’t know how to read and write, but I’ve been writing (in pencil) all my life.
Performs eye exercises
Reminds children of the work schedule (time on the hourglass)
Offers to finish work and clean the workplace
Reads a poem
Finished the job together
So, we need to put things in order
Put everything in its place
You must do everything yourself
They explain the rules of TB
You need to work at your own workplace.
Before you start work, you need to prepare your workplace correctly.
While working, keep your work area in order: where you got the tool from, put it there after completing the actions.
Do not put small parts in your mouth.
When working with glue, you must be careful; if glue gets on your hands and face, rinse them with water.
When working with scissors, keep them parallel to the table.
Pass scissors only when closed, rings first.
When cutting, keep the ends of the scissors away from you.
When working, do not hold the scissors with the ends up.
When cutting out a part, rotate the paper.
Do not leave scissors open.
Do not use loose scissors.
Take care of tools, save materials.
When you finish your work, clean up your workplace quickly and neatly.
Lay out the algorithm on cards
Do physical exercises
Start working independently
DIY greeting card
Answer the teacher's questions
Proverbs tell
Guessing riddles
Doing gymnastics
Keep an eye on the hourglass and the pace of work
Finish work and clean up the workplace
Clean up the workplace
6. Summary of the lesson
6.1. Reflection
Analyzes postcards with children
Now we will look at your gifts. Let's admire the postcards. How much soul and warmth you put into them, diligence and hard work, because you made them with your own hands, for your loved ones.
Which cards did you like best? Why?
Place small hearts on the card you like.
And I will do this with you too.
And what good words will you tell your grandparents?
In what mood will you give?
Offers children quatrains to congratulate at home
Offers to spread rays of sunshine with kind words addressed to your loved ones.
Look, children, how many rays of rays bring warmth to your grandparents! Let our sun warm all the grandparents around the planet
Thanks everyone for the activity!
The lesson is over.
And now I invite everyone to a tea party. I ask everyone to come to the table
Analyze their own work and the work of their peers
Saying kind words
Reading short congratulations:
To enjoy warm days more often
To grandma - sunshine, to grandpa - verse
Lots of health for both of you!
I wish you happiness for two centuries
Happy Older Person's Day!
Lay out rays with quatrains to the sun
Every modern child who attends kindergarten or school there are grandparents. And, probably, many people know that a special holiday has been created for such people called the Day of the Elderly. Of course, this celebration involves a fun time with songs and dances for older people. Of course, the celebration is not complete without gifts that the children make on their own. In this article, we decided to present for you crafts for the Day of the Elderly so that you can make them with your own hands.
Best craft ideas
Presentation candy.
Everyone loves sweets without exception. Therefore, absolutely all people will be happy to accept this gift. To make this gift you should use:
- Small size candies
- Cardboard sleeve and chewing gum,
- Tape and wrapping paper,
- Paper, scissors and tape.
Progress:
- The cardboard cylinder is first wrapped in wrapping paper.
- On the left side the paper is secured with tape.
- The packing tape is tied beautifully in the next step. You can even make curls.
- Place sweets and chewing gum in the right side of the cylinder.
- Now all that remains is to sign this gift and give it to the elderly person.

Chandelier made of pine cones.
If you decide to make a craft on the day of an elderly person, then you will probably be interested in many of the crafts that are offered here. Crafts for this holiday can also be made from natural materials. For another craft use:
- Screws half ring,
- Cones and sparkles
- PVA glue.
Progress:
- First of all, a screw is screwed into each cone.
- Glue is applied to the ends of the tops of the cones.
- Sprinkle glitter on the glue.
- Then, when the cones are dry, you can screw the cones to the chandelier.
- Such useful gift will definitely turn out to be useful person for each.

Mosaic for a flower pot.
Another gift would look interesting and great. And if you are looking for children's crafts for an elderly person's day, then you can take a closer look at the next option. To make it, you should use the following materials:
- Several CDs
- Plastic pot and acrylic paint,
- PVA glue and scissors.
On a note! To create a craft you need pieces of disks. Therefore, the disc is cut using scissors. And it is recommended to do this with glasses.
Progress:
- The disk is cut into pieces that have different shapes and sizes.
- On flower pot apply glue. Then pieces of the disk are gradually glued to the pot. In this case, space must be left between the parts.
- Cover the pot and let it dry.
- After the craft has dried, the space between the pieces of disks is painted with acrylic paint.

Original flowers.
An exhibition of crafts for the Day of the Elderly cannot be complete without something beautiful. Flowers are a traditional gift option. But it is best to give those flowers that will retain their beauty for a long time. for a long time. The following materials are already used here:
- Flower wire and coffee filters.
- Watercolor and pliers.
- On a note! Instead of filters, thin paper is used, which can be corrugated.
Progress:
- For this craft, use 4 coffee filters.
- The filters are stacked in a pile, and then in half.
- In order for the petals to take on a beautiful shape, their edges are cut with a wavy line.
- The first half of the filters is set aside, and the other half is cut off a few more cm.
- After that, the filters are unfolded and laid out on a flat surface. In this case, small forms are laid out on top of large ones. Then, the middle of the filters is pierced with wire. First, the wire is pierced in half and bent. Space is left between the holes.
- Use your fingers to squeeze the paper. Lifting it up and twisting it slightly. This is done with each filter.
- The base of the bud is then wrapped with wire.
- Green adhesive tape is wrapped around the flower stem down to the base of the bud.
- If desired, the filters can be painted in the colors you like.

Flowers in a cone.
On the eve of this wonderful holiday, you can create a lot. For example, you can do a lot beautiful crafts, which children can also create. For the next product, take:
- Waffle cone and stationery knife.
- PVA glue, colored paper and scissors.
Progress:
- A quarter circle is cut out of a sheet of colored paper, through which a cone is wrapped.
- The same paper is wrapped around the cone, and then the ends are secured with glue.
- Now the petals are glued in a checkerboard pattern. This is done around the skewer. After that, glue is applied to the tip of the cone and the bud is glued to it.
- Leaves are cut out of green paper and then glued to the cone.

Gift panel.
We continue to list crafts for the Day of the Elderly that you will make with your own hands. Almost every home has old CDs. And just this item can be the basis for your craft. You will create this one from plasticine. From this material you can create completely different objects that will be glued to the disk. Using plasticine you can also create an inscription, for example, for your beloved grandmother or grandfather.

Unusual craft.
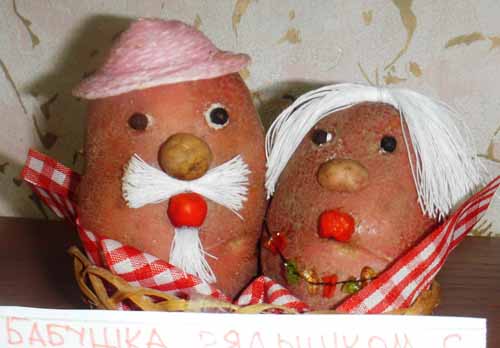
You've probably noticed that the next garden craft for Elderly's Day looks interesting. And indeed it is. To create it, vegetables were used, namely potatoes. Facial features are also created from berries and small tomatoes. And hair and beard can be made from threads.
Potatoes can be placed in some beautiful basket.
Felt craft.
An older child can always please his grandmother with something very beautiful. For example, her portrait can be made from felt. Everything is simple here. Pink and gray felt is used. The same material is used to cut out facial features and glasses for the grandmother.

Finally
Use these tips to create very beautiful products for your beloved grandparents.
Due to our busy schedules, we often do not have enough time to devote to our mothers, fathers, grandmothers, and grandfathers. But there is a day in the year when all attention should belong to them. And do-it-yourself postcards for the Day of the Elderly will come in very handy, because older people love to receive gifts made by the hands of their beloved grandchildren and children.
Shadows of memory
The technique of this postcard is very simple; grades 1-2 will cope with this task without difficulty.
To get started you will need to stock up necessary materials. Decorative craft cardboard or scrapbooking paper autumn flowers, scissors, glue and black construction paper.
Once everything is collected, you can begin. Making the base of the postcard. We bend a sheet of cardboard in half and place it under a press so that it holds its shape well. From black paper we cut out the silhouettes of grandparents and a child.

You can draw the shadows yourself. You can also use the template:

Glue the shadows and printed wishes onto a cardboard base and decorate as desired. Example of a congratulatory text:
Your invaluable experience, your knowledge
Are you ready to hand it over to us?
Allow me to express my recognition,
Long life and good health!
Your years are wealth!
You have so much to tell!
We are ready to admire you!
We are ready to follow your example in everything!
This is what you get as a result:

Flower bouquet
Give your dear people a bouquet of autumn flowers, which will also be made by your own hands and in the form of a postcard. The technique is quite simple, so if your child helps you, then 3-4th graders will be able to cope.
To do this, you will need to stock up on the necessary materials: cardboard, colored paper, scissors, glue, pencil and ruler.
Now you can get to work. We cut nine circles of different diameters from colored paper. We cut the edges into fifteen to sixteen pieces. Now, using scissors, we give the scraps the shape of petals.


Now use your fingers to bend the petals with the edges inward and place three circles on top of each other from the largest in diameter to the smallest. How to do it, see the link below.


We cut out leaves from green paper and shape them with our fingers in the same way as petals.

The decoration for our card is ready. Now all that remains is to put everything together. Attach flowers and leaves to the front side of the craft using glue. You can decorate with a twisted ribbon of colored paper. Look at the photo below:

All that remains is to sign the card and write a congratulatory message. This is what will happen in the end.


The simplest postcard
This postcard model is very simple and because of this it is great for children.
All you need is an autumn leaf stencil, a piece of cardboard, yellow construction paper, glue and scissors.
Once everything is assembled, you can begin. From paper yellow color cut out Maple Leaf and from paper of a different color the number one.


Fold the cardboard in half and cut two pieces along the fold. Push them inside and glue a maple leaf on it.


Now glue the number one to the piece of paper, that’s all. You can further decorate it to your liking.

Video on the topic of the article
For your convenience, watch a selection of videos on this topic.
We also recommend
 We make beautiful crafts from satin ribbons
 Logical and entertaining problems (300 problems) Easy riddles for children 5 years old short
 Hairstyles for long hair Quick hairstyles for long hair with your own hands
 How to make a paper fish: master class Movable paper fish
 Children's carnival crowns and kokoshniks Crown with oblique crochet pattern
 Bodysuit for Baby Born doll