DIY Happy New Year cards. Happy New Year of the Pig cards for children
With the approaching New Year 2017, we are all starting to look for New Year's gifts, and with them New Year's greeting cards. If buying a New Year's card is not an option for you, if you still prefer handmade items, then this article will be useful for you.
The news port “site” in this article has prepared for you several ideas for making New Year’s cards with the symbol of 2017, the red fiery Rooster.
DIY postcard with Rooster

This charming Cockerel in the shape of a lush heart will be able to convey all the warmest and most tender congratulatory speeches to your family and friends, loved ones and friends, work colleagues and just acquaintances.
To make a decoration for a postcard, the Rooster itself, you will need thick colored paper or cardboard, scissors and glue.
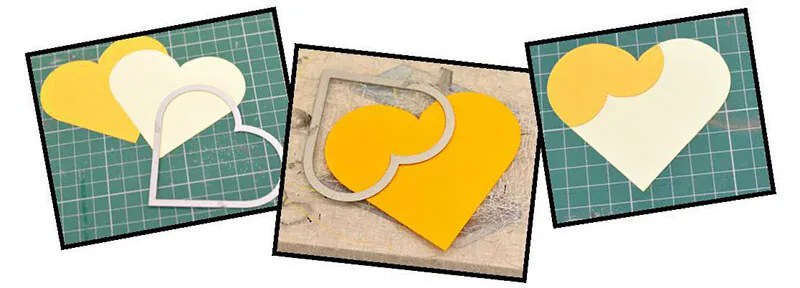
From colored paper you need to cut out the necessary parts, which, without exception, are heart-shaped. Symbolic isn't it? From a thin strip of yellow colored paper, twist a spiral that will become the legs of the cockerel.

Now form a Cockerel on the front of the greeting card and secure everything with glue. Don't forget to sign the card!
Do-it-yourself voluminous postcard with a Rooster

A very unusual option for decorating a greeting card.
From thick cardboard or a plastic disposable plate, cut out an even circle that would fit on the front side of the greeting card.

Now cut thin strips of colored paper and glue it to the prepared circle.

Now all that remains is to cut out the red legs, beak and comb.
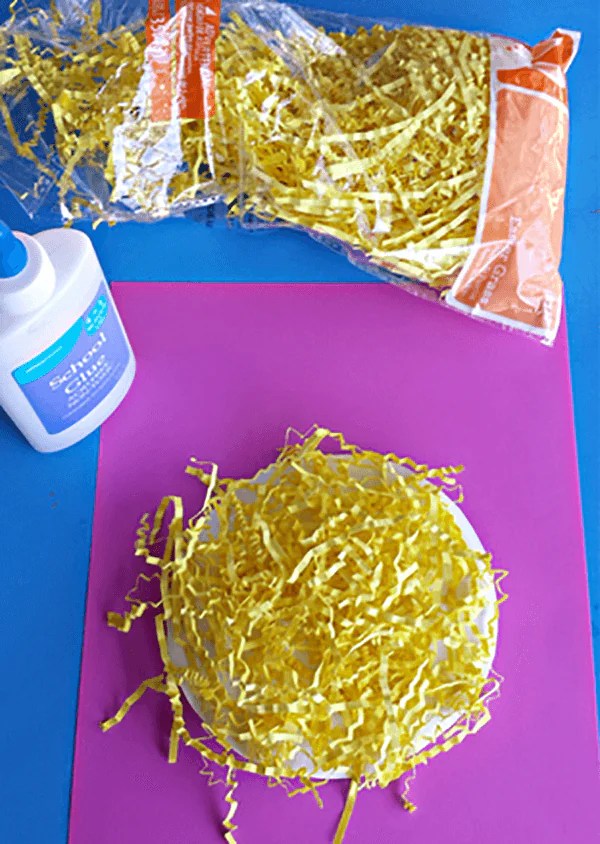
And don't forget about the lively eyes!

DIY New Year card with Rooster

At first glance, this postcard looks completely normal. But you just have to unfold it and scenes of outlandish beauty appear before you.
The best gift for the New Year is, of course, a gift made with your own hands. And if socks or a sweater are not an option for you at the moment, then even a child can handle a postcard. A DIY New Year's card is suitable as a gift for absolutely everyone: friends, relatives, dearest and closest people.
New Year cards can be difficult to make, or they can be very simple, but at the same time not lacking in taste. The most important thing in creating a New Year's card is the flight of imagination. In this article we have collected for you more than 30 original ideas for New Year's cards that you can make with your own hands.
Quite simple to make, but very original New Year's card. To make it you will need: thick paper for the base, corrugated paper, scissors, decorations.
#2 DIY New Year card using scrapbooking technique
Scrapbooking has become especially popular lately, so why not use this technique to create a New Year's card. You will need: thick paper for the base, scrap paper (you can limit yourself to regular wrapping paper), PVA glue, pen or felt-tip pen, decorations.

#3 New Year card made of threads
A postcard made using threads looks original. The designs can be completely different: a New Year tree, a deer, Santa Claus, or simply the inscription “Happy New Year.” To make such a card you will need: thick paper for the base, thread, needle, pencil, ruler, sequins for decoration.


#4 Handmade New Year card using origami technique
An excellent option for a New Year's card would be a three-dimensional card made using the origami technique. To make it you will need: thick paper for the base, colored paper, glue, buttons, sequins, ribbons, etc. for decoration.

#5 New Year card using quilling technique
You can surprise your loved ones with a postcard made using the quilling technique. You will have to spend a lot of time, but it is worth it. You will need: thick paper for the base, paper strips for quilling, scissors, glue, corrugated paper or napkin, toothpicks.

New Year is the most fabulous holiday of the year, on this day everything becomes magical, so it will be very symbolic to give a voluminous card that seems to come to life. To make a 3D New Year's card with your own hands you will need: thick paper for the base, scissors, pencil and ruler, decorations.

For those who love order and control, a handmade New Year's card with a geometric Christmas tree would be an excellent gift option. To make such a masterpiece you will need: thick paper for the base, a stationery knife, a pencil and ruler, PVA glue or double-sided tape.

For romantic natures, strict geometric shapes are not suitable. What is needed here are smooth lines, curves, and additional decoration. In this case, you can give a handmade card made using ribbon and buttons. You will need: thick paper for the base, ribbon, buttons, scissors, glue.

#9 New Year's card from a napkin
To make such a card you will need: thick paper for the base, napkin or double-sided paper, glue or double-sided tape, scissors, decorative elements (beads, rhinestones, buttons, etc.).

#10 Christmas tree card made from colored tape. Preparing cards for the New Year with the children
If there are little residents in the house, they should definitely be involved in creating New Year’s cards with their own hands. There is no need to do anything complicated; kids will be delighted with simple crafts, for example, a New Year’s card with a tree made of colored tape. You will need: thick paper for the base, scissors, glue, multi-colored tape (decorative ribbons, strips from old magazines and postcards are also suitable), stickers or other decorative elements.

Another option for a New Year’s card that you can make with your own hands with your children is a card with a Christmas tree fan. You will need: thick paper for the base, glitter or rhinestones, wrapping paper, scissors, glue, stapler.

Another simple but very original idea for creating a postcard for the New Year. You will need: thick paper for the base, buttons, glue, tape, pencil or compass.

A great idea would be a postcard with a handmade drawing. For example, you can draw New Year's lanterns: it is not necessary to have the skill of an artist.

You can also draw a New Year's card with the kids. You will need: thick paper for the base, marker, ruler, paints.

To create such a card you will need: thick paper for the base, colored paper, scissors, glue, glitter, rhinestones and sequins.

What you need: thick paper for the base, colored paper for the Christmas tree, pencil, scissors, glue, decorative elements (beads, sequins, stickers, etc.).

For such a card you will need: sequins of different shapes and sizes, a needle, thread, glue, ribbon for decoration.

New Year's cards decorated with felt look very original. We will make cards with Christmas trees from pieces of fabric, but you can use your imagination and make something more complex. You will need: thick paper for the base, felt, scissors, glue.

#19 Very simple DIY New Year card
You will need: thick paper for the base, cardboard for round blanks, colored decorative ribbons, glue, glitter, felt-tip pen.

You will need: 3 sheets of colored paper of different sizes, glue, thick paper for the base.

If you have little time left for postcards, you can try this option. You will need: thick paper for the base, a Christmas tree template, a pencil, glitter, glue, a stationery knife, sequins or beads for decoration.

#22 New Year card with a voluminous Christmas tree made of paper for scrapbooking
A very cute and simple New Year's card. To create it you will need: thick paper for the base, thick paper for scrapbooking or cardboard, glue, ribbon for decoration.

#23 New Year card with voluminous Christmas ball
And here is a New Year's card with a three-dimensional Christmas ball. The manufacturing principle is the same as in the previous postcard, the only difference is that instead of colored cardboard triangles you will need circles. By the way, you can use old postcards as consumables, but only those that are not valuable to you as memories!

#24 New Year's card for the garden
This New Year's opener, literally made with your own hands, is perfect as a gift for grandparents, as well as for kindergarten. Kids will have great fun creating! You will need: thick paper for the base, paints, felt-tip pens.

#25 Beautiful vintage New Year card
A vintage New Year's card can be made from the most ordinary materials: old notes, thick paper, a beautiful old card (you can cut out any picture from a magazine), glue and a little glitter. Step-by-step instructions in the picture below.

#26 New Year card with voluminous garland
New Year means, of course, a Christmas tree and Christmas tree decorations. In fact, Christmas decorations come in many different shapes, but the most common are balls. This is why we associate Christmas tree decorations and the New Year with balls. So we’ll make a card with a voluminous garland of Christmas balls.

If cards with Christmas trees are unacceptable for you, then you should pay attention to other attributes of the New Year holiday, for example, garlands. We will make a garland from pieces of felt and literally “hang it” on a postcard.

#28 Felt card
To make cards with your own hands, you can and should use various materials, in particular, pay special attention to felt. No, no, not the entire card will be made of felt, but only some decorative elements. In this case, a Christmas tree. How to make a postcard from felt - see the step-by-step tutorial with photos.

#29 Original card in the shape of a Christmas tree
A New Year's card does not have to be square or rectangular. Get creative and make a card, for example, in the shape of a Christmas tree. The idea is not new, but you must agree, it is very, very original! By the way, with such a postcard you can safely go to a competition in kindergarten.

#30 Accordion Christmas tree: making a card with children
A postcard with an accordion Christmas tree will be a great gift for grandma and grandpa. The child can make all the elements of the craft independently. Mom's help may be needed, except for gluing. Take note of the idea and have fun with your child.

#31 New Year card from different materials
But here’s an idea for those who want to make a beautiful, simple and unusual craft - a postcard from different materials. You will need colored paper, fabric, you can also use fringe, braid and other unnecessary little things that are lying around idle and you don’t get around to throwing away. Step-by-step instructions in the photo below.

#32 Sparkles and nothing extra
You can make a stylish New Year's card using glitter. For a greater effect, use dark paper for the base, although you can do it on light paper, only in this case take dark glitter, the gold will be lost on the white background. To make it you will need glue, brushes and glitter. See the step-by-step master class below.

#33 New Year card from scrap materials
Here's a great idea for those who do needlework once a year. The only material for a postcard in the house is paper? No problem! You can make a great card from a coffee box. How to do it - look at the photo.

#34 Simple card for children
Making crafts with children is a real pleasure. Here you are, mommy, when was the last time you made something with your own hands? In kindergarten, in primary school, at the final exam in art school? That's it, it's so much fun! Children are not only our joy, but also our teachers, who give us the opportunity to remember what we sometimes forget!

#35 For the little ones
And here is another version of a postcard for the little ones, for those who still don’t really know how to hold a brush in their hands. Well, let your child start learning art from an art house!) A simple card with a Christmas tree made from a handprint.

#36 Unusual DIY snowman postcard
Here's another idea for an original card in the shape of a snowman. Simple ideas are good because they are easy to implement, but at the same time they are not devoid of grace.

#37 Unusual New Year card with children
And another option for a simple postcard to make with children. This craft will look very, very original and is quite suitable for competition work. Prepare a thick sheet of paper and a lot of colored scraps (colored paper, foil, pieces of fabric, etc.). Glue all this stuff onto the base, and then cut out elements for postcard decor from the resulting panel: Christmas trees, gifts, balls, and more.

Photo. 40+ more DIY New Year's card ideas for inspiration


Making a New Year's card, especially with your own hands for the 2017 Year of the Rooster, is a wonderful way to show creativity and surprise your loved ones with a creative surprise. After all, a thing made by yourself carries a huge positive charge, the warmth of your heart and hands. All you need to do is stock up on a small amount of materials and use your imagination.
Such a postcard will be a wonderful addition to the main New Year gift for the Fire Rooster, who will definitely like such amateur activities. Below are some DIY options that you can use as a basis for creating your own masterpieces. With us, it’s not at all difficult to make cards for the New Year 2017 with your own hands, just focus on the photographs, read the explanations, and everything will work out for you.
Idea No. 1 - Variegated Christmas tree
New Year's cards for the 2017 Year of the Rooster may have as their main decoration a purely winter symbol that is firmly associated with this home holiday. This is, of course, a Christmas tree. What's a holiday without a prickly beauty?
Only in our case, the main attribute of New Year's fun will not be with needles, but made from any paper you like and matching the color. It is better if a different design is applied to the paper on both sides - this will become the main highlight of our Christmas tree.
Making it yourself is extremely simple. Cut out a semicircle from paper, fold it as shown in the figure, as if forming a fan. Another method is to cut out “branches” and then glue the paper together so that it does not open. The top can be decorated with a star-sticker, a snowflake, a bead - whatever you like. 
Idea No. 2 - Mountain of gifts
Implementing this very original idea for a postcard is as easy as shelling pears, and there will be a lot of emotions from receiving such a surprise. So, we choose paper, preferably a bright, saturated color, maybe textured (with some kind of decorative pattern). 
Fold the selected sheet in half and use a ruler to mark 3 squares (from largest to smallest or vice versa), which in the future will become gift boxes. Then, using scissors or a stationery knife, we make cuts at the top and bottom, thus giving our boxes volume.
We glue them on top and decorate them to our liking. That’s it, your unusual postcard for the New Year of the Rooster 2017 is ready!
Idea No. 3 – Creative Christmas trees and a cute snowman
DIY New Year cards for the Year of the Rooster 2017 using the following ideas prove that it is very easy to be original without putting in a lot of effort. What is needed for this? Different textured paper of different colors (in our case it is white, red, green, black), cardboard, pieces of ribbon, buttons, glue, felt-tip pens.
Snow beauty
To make a simple but very elegant Christmas tree from white paper with an ornament, just cut out a triangle with a long top and decorate it with two bows made of transparent white ribbon. The top can be decorated with a silver snowflake.
Shine Christmas tree!
A Christmas tree made from circles of different sizes, cut from paper, differing in texture and color, looks even more interesting. Then the circles are simply glued in the shape of a Christmas tree onto the base, and this splendor is crowned with a star.
Unusual snowman
Let's make a snowman out of buttons with our own hands? It will turn out interesting and unusual. We take 3 buttons of different sizes, choosing the smallest one with two holes that will be the eyes. We glue the buttons on top of each other, finally “tying” a thread scarf and placing a funny hat on the snowman’s head. Or... a bucket cut out of paper is also an option.
Using a felt-tip pen, we draw snowflakes around the snowman, and tie a bow from a contrasting ribbon on top. That's it - you can give a surprise for the New Year! 
Idea #4 - Button Mood
Buttons provide a wide scope for creativity. You can make a Christmas tree out of them with your own hands, lining the gaps with rhinestones, beads or paper circles. Buttons can be used in the same color and successfully combined with shiny rhinestones in the same tone.
To do this, you can take a ready-made card and decorate it with buttons according to your taste and desire. Or you can not limit yourself to ready-made templates and create your own, unparalleled options.
Buttons can not only be glued, but even sewn to a base cut in the shape of a Christmas tree - this will be even more interesting. We use snowflakes, beads, bows tied from ribbons as decoration.
And how nice is a Christmas wreath made of red buttons of different sizes and even shapes! We lay them out in a circle, having previously coated the lower part with glue and forming a wreath, “hanging” it on a ribbon attached with glue to the paper. It turns out extraordinary and very European. You can use combinations of buttons of different colors within one wreath or even lay out interesting ornaments. 
Idea No. 5 – For the creative and... thrifty
If desired, when creating postcards for the New Year 2017, you can even use scraps of ribbons, scraps of fabric, lace, twine, threads, in short, everything that lies dead weight in sewing boxes, patiently waiting in the wings. 
Postcard in rustic style
So, simply by tying pieces of different fabrics, lace ribbons in the middle and gluing them under each other, you can get a nice Christmas tree in a rustic style. Buttons and mother-of-pearl beads are suitable for decoration.
Note to minimalists
For lovers of minimalist design, the following option would be ideal: select narrow ribbons in green, slightly different in width, and attach them one under the other, securing them with a bead in the middle. It turns out simple, but very unusual!
"Live" Christmas tree
Ribbons of different lengths tied to a stick attached to paper will perfectly depict fluffy twigs. A shiny star on top will complete the picture. Even a child can cope with such a simple task, and the result looks extremely stylish.
As you can see, it’s not difficult to make cards for the year. In addition, the process itself is addictive and gives a lot of pleasure. Even one single idea can become an inexhaustible source for the realization of your own creative discoveries.
Based on the methods outlined in this post, feel free to create your own, which can and will become much more interesting and original. The main thing is to remember that the beauty of such a craft is in your own vision of the final result. Let him be a little naive and funny, your surprise will only benefit from this, believe me!
It’s quite easy to create a New Year’s mood, because it’s all in the little things. Try making wonderful New Year cards with your own hands, it’s very fun and simple, such an original gift will be appreciated by friends and family. We invite you to familiarize yourself with several master classes on creating postcards and turn the proposed ideas into reality.
Master classes
Mini-album-postcard “Herringbone”

What is necessary:
- Pastel paper;
- Corrugated cardboard with an image;
- Double-sided tape;
- Spray paint;
- Cutter;
- Rhinestones;
- Decorative lace (golden);
- Pigment cushion;
- Glue “Moment” and for attaching rhinestones (transparent);
- Ruler;
- Mat mock-up;
- Creasing tools;
- Pencil.

Origami Christmas tree for postcard
Today, postcards in the scrapbooking style have become very popular; the finished product looks bright and very beautiful. We recommend that you familiarize yourself with the scrapbooking master class for beginners.Required materials: 5 squares of colored paper measuring 10 cm; 9 cm; 7.5 cm; 6.5 cm; 5.5 cm.
How to do:

- So, you need to take the largest square and fold it so that you get a triangle.
- Unfold the square and make the exact same triangle by folding opposite sides of the cardboard.
- Place the unfolded sheet of cardboard in front of you.
- Fold the sheet along the folds to form a three-dimensional triangle.
- Now one of the sides of the figure will need to be bent inward, as shown in the photo.
- In the same way, fold the cardboard on the second side - this is the first module of our Christmas tree.
- We add the remaining modules using the same scheme; accordingly, their sizes should be different - from larger to smaller.
- You need to glue a small piece of tape to the top of the first module. We place the largest module inside the smaller one and do the same with the rest.
Christmas tree made of decorative tape for a postcard
Creating wonderful cards for the New Year 2019 with your own hands is very entertaining, so involve the kids in this process. Preparing for the holiday will be more fun with children.
To work, you will need a minimum of material - decorative tape, as well as strips of colored paper.

Manufacturing Features:
- Stick a piece of tape (preferably plain) vertically onto the cardboard blank; the top of the strip should be slightly narrower than the bottom - this is the trunk of the future Christmas tree.
- After this, you will need to cut the tape into strips of various sizes. The ends of the strips should be cut obliquely, imitating spruce branches.
- Glue the strips in a pyramid pattern (from largest to smallest).
Manufacturing instructions:

- Take green colored paper, cut out a circle, cut into two halves.
- Fold the edge of the paper as shown in the photo.
- Now make the next bend in the opposite direction, thus folding the edge again and creating a Christmas tree. The paper craft looks original.
- Glue the “branches” to the base using a glue stick and you can start decorating New Year’s cards with your own hands.
3D New Year card
Making voluminous New Year's cards with your own hands is not at all difficult; see this in the example of the proposed master class.You need to prepare:
- Double-sided tape;
- Multi-colored cardboard;
- Glue;
- Scissors;
- Figured hole punch.


Postcard “Christmas balls”
You can make an unusual New Year's card with your own hands in just a few minutes; prepare an excellent gift for your loved ones for 2019.You need to prepare:
- Colored paper of two colors;
- Scissors;
- Stationery glue;
- Pen for writing.

- Before you start making a New Year's card with your own hands, as in the photo, you will need to prepare all the necessary materials and tools.
- Fold blue paper in half for the base; the background made in this way will contrast perfectly with the light blue “balls”.
- Cut out circles from light-colored paper.
- Fold each one in half.
- Now you need to attach these circles to each other, thus forming three-dimensional balls.
- Glue them on the outside of our card.
- Using a pen, draw the threads that “hold” the balls. Now your DIY New Year's card is completely ready, you just need to sign it.
Quilling holiday card
You can even create beautiful children's cards using quilling, try it, you will like it.You will need to prepare:
- Colored cardboard;
- Colored stripes;
- Glue;
- Toothpicks;
- Scissors;
- Corrugated light paper.

- Take quilling (green strips), make cuts at equal distances using nail scissors.
- Wind the prepared ribbons onto a toothpick, so you get several skeins, as in the photo.
- Now you need to fix the bottom of the skein with glue and straighten the fringe, you will get voluminous balls.
- Next, we proceed to the final stage of making a New Year's card with our own hands. You should glue the balls on a sheet of cardboard in the form of a pyramid, you will get a Christmas tree. Now you can “decorate” it as you wish.
Bright "Christmas tree"
Required:- Paper of various colors and textures;
- Double-sided tape;
- PVA glue;
- Decorative hole punch;
- Rope.

- You will need to fold a piece of colored paper in half, glue on a triangle of green paper and a small rectangle of brown paper to create a Christmas tree.
- Cut out circles of various sizes, then use a hole punch to make snowflakes.
- Glue all the figures onto the Christmas tree, decorate it with beads, and then decorate the lower part with openwork paper ribbon. You can also come up with your own card design.
- Wrap the string around the card, then tie a bow. You can glue white paper at the bottom for text.
Volumetric Christmas tree with beads
Required tools and materials:- Colored paper with ornaments for scrapbooking;
- White postcard without design;
- Scissors;
- Stationery glue;
- Double-sided tape;
- Ruler;
- Decorative pins with carnations.

- It is necessary to cut out 12 rectangles from paper, their length should be 10 cm. The width of the smallest one is 9 cm, all the rest are 6 mm wider.
- Wrap each of the rectangles around a pencil to create tubes.
- Now you need to glue them together, the longest one will be at the base, and the shortest one should be located at the top.
- Glue the Christmas tree to the card and decorate with carnations and pins. That's it. Everything is ready.
Children's card with fingers
Children are introduced to this method of creating postcards in kindergarten, try doing this at home.

These photos demonstrate how you can keep the kids busy and prepare for the New Year; for this you need to prepare paints and paper or cardboard.

Postcards with “potato print”
If you don’t know how to have fun celebrating the 2019 Year of the Pig, then get creative with your kids. This master class demonstrates the original creation of a holiday card.You will need:
- Raw potatoes;
- Paints.

How to do:
- Cut the potatoes in half, dip them in paint, and make a print on the cardboard.
- Now all that remains is to complete the details of the drawing, you will get a cute penguin or snowman.

You can make the following design from felt:


Ideas for inspiration


Quilling:


Video about creating a postcard in scrapbooking style:
Origami crafts for cards:


On the eve of the New Year, everyone is wondering what gift to give to their loved ones, friends or colleagues. Everyone wants their gift to be special and evoke only sincerely positive emotions. It is considered a good old tradition to give each other New Year's greeting cards. A bright, hand-made holiday card will undoubtedly only cause admiration. Especially in the age of modern digital technologies, when most are limited to just one click to send an electronic greeting.
DIY cards for the New Year 2017.
Making a New Year's card with your own hands is a great way to show your imagination and please your loved ones with an original surprise. After all, a gift made with your own hand is charged with enormous positive energy, your love and care for your loved one. A homemade postcard will be a wonderful addition to your main New Year's gift. Moreover, such creativity is very much to the liking of the symbol of 2017 - the Fire Rooster.
Creating such a postcard will not require large financial costs and time; it is worth stocking up with only a few creative items, which will be described in detail in each of the examples, and inspiration.
So, let's start with the simplest options for New Year's crafts that even children can make. In the following examples we will provide a step-by-step guide on how to make a New Year's card yourself.
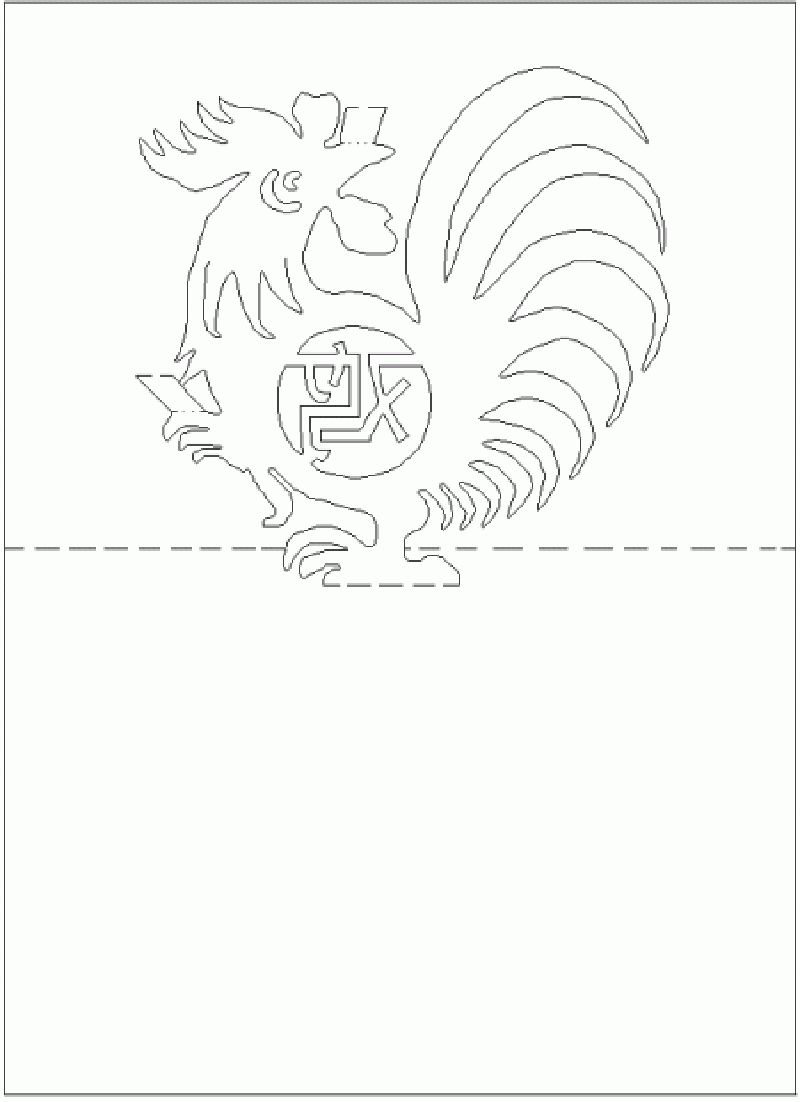
Postcard "Cockerel 2017".
 Postcard "Cockerel 2017". with your own hands
 An interesting and relevant design for a New Year's card will be the image of the main symbol of the coming year - the Fire Rooster.
This method is quite simple and creating such a postcard will not cause difficulties even for a primary school student.
You will need:
- an image of any rooster you like;
- thick cardboard;
- paper;
- scissors;
- glue;
- additional decorative elements, if desired.
The first thing you need to do is select and print any suitable picture of a cockerel that you like. When the template is ready, you can start creating the base of the card. To do this, take thick cardboard and bend it in half. You can choose any form of postcard; we will give one example of the form of such a postcard. For example, to add more originality, you can make the front and back of the card different sizes. To do this, take our template, measure its borders, and cut off the rest of the front side. Thus, it turns out that the front part will be narrower than the back. Using this principle, you can make rounded corners or give any other shape - the main thing is to use your imagination.
After you have prepared the base itself, you can begin to design the appearance: glue the selected template to the front side and cover the inside with white paper, where you will write down a beautiful greeting for the New Year 2017.
According to your wishes and preferences, you can decorate the card with additional decorative elements: rhinestones, beads, sparkles.
It will be a pleasant surprise if you add a sweet gift in the form of a chocolate candy to the card itself. To do this, you need to make two holes and thread the threads with which such a surprise will be tied. Its location can be anywhere in the product, the main thing is that it is harmoniously combined with the image itself.
Postcard with New Year's embroidery.

Such a postcard will not leave even the most fastidious recipients indifferent. After all, here you invest your strength and soul not only in assembling ready-made parts and giving them a festive look, but also creating these very details with your own hands. For embroidery, you can choose any pattern that matches the theme of the New Year. This could be Santa Claus, a cheerful snowman, a festive tree, New Year's balls, the symbol of 2017 - the Fire Rooster and more.
To create such a New Year's craft you will need: glue, scissors, embroidery, satin ribbons, and other decorative elements, if desired.
As in the first option, we first prepare the base of the postcard and give it the desired shape. Then we glue the embroidery and decorate the edges of the picture. This can be done in the following ways: use satin ribbon, half beads, rhinestones and sparkles. Such a card in itself is already a finished product and does not require any special additions in the form of sparkles and sequins, but if you think that they will only complement the overall look, then add them. If the card is intended for a friend, sister or mother, you can use a bow made of satin ribbon; such decor will make the product more pretty.
Holiday card with glitter.

This version of this postcard is so simple that you can even do it with your children without fear for its safety. You will need: glitter, cardboard, pencil, glue.
First we decide on the cover. We choose what you would like to depict on the front side of the New Year's craft. Next, we redraw the image onto cardboard and fill the entire area of the picture with glue. Sprinkle glitter on the glue and wait until it dries completely. Here you can use glitter of different colors and sizes, depending on your design.
As an alternative to sparkles, sequins, beads, rhinestones, and multi-colored sand can be used here.
Postcard for the New Year 2017 with a wreath in miniature.
An original gift would be a postcard with details made from vegetation. In this case, pine (spruce) branches or thorns, fastened in a circle, are perfect. You can also use parts of an artificial Christmas tree. If you use whole branches, the composition will take on a voluminous appearance; pine needles can also be formed into a New Year's wreath. Here you should give free rein to your imagination and experiment.
The principle of operation is also based on gluing and festive decoration. We glue the vegetation onto the finished cardboard base (you can attach it with a thread and a needle) and form a wreath from it. Give the product a bright, festive look according to your taste. Write a beautiful wish inside the card - your New Year's card is ready.
 Photo: Christmas cards “Christmas trees”.
 Without a doubt, the main attribute of the New Year is a Christmas tree with garlands and balls. This item will also be relevant for creating a greeting card. There are a great many ways to make such a card. In all the examples given, a sheet of any thick cardboard is taken as a base and folded in half, forming two equal halves.
- Multi-colored Christmas tree
This Christmas tree is prepared as follows:
- first decide what kind of Christmas tree you want to make: shape, size, appearance;
- strips of different lengths and colors are cut from colored paper (you can use colored adhesive tape or braid);
- the finished strips are glued to the front side of the product in an order reminiscent of the shape of a Christmas tree. This can be a tree with horizontally glued, chaotically located colored stripes or cut out triangles in a sequential order. The main condition is compliance with the outline shapes of the tree;
- don’t forget to make a tree trunk;
- The final stage will be decoration with decorative elements.
- Christmas tree made of buttons
Never rush to throw away old and unnecessary things, such as buttons, pieces of fabric, leftover ribbons, decorative flowers, etc. Little things like this can be useful for creating many original gifts. Especially now, when hand-made things are becoming especially popular.
To create such a Christmas tree you will need: glue (thread with a needle), buttons, satin ribbon, scissors.
Step by step guide:
- First decide how the buttons will be attached to the craft. This can be done with glue or sewn on with thread - this method will look more impressive;
- if you choose the sewing method, then you should take care of the appearance of the inside and cover the knots with a sheet of white paper;
- We attach a pre-made bow to the top of the finished Christmas tree. Thick threads and ribbons can be used as material for the bow;
- Alternatively, you can make a base for your Christmas tree by cutting out a shape from thick cardboard or fabric and sew buttons onto this base. Then just glue the finished Christmas tree craft to the base of the card. This way you will hide knots and irregularities as much as possible during the sewing process.
- Velvety Christmas tree
An example of such a New Year's craft will require a minimum amount of materials and your time. But, nevertheless, this will not lose its effectiveness.
The following materials will be required:
- colored paper;
- scissors;
- glue.
To begin, you need to cut long strips of colored paper, about 2 cm wide. To get 11 flowers, you must have 22 strips. When the strips are cut, we proceed to making the flower itself. To do this, take two strips and apply them to each other - you get a double strip. We make frequent cuts along the edge of such a strip and roll it into a tube, having first secured its edge with glue. You will get a small roll with fringe around the edges. Next, these cuts must be carefully pressed with your fingers to form a roll with one fluffy side. We glue the furry flowers to the base of the card and decorate with sparkles.
To get a more beautiful Christmas tree, it is advisable to use at least 10 flowers. You can choose any colors that best suit the New Year's theme. For example, take white and green.
- Christmas tree made of threads
To create this craft you will need:
- colored threads for knitting;
- glue;
- scissors;
- cardboard;
- half beads, rhinestones.
First, we take thick cardboard and cut out a tall triangle - this will be the base for the Christmas tree (you choose the size of the triangle yourself). Next, we take the knitting threads and begin to wrap the base, placing each new layer of threads horizontally to each other. The color of the thread can be any, as well as their thickness and quality. In addition to knitting threads, you can use floss threads or thin satin ribbon.
We glue the finished thread tree to the base prepared in advance and decorate it as desired. Inside the card we write warm wishes for the New Year.
The art of scrapbooking.
Photo: DIY postcardScrapbooking is a type of handicraft based on the creation of family or personal albums and photo albums. The principle of this technique is to cut out notes, interesting notes, photographs and paste the clippings into an album. Now this concept has acquired a broader meaning and implies any handmade design of albums, gift wrapping, postcards using appliqués.
Using this design method, you can also create an original New Year’s craft that will be a pleasant surprise for anyone.
To create such a postcard you will need:
- scrap paper;
- glue;
- scissors;
- pencil;
- large beads for decoration.
- Initially, it is necessary to cut the scrap paper into small rectangles of different lengths, so that later these rectangles can be rolled into tubes;
- Next, we proceed to what was mentioned a little higher: we twist the finished rectangles. To do this, use a pencil or any other cylindrical object.
- To prevent the edges of the tube from unwinding, we glue them and let them dry;
- Then we glue the finished tubes together in decreasing order, that is, the bottom tube should be the longest and so on until the shortest.
- Thus, you should get a Christmas tree, which we glue to the base of the card;
- The final stage is decoration according to your taste.
The art of quilling.
Quilling is a type of decorative art that involves creating three-dimensional and flat appliqués from strips of paper twisted into spirals. You can also find such a name as paper rolling. The main part of this technique is the spiral, which is later given the required shape.
Using the quilling technique, you can create compositions of any complexity and shape. To do this you need:
- Decide on the design that you want to depict on the greeting card;
- Redraw the image template onto the front side of the product;
- Twist the required number of spirals and give them the desired shape;
- Glue the finished spirals along the contour and area of the template.
- Decorate the craft.
There are a great many options for postcards for the New Year 2017, you just have to choose the one that suits you - and feel free to get down to business. Give free rein to your imagination!
We also recommend
 Presentation "February 23 - Defender of the Fatherland Day" presentation for a lesson (7th grade) on the topic February 23, history of the holiday presentation
 What does a children's railway look like around the world?
 Do-it-yourself web with a chestnut spider and a dragonfly made from natural materials
 New Year's topiary Christmas tree: we decorate the holiday ourselves Topiary for the New Year's tree
 DIY educational toys for kids
 Asymmetrical stylish vest