DIY New Year's topiary: decorating your home for the holiday. New Year's topiary Christmas tree: we decorate the holiday ourselves Topiary for the New Year's tree
Candy topiary is a magnificent hybrid of plants and sweets. This is a bouquet of flowers or a wonderful tree made from candies! The product itself is beautiful and original, but also contains a deep inner meaning.
Secret meanings of a New Year's gift of candy
Why and why do we give gifts? On the one hand, in order to make a person happy, to caress him with your attention, on the other, to wish him well-being and a good life. The idea of New Year's topiary is that these wishes are embodied in a material product, and not in words. Everything is important when making it. Every element matters.
The form itself is a bouquet, a flower or a tree, which respectively means: happiness, love or wealth (remember about the money tree?). And the filling is the polishing of the elements.
- Chocolate is an extraordinary delight in possession, pleasure.
- Caramel – action and development, harmonious, unhindered achievement.
- Lollipops – successful goal setting.
Any candy that you use in topiary is equal in meaning to a beautiful phrase or wish! But the main thing is that such an elegant gift cannot offend or offend, in other words. During the New Year period, such gifts are especially relevant.
Making New Year's topiary
You will need:
- candies;
- Styrofoam;
- penknife and scissors;
- glue gun;
- colored rope;
- wire, cable with a diameter of 0.5-1 cm;
- decorative elements (beautiful paper, beads, ribbons, rhinestones, pine cones, Christmas balls)

Let's prepare a bundle by wrapping tape around the cable (we fix the edges of the tape with a gun).

We tie a bell to the wire and wrap it with decorative paper or ribbon, not forgetting to fix it.

We glue a rope to a pre-prepared foam cone along the bottom edge (you can use synthetic fiber).

Wrap the rope tightly around the base, periodically securing it with glue.

Insert a wire with a bell on top of the cone. Continue wrapping the topiary all the way to the bell. Near it, secure the rope with a gun.

We insert the previously prepared cable into the lower part of the topiary and glue the candies.

Now that's beauty!

We will also make a stand for the New Year's decoration using polystyrene foam. We decorate it with paper, textile and plastic ribbons, cones, balls, and flowers.


The final touch is to attach the New Year’s topiary to the stand.

Let's add more decorative elements!

Ready! Sweet beauty made with your own hands will serve as a worthy decoration for the New Year's table or as a gift for loved ones.
The secrets of making 20 types of topirias are revealed with step-by-step instructions and video lessons.
The history of the origins of the art of topiary stretches back to ancient times and involved the curly cutting of green plants. Intricate tree figures could be observed in the gardens of the Roman nobility, whose original shape was given by court slave gardeners.
A modern topiary is a miniature copy of trees and bushes, and it depends only on the imagination of a skilled florist what shape of crown he will give to his own tree. Topiary is a tree of happiness that has regained its popularity in modern European floristry.
DIY topiary for a wedding
You can make topiary for a wedding with your own hands. To get started, check out the ideas for wedding topiary shapes in our gallery. 

Aren't the ideas simply charming? Can you imagine the faces of the newlyweds if you present them with a “wedding tree of happiness” as a gift? Or maybe your family is planning a celebration, and you will be able to make beautiful decorations for the wedding table yourself, surprising you not only with your original idea, but also with your craftsmanship.
For example, we offer you an interesting wedding decor in the form of topiary, on which you will not have to spend a lot of money and effort. Please prepare the following materials:
- Original pot for a flowerpot
- Twig for the trunk
- Hot melt adhesive
- Stipler
- Beads
- Beads
- Cotton pads
- Green crepe paper
So let's get to work.
- Our wedding tree will consist of roses, which we will make from ordinary cotton pads at the rate of one pad - one rose
- Fold the two sides of the disk towards the center so that we get a wide edge on one side and a sharp edge on the other, and fasten it in the center with a stapler
- Now carefully unfold the wide edge outward, and the first white rose bud is born in your hands
- Do the same with other disks - the number of roses depends on how wide your ball is


- Let's start preparing the crown for the wedding tree of happiness. To create it, you can use polystyrene foam, crumpled newspapers into a ball.
- The main thing is that the material for the base is not heavy. Wrap the ball on top with a white sheet of paper and secure it with glue to a prepared twig, which in your case will serve as a trunk
- Glue the ball to the base of the barrel with hot glue
- The next step is gluing the roses. They need to be glued thickly, pressed tightly against each other so that the base is not even visible


- At this stage of the work, you need to take crepe paper and cut out small squares from it that will serve as small leaves. Glue them with PVA glue


- Finally, place white beads on the bouquet in a chaotic pattern using hot glue.
- It's time to decorate the pot
- A beautiful small vessel or yogurt jar is perfect for this purpose.
- Pour dry plaster into a container and fill it with water until it reaches the consistency of thick sour cream.
- Carefully, in the center, insert the tree of happiness and let it dry well. Ideally, you should leave it overnight.


- The next day we will start decorating the tree trunk. We put white beads on a thread and secure the beads under the tree crown. Wrap a spiral around the trunk and secure the beads at the base of the tree with glue. Cover with a layer of small beads
- Depending on what kind of tree pot you have chosen, you can come up with decorations for the wedding theme; white organza is ideal
- Tie it with a bow and your wedding topiary is ready


Topiary on a glass master class
If we’re going to make a surprise for the wedding, then let’s do it in its entirety - add glasses for the bride and groom along with the beautiful wedding topiary. But the glasses will not be simple, but super interesting.
After all, you will make the topiary on the glasses with your own hands. This means that you will pour your whole soul and love into them, while wishing the bride and groom many happy and cheerful years in strong love.
Video: Master class DIY wedding glasses
Topiary for March 8
- The holiday of March 8 is considered women's holiday. At the same time, a joyful mood is observed in everyone, regardless of gender and age. A holiday in itself brings joy and in order to enhance it, it is customary to give interesting gifts
- At all times, men gave women flowers - be it a beautifully decorated bouquet or flowers in pots. But if you want to pleasantly surprise your woman, you can use the idea of topiary
- Moreover, there are many options for holiday topiaries, and you can always choose the one that will touch the heart of your loved one


Rose napkin topiary step by step instructions
So, let's get to work - we will create roses.
- In order to create this magnificent beauty, we will prepare napkins of a certain color
- In our free time, we’ll start turning them into rosebuds. Cut each napkin into 4 parts
- Take one part of the napkin and fold it as shown in the photo. That is, not in half, one third
- We do the same with the remaining parts. For a rosebud you will need 2 napkins. And again, you can adjust the size of the buds yourself


- Now we form the bud by twisting. We shape each petal with our fingers, giving the bud a beautiful shape. This is what you should get as a result.

- We glue the finished rose buds from napkins tightly to the ball.


- For topiary for Valentine's Day, you can use white and red napkins for roses, and decorate the structure with hearts and Cupid's arrow
- For example, you can take note of this option for making roses


- For Women's Day on March 8, buds of any color are suitable. The main thing is to do it from the heart and with love, and decorate the topiary itself with decorative elements that will correspond to the holiday
 Topiary for the New Year
Topiary for the New Year should symbolize the solemnity of the event. We have already talked about what topiary is and what are the basic principles of its manufacture.
But what is topiary for the New Year? You guessed it - it’s customary to make wishes on New Year’s Eve. And if you decide to make a New Year’s tree of happiness with your own hands, then you will have every opportunity to securely secure your wish with durable glue.
 Before you start making it, you need to decide on its shape. New Year's topiary can have a traditionally round shape, but you can also give it a figured shape, such as a Christmas tree shape.
We will consider the option of topiary made from Christmas balls. You will need to prepare:
- Christmas tree balls in silver or golden color (you can combine the colors of the balls)
- Foam for base
- stick
- Potty
- Polystyrene foam for ball
- New Year's design elements - pine cones, decorative berries and fruits
- If you have selected a pot for the New Year theme, you can leave it as it is now. In another case, the pot must initially be decorated with satin fabric and secured to the base of the pot with double-sided tape
- Immediately place foam inside the pot, which will serve as a reliable support for your topiary. Secure the trunk in the middle of the oasis - it can be an ordinary stick wrapped in satin ribbon or a cardboard base made from cling foil or film
- At this stage, attach the foam to the upper part of the trunk of the tree of happiness, having previously made it into a ball shape. The moment has come when we will form the crown of the tree with our own hands. In our case, these are New Year's toys-balls. Place each individual ball on toothpicks and glue them at the base. Now insert the toothpicks with balls tightly into the crown ball.
- If you use large balls, then the spaces between them can be filled with small balls and decorated with beads and tinsel
- To ensure that your design holds up well, we recommend gluing the balls together at the end of the work.

 Don't be afraid to use your imagination, add or change elements at your discretion. The main rule is that they match each other in color!
DIY Christmas topiary
Soon after the New Year celebration comes the Christmas holiday. Naturally, you can use your New Year’s topiary for Christmas. But! You all know very well that Christmas is always associated with the colors red, white and green. Therefore, if you decide to make another Topiary, then use the decorations in these exact shades.
Topiary made of fresh and juicy strawberries in the form of a Christmas tree. You can use this delicious strawberry decor not only for Christmas, but also for any holiday, formal buffet or banquet.
To make a Christmas tree of happiness in the form of a Christmas tree, you will need to prepare:
- Foam cone
- Cling film or foil
- Stand in the form of a vase or pot
- Fresh mint, basil or lettuce leaves
- Chocolate
- Strawberries – 2 kg
- Powdered sugar
- Cannon,
- Toothpicks
- Bows for decoration
So, let's begin the exciting process.
- First, securely attach the foam cone to the base using hot glue. Now wrap the cone-trunk of the future fruit tree with cling film or foil
- Carefully sort the strawberries and select only healthy rafts with pointed ends, approximately the same size
Lay out on the table all the necessary elements for work:
- Toothpicks
- Chocolate
- Blackberries
- Strawberries without green leaves
- Floral pins
- Start working from the bottom, carefully in a circle. In this case, it is not the cone that needs to be rotated, but the base. Dip each strawberry upside down into melted chocolate, place it on a toothpick and attach it to the cone.
- Close the gaps between the strawberries with mint or basil leaves using floral pins. Try to attach leaves at a distance of 7-8 cm from each other
- You can also insert blackberries in between the strawberries, which will give your tree an even more original look.
- Decorate the top of your Christmas topiary with carom or you can cut out a Christmas star from a mango or pineapple. If you don’t have either one or the other, then you can also decorate the top with an original bow
- Before serving, sprinkle the strawberries with powdered sugar, which will give your tree a more festive look with a snowy effect.


Topiary made from banknotes
A gift in the form of a topiary made from banknotes – a real money tree – will cause a lot of delight and pleasant emotions for the birthday boy!!!
To make such a great gift, you will need:
- Hot melt glue, PVA glue
- Newspapers and threads
- Wooden skewers
- Napkin
- Leg-split
- Paper bills
- Coins
- Sackcloth
- Gold acrylic paint
- Golden lace
- First let's decorate the pot
- You can take a sour cream container, or buy an original flower pot shape especially for this occasion.
- Paint the top of the pot with gold acrylic paint and set it aside to let the paint dry thoroughly.
- If necessary, you can apply another coat of paint.
- Grease the rest of the pot with PVA glue and wrap it tightly with twine, securing its tip with hot glue
How to make a topiary ball from newspaper
- Crumple the newspapers into a ball approximately 10cm in diameter.
- Wrap it with regular sewing thread
- Now tear the colored napkin and coat the ball with a thin layer of glue
- Stick 1-2 layers of napkins to the ball so that the threads are not visible
- Let the glue dry well
- Using a knife, make a hole in the ball for the future trunk
- Take 10-15 skewers and tie them together with threads at both ends. Pour a little glue into the hole of the ball and immediately insert the skewers with sharp ends. Lubricate the trunk with glue and wrap it tightly with twine. Securely secure the end of the twine with glue
- Dilute the gypsum with water until it becomes thick sour cream and pour it into the pot. Insert the finished barrel with the ball into the center and hold it in this position for a while so that the plaster sets well. Otherwise your trunk may become askew
- After 30 minutes, you can start decorating the crown of the money tree.
- While the plaster dries, prepare the blanks. To do this you will need souvenir bills and a gold ribbon.
- Fold the bill like an accordion, tie it in the middle with gold thread, and glue the edges together to form a disk. For your ball you will need approximately 18-20 discs
- Glue the discs onto the ball, starting from the bottom. Your ball is ready
- Now you can make various fans, scrolls, airplanes, etc. from banknotes. Glue them in the places where you like best - the main thing is that your tree turns out lush and interesting
- All that remains is to decorate the stand. For this you can use green moss or sisal. Place a small burlap bag under the tree, putting coins in it and tying it with gold thread on top
- Your money tree is a topiary of banknotes, ready. Enjoy its beauty and sophisticated look


Pearl topiary
Pearl topiary will be a wonderful decoration for the interior of your room or wedding table. There are many options for making it and all of them are simply amazing. See for yourself.


Candy topiary
Remember, we recently discussed with you the option of making topiary for Christmas. For this we used fresh strawberries. And now a new proposal is to make topiary from candies.
Such an unusual attribute is perfect for any celebration, but above all, for a children's party, which will make it unusual and original. It will delight you not only with its design, but also with its internal content.


Video: Master class Bouquet of sweets
Video: Candy topiary for Valentine's Day
Fruit topiary
For fruit lovers, it is not difficult to make topiary to suit their taste. It will not only decorate the interior of their home, but will also remind them of a wonderful and warm summer all year round. I will tell you how to make a bright decorative topiary from fruits. By the way, you can make any fruit tree using this technique.
So, let's start making topiary from fruits.
We will need:
- Flowerpots
- Wires
- Styrofoam ball
- Decorative leaves and apples
- Brown acrylic paint
- Hot glue
- Ribbon or chain
- Wooden skewers – 4 pcs.
- Any decorative element - butterfly, bird, etc.
Let's start by using thick wire to form the trunk and branch of a fruit tree. We fasten them with thin wire.


Fill the plaster with water until the consistency of thick sour cream is formed. Pour the mixture into the flowerpot and place the trunk of our future tree in the center.

Topiary made from knitting threads
If you knit, then, of course, after each of your creations you have extra threads. Diversify your creative abilities, thereby surprising your loved ones with a new hobby - topiary made from knitting threads.
The technology for making topiary in this case remains the same, but the appearance will differ in many ways. To create an original topiary, you can use multi-colored balls of thread or crochet original flowers from them, which will decorate the top of your tree of happiness.


 Here is an example of what flowers you can knit yourself. Naturally, you shouldn’t follow an example, because, as if you are a needlewoman, you can come up with new creations on your own. These can be flowers, cones, fruits, vegetables, and even various figures of moths, birds, etc.


Topiary with photographs inside
There is no doubt that a gift in the form of a tree of happiness with a photograph inside will not go unnoticed and will evoke a lot of positive emotions in the hero of the occasion.
It’s not difficult to make, you just need to choose the right photo and come up with the shape of the tree crown. This topiary looks original for Valentine's Day.
You can choose a heart shape and put your photo in the middle. Intrigued? Naturally. Then nothing can stop you from making such an original proposal with your own hands.

 Topiary from improvised means
Such a popular interior decoration as topiary, it turns out, can be made from the most ordinary available materials. You can use coffee beans, pasta, and even ordinary colored paper as decoration. By the way, the latest version is ideal for those mothers who want to teach their child to art. Your child will take great pleasure in making it.
To make it you will need the following materials:
- Colored paper
- Wooden stick
- Baby puree jar
- Masking tape
- PVA glue
- Figured hole punch in the shape of a flower
If you don’t have such a hole punch in your house, then you can involve your child in the process of cutting out flowers.
So, crumple up a ball from newspapers and wrap it with masking tape. Lubricate the end of a wooden stick with PVA glue or Moment and immediately insert it into the ball, after making a hole in it with scissors.  Using a flower hole punch, we cut out flowers from multi-colored paper - you will need about 100 pieces, depending on the size of the ball and the flowers themselves.
  Finally, let's decorate our topiary with a beautiful bow.

Felt topiary, photo
Material such as felt looks very beautiful on the tree of happiness - topiary. The result is not only a somewhat unusual tree, but also an appetizing one. Some of its types strongly resemble the large Chupa Chups candy that children love to enjoy.
You can also involve children in this process, because this material is easy to work with. But as a result you can get the most beautiful creations. A little flight of children's imagination and a gift for the birthday of classmates, ready.


Topiary for beginners with satin ribbons
Who among us in childhood did not try to make roses from satin ribbons? Probably everyone. But none of us could even imagine that several of these roses would help create an amazingly beautiful topiary.
So, satin ribbons, a little design tricks and topiary can really decorate any celebration, become a great gift for a birthday or Valentine's Day, serve as a decoration on a wedding table, etc. Are you inspired? Then let's get started.
Naturally, to create a topiary from satin ribbons, first of all you need to stock up on satin ribbons - choose their color to your liking, depending on the nature of the holiday. 
- Just don’t forget to secure each of them with hot glue from the bottom. Now let's start making topiary. We will usually need a pot, a stick, and a ball
- We do exactly the same as in previous cases. We assemble a structure from a ball and the trunk of the future tree of happiness and begin to carefully and tightly place the prepared roses on the ball, fixing them with a drop of hot glue
- The ball is ready, all that remains is to add a few design touches and... Here is the result. Beautiful, isn't it? With such a gift you can immediately go to your beloved girl


Flying topiary
And for dessert, we suggest you make a slightly unusual topiary - a flying one. It sounds unusual, but it looks interesting. I have no doubt that you are simply intrigued by this idea and are in a hurry to find out how you can make such an original topiary with your own hands.
Does it look like a figure in zero gravity? You have a lot of questions now – I’m sure of that. But, you can really do this yourself, and don’t hesitate.

 To make a “Floating Cup of Coffee” you will need to prepare:
- Pliers,
- glue gun,
- Cup,
- Saucer,
- Arabica coffee,
- Aluminum fork.
You may be surprised to see the name aluminum fork in the component materials. Aluminum because it is easier to bend - we need to bend it with the letter “zyu”, that is, in the shape of a future waterfall.


- So, the fork was bent. Now we need to securely glue it with hot glue on one side to the saucer and the other to the cup. To be secure, secure the top with tape.
- Now we need polyethylene foam, which can be found in dish packaging. Cut it to the width of the future waterfall and glue it to the fork
- We select large coffee beans and begin to paste them onto the tape on both sides. Make sure there is no empty space left. Coffee beans can be glued in several layers


- Let the glue dry well and you can start decorating. Coffee beans can be coated with a layer of varnish. But in this case, the coffee will not release its aroma. So it's up to you. Decorate the cup with a beautiful bow, put cinnamon sticks on the saucer - in short, let your imagination run wild
- You already have the basis, and the decoration is in your hands. So you have already learned how to make beautiful topiaries with your own hands
Craft, offer your ideas and delight people close to you with new works of your creativity.
Video: Ribbon Topiary
It won’t be surprising if a master class on what to give to friends and family for the New Year will soon be in demand. When you run out of ideas, you really want instructions to miraculously appear, and it becomes clear what to give, so that the gift is liked and remembered. Handmade gifts are good taste and an excellent sign of attention. And one of these gifts could be a New Year’s topiary.
Topiary is a decorative tree in a pot, usually with a round crown, a beautiful souvenir, the materials for which can be any objects. These include natural materials, handicrafts, and the most unexpected things.

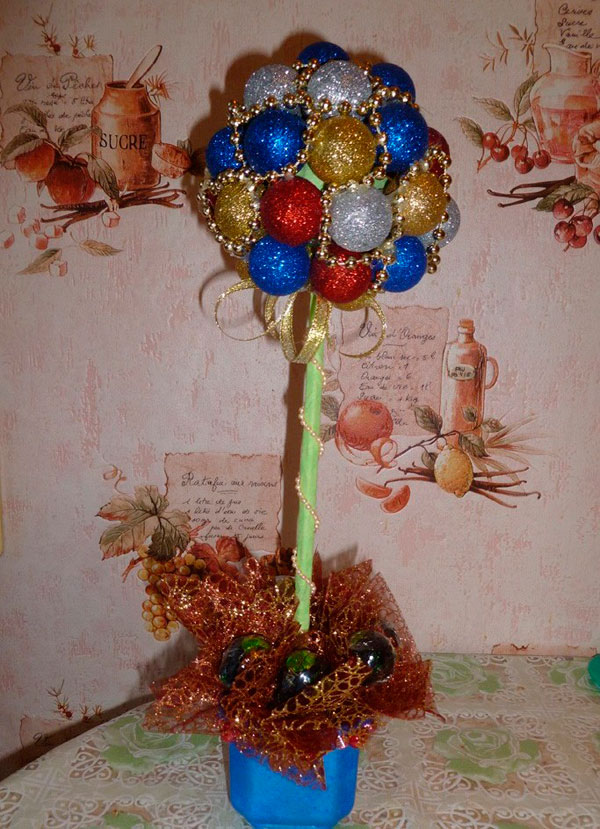
New Year's topiaries can be a variant of a Christmas tree, decorated in an interesting way. But another bright topiary that will decorate your home or work area on the eve of 2018 is ball topiary.
Step-by-step instructions - how to make a New Year's topiary with Christmas balls:
- The materials you will need are the following: a foam cone, small Christmas balls, a fairly large candlestick, wide ribbon, hot glue.
- The candlestick in this MK is used instead of a pot. The more refined and elegant it is, the better it will emphasize the festive nature of such a topiary. Apply hot glue to the top of the candle holder. You need to press the foam cone firmly to the place where the glue is applied. You need to hold the cone for some time so that it “takes” well.
- While the glue dries, you can work with the balls. The first thing you will do with your own hands is remove the metal fasteners. For such a Christmas tree topiary, it is important that the balls are well fixed and do not cling to anything.
- It's great if you prepare the cone for gluing the balls. Still, there can be, and probably will be, gaps, so the cone needs to be spray painted. For example, golden or silver, or maybe green with gold. Sometimes the cone is simply wrapped with thick golden threads with your own hands. There is no single method, one master class suggests painting, another – winding, the third – pasting with napkins.
- Grease the top of the ball with hot glue. The ball must be literally pressed into the cone, very carefully, but so that it grabs well. Many MKs indicate that it is better to pour the glue somewhere so as not to take the gun every time. An unnecessary frying pan will do. The ball is simply dipped in glue in the frying pan, and this way the process goes faster.
- Slowly the entire surface is filled with balls, creating a Christmas tree. You can tie a ribbon with the numbers “2018” on the candlestick or just an elegant, beautiful one.

Ready! This master class is extremely simple, the main thing is not to put too much pressure on the balls, remembering their fragility. In the photo you can see the color combinations of this Christmas tree ball topiary.
New Year's topiary: ideas and MK (video)
New Year's topiary: master class
To create another interesting Christmas tree in a pot you will need yarn. By the way, this MK is suitable even for children; it does not use hot glue, which is dangerous for them.
You will need:
- Foam or cardboard cone;
- Skein;
- Scissors;
- Sewing needles;
- Very small Christmas balls;
- Round nose pliers;
- Pot;
- Small rod-trunk;
- Ribbon.
It is fair to say that such a tree is often not planted in a pot at all, but while observing a certain tradition, it is still worth doing everything more conservatively.
So, if you look at photos of such topiaries, you will see that it is better to take thick yarn, maybe embossed, or non-uniform. But some Christmas tree colors should be guessed in it - green, blue, white, light blue, silver, etc.

A DIY yarn Christmas tree is made like this:
- Secure a skein of yarn with sewing needles at the base of the cone. Attention, the cone must not be hollow! Please worry about this in advance.
- Gradually wrap the cone with yarn with your own hands, the turns should be tight, no gaps.
- The threads can be secured in place during the process with the same sewing needles.
- Having reached the very top of the Christmas tree cone, the thread is cut and fixed with a needle.
- Half the work is done. You can place the cone on the trunk. At the Christmas tree it should be very small, almost invisible. A piece of pencil, any small cylindrical object. Think about how to secure it in a foam cone. At this point, it is still better to use glue, but if a child makes the Christmas tree with his own hands, fix it with glue yourself.
- Now the tree needs to be inserted into the pot. In fact, you can use any flower pot, small and elegant. So the decor awaits him anyway; initially, color and texture are not so important.
- Usually the master class suggests using plaster or alabaster. And this is the most reliable option. Be sure to decorate the top plaster layer with either New Year's tinsel, or sparkles and other decorative things associated with the New Year.
- When the tree is in its pot, you can start decorating. Hang miniature balls on the yarn. An alternative to them is to make berries on needles, which are used in making jewelry. The top of the tree can be a star, also made by hand, for example, from twine or designer cardboard.

The pot can be decorated with the inscription “2018”, wrapped with beautiful ribbons with gilding or silver threads.
Christmas tree made of threads: New Year's topiary (video instructions)
New Year's topiary Christmas trees: step-by-step instructions
Good ideas on the eve of 2018 - soft Christmas trees. They are quite easy to make with your own hands, especially if you have already dealt with wool for felting.

And yet, what nuances can this master class have:
- If a foam cone is not found, make a cone with your own hands from cardboard. Paint it the same color as the fur to prevent any gaps.
- You need to stretch it to the very top of the cone a thick wire that will make such a “squiggle” at the top of the tree, with which the Christmas tree will be cute and cute.
- The trunk for the tree can be wooden skewers. The base of the cone needs to be glued onto skewers, after which they are painted brown so that they resemble a trunk.
- The result is a Christmas tree that needs to be planted in a pot.. Look at the examples in the photo; they use both beautiful expensive pots and ordinary plastic glasses that are decorated with fabric.
- A thin piece of wool needs to be separated from the total mass, and glue it to the squiggle wire. And from there the winding is carried out, so that there are no gaps.
A pot in the form of an unsightly container can be wrapped in beautiful corrugated paper or foil and tied with ribbon or tinsel.
Topiary for the New Year: master class with coffee
Coffee, or more precisely, coffee beans, is such a universal material that it is perfect for New Year’s topiary 2018.

A master class using coffee will be similar to other instructions.
Master class - topiary for the New Year 2018 with coffee:
- For a change, you can stick to the idea of a round tree. The basis, therefore, will be any spherical blank. If you don't have a foam ball or a small rubber ball, a wad of newspaper tied with thread will do.
- The ball must be perfect, therefore, if it is not hard enough, it is covered with napkins according to the papier-mâché principle.
- Next, the ball needs to be painted with brown acrylic paint.. And after drying, you can start pasting with coffee beans. There are craftsmen who then specially paint over some of the grains with golden paint to make it look “2018”. It is better to glue coffee beans with a glue gun.
- The blank ball leaves space for fixing the barrel. The trunk for such a coffee tree can be made from a drumstick or a thick pencil tightly tied with twine.
- The trunk is fixed in plaster, which is poured into a pot. This must be done quickly and carefully.
Well, then directly what will make an ordinary coffee tree look like a New Year’s tree. Numerous examples in the photo offer several options at once. First, the pine cones lying in the pot. Ideally, you can paint them with a gold spray.

In some photos you can see beautiful ribbons with the inscription “2018” and Christmas tree prints. The Christmas tree can also show off like a picture on a pot. By the way, you can make a Christmas tree out of coffee beans on the facade of the pot.
The aroma of coffee and beautiful decor are a great gift for a coffee lover in 2018. Often such trees are used as an idea for a photo; photo sessions with such an accessory turn out to be very interesting.
New Year's topiary made from coffee beans in the form of a Christmas tree (video master-cash)
You can make your own photo or video master class, because many ideas come to mind while viewing someone’s work. One inspiring photo and you are ready to make your own Christmas tree topiary. Creative inspiration and interesting finds!
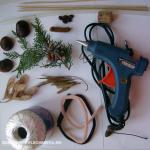
New Year's topiary (photo)


New Year's topiary “First Snow” is made from dried chestnuts, walnut shells, acorns with caps, sisal and rattan balls. An elegant tree of happiness was planted in a restored flower pot for the New Year. The trunk of a curved branch is reinforced with plaster. A small composition has been assembled from padding polyester in a snowy clearing: cinnamon sticks, sisal balls, an acorn, smooth berries.

Large used foam ball with a diameter of 15 cm, you can also make the frame yourself.
The total height of the New Year's topiary is 42 cm, pot - 10 cm, crown diameter with decor - 20 cm. To make a topiary of this size you need 5-6 hours.
Materials for creating the New Year's topiary “First Snow”


- Gypsum or alabaster for pouring.
- Thermal gun, 5 silicone sticks, 20 cm, d=11.2 mm.
- Scissors, brushes.
- Paint - acrylic white and bronze.
- Crushed stone - to the bottom of the pot.
- Any pot - 500 ml.
- Ice cream sticks (curly or straight) - 20 pcs.
- Foam ball, d=15 cm, fabric for wrapping the ball.
- Trunk branch, length 30 cm, plasticine.
- Dried chestnuts.
- Walnuts - whole and halved.
- Acorns with and without caps.
- A bunch of acorns.
- Peach pits.
- Chocolate-colored sisal into balls.
- Italian pasta, dark
- Satin ribbons: chocolate 2 pcs., bronze 1 pc. - 10 cm each.
- Organza white - 20 cm.
- Narrow white satin ribbon (to wrap around cinnamon sticks) - 10 cm.
- Half beads - 10 pcs.
- 1 bunch of white and 2 bunches of burgundy berries - 20 berries per bunch.
- Rattan balls, d=3 cm - 4 pcs.
Video master class - do-it-yourself topiary for the New Year
A convenient and simple master class in excellent FullHD 1080p quality on how to make a New Year’s topiary “First Snow” from natural material with rattan and sisal balls. Watch, get inspired, generate new ideas and share them with friends!
How to make a New Year's topiary - MK in 1 picture

Did you like the format of the master class in 1 picture? Watch everything from Alena Tikhonova!
Step-by-step master class with photos - DIY New Year's topiary
Restoration of a pot
Stage 1. Gluing ice cream sticks. Any container is suitable for restoration - the main thing is that it is free of cracks and chips. Glue a plastic lid or similar product to the bottom: close the drainage holes so that the plaster does not spill out when pouring. We cover the pot with ice cream sticks: if the height does not match, we cut the sticks.


Stage 2. Painting the pots. Using white acrylic or gouache with PVA glue, paint the entire pot for the New Year's topiary in 2 layers. In this case, be sure to paint the second layer with a soft brush to cover the pot evenly, without smears.
An alternative to liquid paint is acrylic in a spray can for whitewashing a pot to look like a tree of happiness for the New Year.


Bronzing of the barrel and decor
Stage 3. Painting the decor. Using acrylic paint - antique bronze or medium gold - we paint dried chestnuts, walnut halves, acorns and caps.
Heavily dried (wrinkled) chestnuts can be partially painted, even sponging is allowed: the result is a very interesting texture!
Stage 4. Painting the barrel. We bronze the trunk of the New Year's tree of happiness in the same color as the decor. We paint all elements evenly, in 1 layer.


Formation and decoration of the crown of the New Year's tree of happiness
Stage 5. Preparing the ball. The foam ball melts from hot silicone, especially with heavy decor. Wrapping with fabric, twine or knitting threads will solve this problem.
Instead of a commercial foam ball, you can use alternative solutions. Find out how to make it yourself almost free and very easy!
Stage 6. Crown decor. The secret of the color of the New Year's topiary is a variety of decor made from natural materials in combination with artificial elements. Over the entire surface of the ball, in a heap, without gaps, we glue the decor, alternating painted and unpainted elements:
- Chestnuts, walnuts, acorns.
- Single and paired caps of acorns.
- Rattan balls.
- Sisal balls. Step-by-step instructions on how to do it.
- Cut cinnamon sticks.
- Peach pits.
- Star anise.
- Foam berries of white and burgundy color (viburnum).
- Italian pasta is dark brown.
First, we glue the large decor, then use small elements to close all the gaps on the crown of the New Year’s topiary craft.


We recommend treating the crown of natural material with any hairspray to avoid insect damage. It is important to do this before gluing snowflakes and garlands with beads so that the plastic elements do not become deformed.
Stage 7. New Year's decor. We wrap the finished crown in different directions with a garland - beads on a fishing line, and fix the large beads with glue. We glue plastic snowflakes over the surface, covering bald spots, if any remain on the New Year's tree of happiness.


Flowerpot decor
Stage 8. Satin bow. You can use a ready-made brown polka dot bow or make your own triple bow from satin ribbons, as shown in the video. We glue white organza loops crosswise under the bow, and a snowflake and a bead on top.


Stage 9. Decorating the pots. Glue plastic snowflakes and half beads on each side, except for the one where the satin ribbon bow flaunts.


Pouring and filling the flowerpot of the tree of happiness
Stage 10. Filling with plaster. The New Year's topiary “First Snow” turned out to be heavy: for stability, we put a layer of crushed stone on the bottom of the pot. We attach the trunk to plasticine and fill it with plaster (alabaster) to 2/3 of the volume of the pot. We dilute the solution thick, the gypsum/water ratio is 2:1.
After pouring, the tree of happiness must be fixed in the desired position and left until completely dry - 18-24 hours.

Last stage 11. Filling the pot. We cover the gypsum surface in 2 layers with padding polyester and carefully glue it. This is a snow-covered clearing where we will form a composition at the base of the New Year's topiary. We use all the elements that were used to decorate the crown: a chestnut, a ball of sisal and rattan, an acorn, a nut, 2 tied cinnamon sticks, and a star anise. We randomly scatter several viburnum berries in the clearing.


Photo - presentation of the New Year's tree of happiness “First Snow”


The latest gift trend is the tree of happiness. This is a winner for most holidays. New Year is no exception, when such a gift is more than appropriate.
Tools and materials Time: 3 hours Difficulty: 4/10
- flower pot;
- alabaster or plaster;
- stick or unnecessary pencil;
- ball for base;
- decorative details for decoration;
- glue gun

The tree of happiness is also called topiary, so our New Year's tree of happiness can still be considered a New Year's topiary.
You will need:
- massive flower pot;
- foam;
- small Christmas tree decorations;
- large and small beads;
- double-sided tape;
- glue gun;
- sweets, preferably round;
- cling film;
- crepe paper;
- newspaper;
- shiny mesh;
- toothpicks;
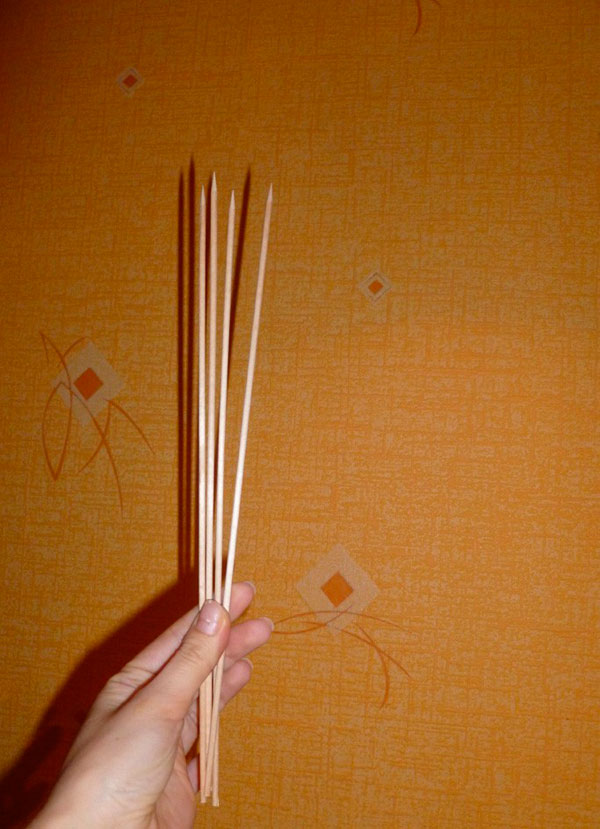
- kebab skewers;
- primer base, varnish and acrylic paint.
How to make a New Year's topiary:
Apply primer to the flower pot, and after it has completely dried, apply paint. Then dry and varnish. That's it, our pot is ready.

We lay out an ornament from beads and fix it with a glue gun.


We take 5-6 skewers, wrapped with double-sided tape, and on top with green paper for the barrel.

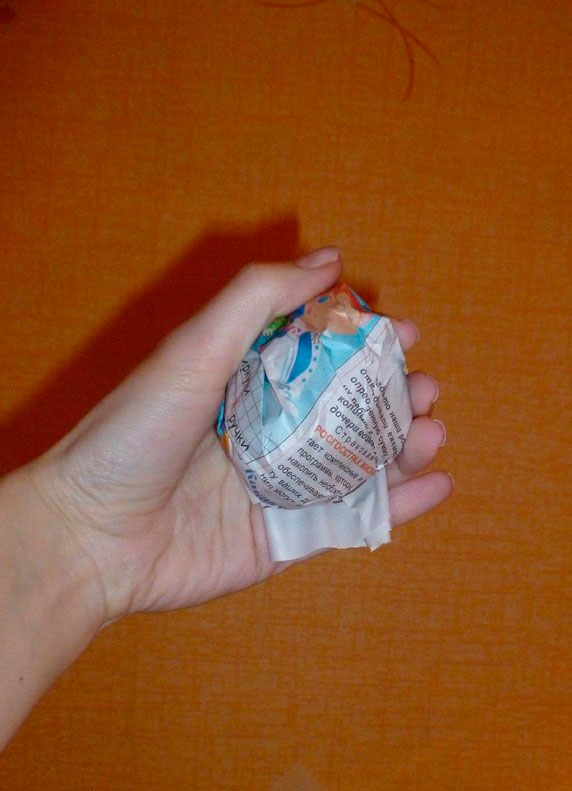
We make the base - a ball from newspaper, you can take a ready-made ball, for example, plastic or foam. Then you need to cover it with tape and wrap it well with paper.


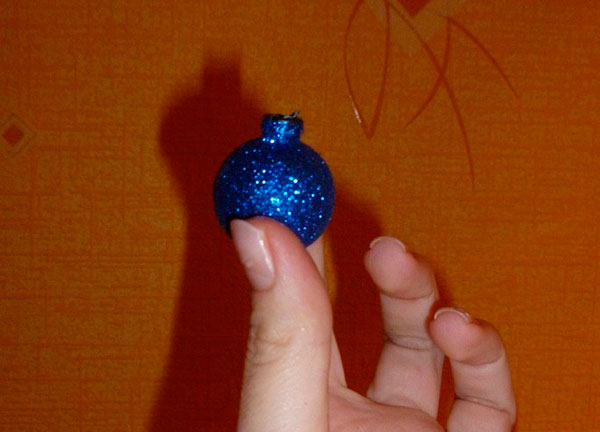
Carefully cut off the tops of the Christmas tree decorations, attach the decorations using a glue gun, evenly distributing them over the surface of the ball.


Fill the pot with foam rubber.

We put the barrel in foam rubber. We secure the thread with beads along the entire length of the barrel with a glue gun.

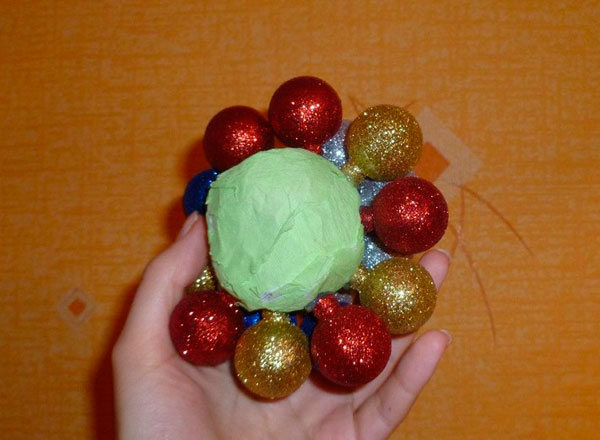
We place a ball with toys on the barrel and carefully fix it with glue. We decorate the junction of the ball and the barrel with ribbons.

We fill all the gaps that remain on the ball with large beads, fixing them with glue.

Now you need to decorate the foam rubber. For this purpose, take candies, insert toothpicks into them and wrap them with cling film, securing it with tape.


We cut out squares from the mesh and attach them with tape to the blanks, which we insert into the foam rubber.


Our New Year's tree of happiness is ready!
Christmas tree topiary
Tools and materials:
- stick for the trunk;
- screwdriver or drill;
- beautiful tin box;
- spruce branches;
- glue gun;
- gypsum;
- PVA glue;
- gold paint;
- beads.
How to make a tree of happiness
We paint the stick gold. Once it is dry, we make holes. The distances between them should be 1 cm.
We attach small spruce branches with glue to the trunk, inserting them into the holes.


We put the tree in a box. After this you need to plaster it thoroughly.

Leave to dry for 2-3 days. After this, we cover the plaster with PVA glue, and make one layer of beads on top. After it dries, make another layer of glue and add another layer of beads.

We decorate the green branches with gold cones and, of course, multi-colored balls. That's it, our Christmas tree topiary is ready!

Mandarin tree
Materials:

- tangerines;
- laurel and spruce branches;
- stick for the trunk;
- white beads;
- wire;
- threads;
- pot;
- sponge for flowers.
How to make a tangerine tree
Make a ball from a sponge and fill the pot with it.

Cut the wire into 10 cm pieces. We wrap the tangerines with thread.

Spruce branches are generously greased with glue and sprinkled with white beads.

We place the bottom of the stick in the pot, and place a sponge ball on top. We stick a wire with tangerines into it. And between them are laurel leaves, folded in half. We decorate the bottom with spruce branches.

In principle, the tangerine tree is ready.

As an option, instead of laurel leaves, you can take multi-colored rain, cotton wool or serpentine.


May the process of making Christmas trees bring you pleasure, and may the fruits of your labor bring you happiness in the New Year!
You can also see how a New Year's tree of happiness is made in the bonus video.
We also recommend
 Presentation "February 23 - Defender of the Fatherland Day" presentation for a lesson (7th grade) on the topic February 23, history of the holiday presentation
 What does a children's railway look like around the world?
 Do-it-yourself web with a chestnut spider and a dragonfly made from natural materials
 New Year's topiary Christmas tree: we decorate the holiday ourselves Topiary for the New Year's tree
 DIY educational toys for kids
 Asymmetrical stylish vest