The name of a craft about a web and a spider. Do-it-yourself web with a chestnut spider and a dragonfly made from natural materials
According to legend, spiders cannot be kicked out of the house; they protect the home from negativity and uninvited energetic guests.
Make this cute amulet with your own hands - a chestnut spider and a dragonfly made from natural material will do the job perfectly! A decorative web made of threads will never be a reason to think of you as a bad housewife; rather, on the contrary, all guests will admire the original decor! Every novice needlewoman can cope with the task.
Preparation of materials and tools
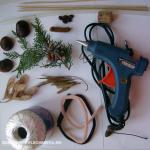
To create the “Chestnut Spider on a Web” craft, as in the photo, you will need the following materials and tools:
- two chestnuts (large and small);
- viburnum fruits;
- two acorn caps;
- three cones with thuja branches;
- five “helicopter” petals;
- fruits of the Saphora tree;
- eight wooden skewers;
- thread with sequins (or any other thread);
- wine cork;
- two fleecy sticks with a wire base, dark brown and light brown;
- a piece of black plasticine;
- scissors;
- glue gun

If you don't have some decorating materials, that's okay, use something else or reduce the number of decorations.
Step-by-step master class on creating decor
First you need to prepare wooden skewers to create the base of the craft - the web. Leave the length of the skewers 10 cm (more or less, depending on the desired size of the finished product), sharpen the blunt edges of the skewers with a knife.

Tie a thread to the finished “skeleton” for the web, closer to the center, to one of the skewers. Secure the knot with a glue gun. Then, at the same level, wrap all the skewers one by one, fixing the intersection of the thread on the stick with glue so that the thread better holds its shape and does not slip. 
After the first level of web, you need to wrap the thread near the initial knot, fix it and make two turns along the same skewer, lifting the thread up to continue the next row of web. Thus, go around in a circle and drop all the skewers to the edges, do not forget to fix the intersections with glue, especially the last knot. 
The web of threads is ready. 
Then start making a hospitable host for the web - a spider from chestnut and fuzzy sticks. For the insect cap you will need: a helicopter petal and an acorn cap. 
Glue a small chestnut to the edge of the larger chestnut, closer to the top. This will be the body with the head of the spider. Then use fuzzy stick scissors to cut 6 legs of 3-4 cm each and bend them slightly in the middle. Glue three legs to the sides of the body (large chestnut).
Cut off the edge of the “vertical” - this will be the visor of the cap and glue it to the acorn cap, and then to the spider’s head. Roll out plasticine and stick on two black eyes. Cut a piece of light brown stick and attach it around the spider's neck. The spider is ready.

Now it’s time to make your own dragonfly from natural material: the body is from a piece of fuzzy stick, the wings are from “verticals”, the head is from an acorn cap, the eyes are from plasticine. 
Start making a dragonfly from the body. To do this, bend the wire almost in half (make one edge a little longer) and twist it slightly (not tightly), leaving a small loop at the base and a thinner end. Glue a head - an acorn cap - to the loop and glue two round, flat eyes made of black plasticine. Glue two “helicopters” on both sides along the edges of the loop - these will be the wings of a dragonfly.

The last guest on the web will be the caterpillar. To make it, you will need the fruits of the Saphora tree (to make the caterpillar longer, they can be glued together). Make the eyes and glue them on from plasticine. 
Place the chestnut spider and other inhabitants and glue it to a decorative web of thread.
To decorate the composition, glue a composition of thuja branches and three cones into the center. 
Add a few brushes of viburnum or rowan along the edges “for a little sparkle”. The craft is ready.

You can make a loop for the craft “Spider from chestnuts on a web” and hang it as a talisman. Let the spider protect your home, which will always be full of goodness and long-awaited guests.
Other ideas of what are waiting for you in our other publication. Such creativity can safely be attributed to, because it requires virtually no costs.
Visit us more often and subscribe to the “Women’s Hobbies” website groups on social networks to be the first to know about the release of new master classes.
The craft of a spider on a web made of natural material is simple in appearance, but it looks original and interesting. Yes, and it’s very easy to do.
What will you need for the craft?
- Thin branches;
- Dry leaves;
- For the spider to choose from: acorn, cone, chestnut;
- Plasticine;
- Scotch tape, white threads (thicker is better);
- Moving eyes, but they can be made from white and black plasticine.

How to make a spider craft on a web?
First you need to decide what or what your spider will be made of. There are these options:
You will need plasticine, a pine cone, thin twigs. The branches should not be too dry so that they do not break off completely when bent.

Prepare 6 identical pieces broken off from a branch. Glue brown plasticine onto the cone between the scales.

Place twigs in plasticine to form spider legs. To do this, the branches need to be slightly broken and bent. For reliability, the fracture site can be secured with plasticine.

Next, all that remains is to glue the eyes and the pine cone spider is ready. All my eyes move, but they can easily be made from plasticine. Roll out two balls from white and the same number of balls, but smaller ones, from black plasticine. Glue it on the pine cone and you will get a very funny bug-eyed spider.

Prepare brown plasticine, twigs, chestnut and acorn cap. And also purchased eyes or plasticine ones.

Glue a small layer of plasticine onto the bottom of the chestnut, which will hold the spider's legs and branches. They also need to be slightly broken or bent, and the bend points secured with plasticine (optional).

All that remains is to glue the eyes, the acorn cap and the funny chestnut spider is ready.

Another simple version of a spider made from natural material. It is made exactly the same way as from chestnut. You will need branches, plasticine, an acorn, and eyes.

You need to glue plasticine to one part of the acorn, and stick 6 bent branches into it. The spider's appearance will be completed by its eyes and nose. I subsequently added plasticine noses to all the spiders.

These are the kinds of spiders you can make from natural materials. For the craft, just one of your choice is enough.

Making a web for a spider from natural materials
Take 3-4 branches, relatively the same size, connect them crosswise. Secure the intersection with tape. If the branches are very thin, plasticine is enough; thicker branches need to be carefully secured in several layers with tape, ensuring that they practically do not move. Otherwise the threads will sag.
Then you can immediately wind the threads, but it is better to first glue the plasticine to certain areas. The photo shows their location. There are many advantages of this action: the plasticine will hold the thread on the branch, hide it, and leaves can later be glued to it.

Wind the threads. I have them thin, it’s better to take a thicker one. You must first wind one tier, from branch to branch, and several times around the place marked with plasticine. Then the second and third. If desired, you can make more of them.

Everything is ready, glue a large maple leaf onto the plasticine in the center - this will be the spider’s nest. And on the sides there are any small leaves - probably the wind blew them into the web. But more for beauty.

The web has been made, now it’s time to place it in the nest of its owner. Here is a chestnut spider on the web.


And now the home and hunting place of the cone spider.


The acorn spider has settled down quite well.


And now the spiders are all together, although in the real version the spectacle would not be for the faint of heart.

This is what a spider on a web made from natural material could look like, simple and as natural as possible.
Today I invite you to weave decorative web and do it for her kinder spiders. This craft can serve as a decoration for a garden or cottage. The web can be woven among tree branches or on a chain-link fence. You can also weave a web in the house and use it as halloween decor.
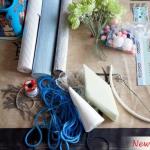
Materials:
- Cases for kinders – 2 pcs.
- Wire
- Insulating tape
- Black paint
- Leg-split
- Scissors
Let's start:
We need to make 6 holes in the kinder cases, 3 on each side. They can be made with a drill or an awl; at worst, you can use a nail heated over a fire.
Also at this stage we need to think about how we will attach the spiders. I missed this point during production and had to glue the spiders on. But it is much more convenient and reliable to fasten them with wire. Therefore, in the lower part of the kinder you can make two holes and pierce a piece of wire, with which you will later fasten the spiders.
We cut three pieces of wire for one spider and thread them through the holes.

We wrap all future legs with electrical tape, due to this they will be fixed and will not move from one side to the other.

We give the legs a shape more similar to the legs of a spider and cover the entire product with paint.
While the spiders are drying, you can weave a web.

Cut 7 strands of twine, the length depends on the size of the desired web. Fold the threads in half and tie one of the threads in the middle.
We tie the ends of the twine to the branches, or as in my case, take care of the mesh. If you want to weave a web in the house, you can glue the ends with transparent tape.
Now we cut off more twine and tie it to one of the threads closer to the center, we draw a thread around all the other threads, at the end we fix the thread and cut off the excess.
We cut the thread again and repeat the action, only this circle is wider and a little further from the first one.
Using this principle, we make another 2-5 rows.


You will need: yarn, scissors, glue stick, markers, white paper, a small piece of cardboard, wire.
First you need to make the body of the spider: to do this, take a small rectangular piece of cardboard (you can fold the paper sheet several times) and make cuts on the sides, insert wool thread into the cuts, and wind the yarn on top. Then remove the thread from the cardboard and tie the skein tightly.


Now you can carefully remove the cardboard. Turn the skein over and tie it with thread on the other side.

Now gradually cut the threads from the sides indicated in photo 4, just be careful not to cut the fastening thread.

This is what should happen.

The next step is to create the spider legs. To do this, cut 4 pieces of wire; they can be either the same length or different. It is better to round the ends, this will not only be safer, but it will also be easier to secure the wound thread.


In order for the yarn to stick better to the wire, the thread must be lubricated with a glue stick and wound in a circular motion. You don’t need to wrap the middle of the foot tightly: this will save your time and yarn.
After the paws are ready, we proceed to the penultimate stage. I decided that my spider would have big eyes and teeth, you can do it as you want - squint, stick out tongue, smile or something else. So, on white paper we draw two eyes and two fangs, then cut them out.

The final stage will be assembling a funny spider. We put the paws through, bend them so that they look like real ones, then glue on the eyes and teeth. Now the spider is ready, you can attach a rope to it and hang it in a corner.

This craft can be done with children; they will enjoy participating in the process, coming up with new colors or funny spider faces.
We also recommend
 Presentation "February 23 - Defender of the Fatherland Day" presentation for a lesson (7th grade) on the topic February 23, history of the holiday presentation
 What does a children's railway look like around the world?
 Do-it-yourself web with a chestnut spider and a dragonfly made from natural materials
 New Year's topiary Christmas tree: we decorate the holiday ourselves Topiary for the New Year's tree
 DIY educational toys for kids
 Asymmetrical stylish vest