Crochet rabbit with description. Crochet toys - rabbit
Legend
I - purl loops
L – facial loops
1PR – add one loop (from the broach)
2LVM – knit 2 together
2LVMP - knit 2 together with a facial tilt to the right
2IVM – knit 2 together purlwise
Head
Cast on 7 loops
1st row I
2nd row 1L, (1PR, 1L) to the end of the row
3rd row I
4th row 1L, (1PR, 1L) to the end of the row (25 loops)
Knit 3 rows
8th row 1L, (1PR, 3L) to the end of the row (33 loops)
Knit 11 rows
20th row 12L, 2LVM, 5L, 2LVMP, 12L
21st row I
22nd row (2LVM) 7 times, 3L, (2LVM) 7 times
Knit 3 rows in garter stitch
26th row 1L, (2LVM) to the end of the row
Fasten the thread. Sew up part of the head, leaving a hole. Stuff it. Sew up the hole. We embroider the eyes and nose. Sew the head to the body
Torso
Dial 15p
1st row I
(29 loops)
Knit 5 rows
8th row (7L, 1PR) x 2 times, 1L, (1PR, 7L) x2 times
Knit 5 rows
14th row 15L, 1PR, 3L, 1PR, 15L = 35p
Knit 3 rows
18th row 3L, 1PR, 1L, 1PR, 27L, 1PR, 1L, 1PR, 3L
19th row I
20th row 16L, 2VMP, 3L, 2VM, 16L
Knit 3 rows
24th row 15L, 2LVMP, 3L, 2LVM, 15L
Knit 3 rows
28th row 1L, 2LVM to the end of the row
29th row I
30th row 2LVM to the end of the row
31st row I
Close the loops
Right paw
Cast on 6 loops
1st row I
2nd row 1L (1PR, 1L) to the end of the row
3rd row I
Knit 3 rows
8th row 1L (2LVMP, 1LVM) 2 times, 6L
* Knit 3 rows
12th row 1L, 1PR, 9L 1PR, 1L
Knit 9 rows
22nd row 1L (2LVM) 6 times
23rd row I
24th row 1L (2LVM) 2 times
Left paw
Cast on 6 loops
1st row I
2nd row 1L (1PR, 1L) to the end of the row
3rd row I
4th row 1L (1PR, 4L, 1PR, 1L) 2 times (15 loops)
Knit 3 rows
8th row 6L (2LVMP, 1LVM) 2 times, 1L
Next we knit like the right paw*
We sew the paws to the body
Legs
Cast on 10 loops
1st row I
2nd row 1L (1PR, 1L) to the end of the row
3rd row I
4th row 2L, 1PR, 7L, 1PR, 1L, 1PR, 7L, 1PR, 2L (23 loops)
Knit 3 rows
8th row 7L, 2LVMP 2 times, 2LVMP 2 times, 8L
9th row 6I, 2IVM 2 times, 2IVM 2 times, 5I
10th row 6L, 2LVM, 7L (14 loops)
Knit 3 rows
14th row 1L, 1PR, 12L, 1PR, 1L (16 loops)
15th row I
16th row 1L, 2LVM 4 times
Tear off the thread and pull it through the remaining loops on the knitting needle.
Fasten the thread. Stuff and sew.
We make 2 parts. We sew the legs to the body
Ears
We knit the ears in garter stitch (knit stitches only)
Cast on 10 loops. We knit 16 rows. Next, in every second stitch in the middle we knit 2 heels together. When there are 7 loops left on the pizzas, we knit 2 loops in the middle in each row until one loop remains. We knit 2 parts.
We sew the ears to the head.
Dress
Cast on 26 stitches and knit with raglan
Raglan calculation
4 raglan loops
4 loops - half back
3 loops – sleeve
8 loops – front part
Total: 4+1+3+1+8+1+3+1+4=26
after 14 rows, close the loops on the sleeves and continue knitting the dress without taking into account the sleeves with a different thread. At the same time, we make increases in the front row every 3 loops.
We knit 23 rows after raglan. Next, in the front row we knit purl loops, after which we close the loops with a needle.
For the pocket we cast on 10 loops.
1st row L
2nd row L
3rd row I
Next we knit 5 rows in stockinette stitch.
After this, in each row we make decreases from the sides - we knit 2 VM
When there are 4 loops left on the knitting needle, cast off all the loops.
Sew the pocket to the dress. Sew the dress from the back, putting it on the rabbit
Baby rabbit
We knit with thinner threads and knitting needles
Cast on 13 stitches and knit 18 rows in stockinette stitch. Next, we tear off the thread and pull it through the loops remaining on the knitting needle. We embroider the eyes and nose. While sewing, we stuff the toy at the same time. To make a neck, take a thread and wrap it around the toy several times, tightening it.
Ears
Cast on 5 loops
1st row 1L, 1I, 1L, 1I, 1L
2nd row is the same
knit 4 more rows in the same way
7th row 1L, 3VM, 1L
8th row 1L, 1I, 1L
9th row 1L, 2VM
Tear off the thread and pull it through the remaining loops on the knitting needle.
knit 2 of these ears
Paws
We knit in the form of a cord. To do this, cast on 4 loops and knit 6 rows in a circle. At the end of the loop, we gather it onto one thread (the one with which we knitted it) and, using a needle, pass it through the limb to the first thread, so that the two threads are side by side. We make 2 such parts.
We sew the paws and ears to the body.
 Educational video course of artistic knitting “Secrets Irish lace”
 Carpet “Extravagant” – video master class
  TRAINING AUTHOR'S COURSE IN ARTISTIC KNITTING
  "150 ideas for exclusive knitted clothes» Zoe Woolwich
VIDEO COURSE “All the best for children” part 1 (for boys) VIDEO COURSE “All the best for children” part 2 (for girls)
VIDEO COURSE BRAIDS AND BRAIDS without “jambs”  VIDEO COURSE “For beloved men”
VIDEO COURSE “I will knit myself a dress...”  VIDEO COURSE “Secrets of working on the BROTHER CK-35 machine”
  VIDEO COURSE “Working on the machine SILVER REED SK – 280/SRP 60N”
  VIDEO COURSE “BASICS OF OPERATING THE SILVER REED SK 840/SRP60N”
  VIDEO COURSE “Calculation and knitting of the finished product”
  VIDEO COURSE “Machine knitting for beginners”
  VIDEO COURSE “Working on the BROTHER KH-868/KR-850 machine”
  VIDEO COURSE “Working on the BROTHER KH-970/KR-850 machine”
  VIDEO COURSE “Working on the BROTHER KH-940/KR-850 machine”
  VIDEO COURSE “Calculation and knitting of the finished product-2”
And I'll show you how to tie easter bunny crochet I didn’t plan to cook it at first, but there were a lot of people who asked for a knitting pattern for these bunnies with carrots. Therefore, I am sharing what I came up with.
Necessary materials for knitting
- yarn:
main color rabbit (for example, gray, white);
pink for ears and nose;
black for eyes and mouth;
orange for carrots;
green for carrot leaves. - synthetic fluff
- Crochet hook(I have No. 2)
- needle for sewing
Symbol
- air loop- VP
- single crochet- RLS
- increase- knitting two single crochets into one
- decrease- knitting two single crochets as one
For beginning needlewomen, I have prepared a special publication -
Easter bunny: how to crochet
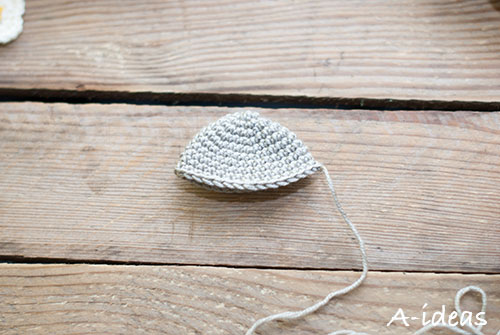
1. Knit the base (2 parts)
Take a thread of the main color and knit according to the pattern shown in the picture.
I will write in additional words an explanation of the circuit.

We knit the base of the rabbit
The first part of the diagram, which is drawn in black
We knit 2 ch.
- 1 circle:
- 2nd circle:
- 3rd circle:
- 4th circle:
- 5 circle:
- 6th circle:(4+pr)*6 times. You will get a circle of 36 sc.
- 7th circle:(5+pr)*6 times. You will get a circle of 42 sc.
- 8th circle:(6+pr)*6 times. You will get a circle of 48 sc.
- 9th circle:(7+pr)*6 times. You will get a circle of 54 sc.
- 10th circle:(8+pr)*6 times. You will get a circle of 60 sc.
- 11th circle:(4+pr)*12 times. You will get a circle of 72 sc.
- 12th circle: We simply knit 72 sc in the round without any increases.
The second part of the diagram, which is drawn in green
Row 13:
- Next we knit 12 sc.
- after the “shell” we skip 2 stitches of the previous row and knit 1 sc - this will be the end of the row.
The third part, which is drawn in blue
We knit this row in the opposite direction, like knitting in rows.
Row 14:
- we skip two columns of the previous row and in the third we knit a “shell” element, which is made up of 7 DCs into one loop.
- after the “shell” we skip again 2 columns of the previous row.
- Next we knit 16 sc.
- again we skip 2 columns of the previous row and knit a “shell” in the third.
- after the “shell” we skip 2 stitches of the previous row and knit a blind loop - this will be the end of the row.
One part of the base is ready. We knit the second one in the same way.
2. Head
Take a thread of the main color.
Knitting the head
We knit 2 ch.
- 1 circle: 6 sc in second ch from hook.
- 2nd circle: pr*6 times. You will get a circle of 12 sc.
- 3rd circle:(1+pr)*6 times. You will get a circle of 18 sc.
- 4th circle:(2+pr)*6 times. You will get a circle of 24 sc.
- 5 circle:(3+pr)*6 times. You will get a circle of 30 sc.
- 6-10 laps: We simply knit 30 sc in the round without any increases.
3. Paws (2 parts)
Take a thread of the main color.

Knitting paws
We knit 2 ch.
- 1 circle: 6 sc in second ch from hook.
- 2nd circle: pr*6 times. You will get a circle of 12 sc.
- 3rd circle:(1+pr)*6 times. You will get a circle of 18 sc.
- 4-7 laps: We simply knit 18 sc in the round without any increases.
We knit the second paw in the same way.
4. Ears (2 parts)
Take a thread of the main color.

We knit ears
We knit 2 ch.
- 1 circle: 6 sc in second ch from hook.
- 2nd circle: pr*6 times. You will get a circle of 12 sc.
- 3rd circle:(1+pr)*6 times. You will get a circle of 18 sc.
- 4th circle:(2+pr)*6 times. You will get a circle of 24 sc.
- 5-8 laps: We simply knit 24 sc in the round without any increases.
- 9th circle:(2+dec)*6 times. You will get a circle of 18 sc.
- 10-13 laps: just knit 18 sc in the round.
We knit the second ear in the same way.
5. Carrots
Take an orange thread and a green one. We knit according to the pattern.

Crochet carrot pattern
It’s quite difficult for me to describe the knitting pattern and besides, it will take a long time. Therefore, if you have any questions, I will answer in the comments.
There are signs on the diagram: Start 1, Start 2, Start 3. They also differ in colors.
It means that we start knitting where Start 1 and knit that part of the pattern that is the same color as the Start 1 indicator. That is, first we knit orange carrot.
AND We start knitting the third part in green where Start 3.
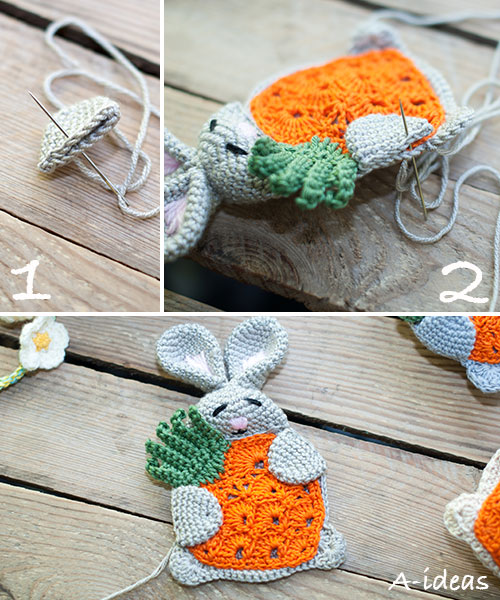
6. Sew on the ears
First you need to embroider the centers of the ears with pink thread. Then sew them at the base. And sew it to the head.
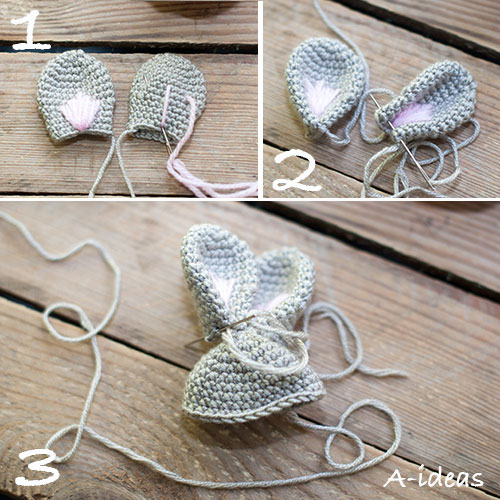
Sew on the ears
7. Embroider the nose, mouth, eyes
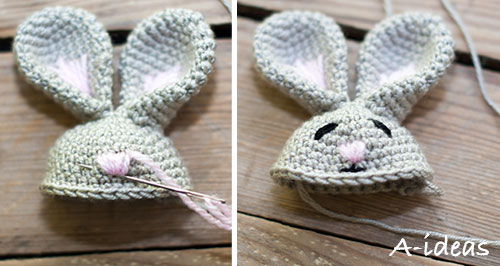
Embroider the nose, mouth, eyes
8. Sew on the head
First, fill your head with a small amount of synthetic fluff.
Sew on the head
9. Sew on the carrot
At an angle (as in the picture) we sew the carrots to the rabbit in the shape of the orange part of the carrot. That is, we do not sew on the green leaves on purpose.

Sew on a carrot
10. Sew on the paws
We first sew each paw at the base.
Sew on the paws
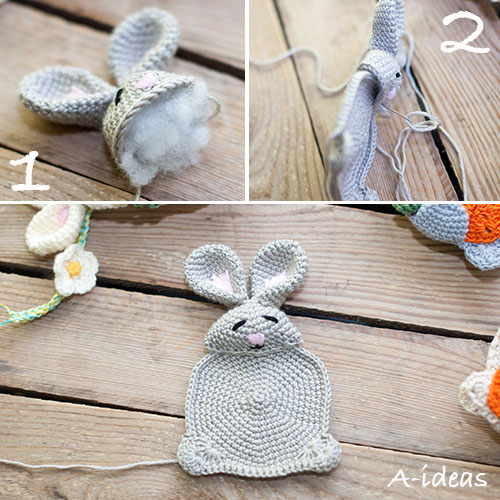
11. Sew on the back of the rabbit base
In the photo I specifically showed the reverse side of the process. That is, we sewed everything only to one part of the rabbit. To hide the wrong side, sew on the second base.
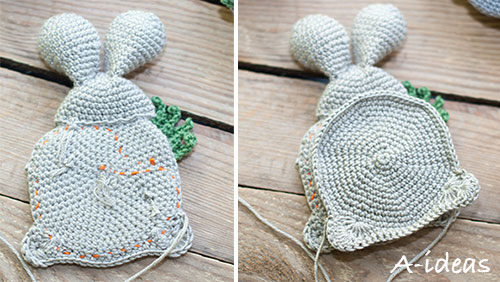
Sew on the back of the bunny base
12. Stuff the rabbit with synthetic fluff
This is the last part of the job - fill it with a small amount of synthetic fluff.

Stuffing a rabbit with synthetic fluff
Each rabbit can be made slightly different, for example using different shapes eyes, and I also sewed the carrots in different directions with their roots.

Master class on knitting an Easter bunny
I hope everything is clear in the master class. If you have any questions, I will answer in the comments.
Please leave your review or comment. I'm very interested in your opinion!
Children really love the animated film “The Secret Life of Pets.” All the characters in this cartoon live a rich life filled with adventures, but only when people are not at home. Snowball Rabbit is one of the main characters of the cartoon, he is insidious and cunning. But everyone knows that amigurumi toys They cannot be evil, they are sweet and touching. Therefore, our rabbit Snowball only looks like his prototype, but in character he is kind and sweet.
The amigurumi rabbit crochet pattern was developed by Maia Craft. Craftswomen with any crocheting experience can handle the pattern. It is important to strictly follow the scheme and follow the sequence of actions. Post photos of your amigurumi Snowball rabbits in the comments to the post, let's rejoice together excellent results creativity!
Rabbit Snowball crochet
Diagram and description of a knitted toy
The knitting pattern has been translated into Russian by Handcraft Studio.
Materials:
- cotton thread 1 mm;
- hook 2.0 mm;
- safety eyes 5 mm;
- filler;
- textile glue;
- needle for sewing knitted items;
- felt (black, white, blue).
Symbols
KA - amigurumi ring
VP - air loop
sc - single crochet
p - loop, loops
add. - increase (knit 2 stitches into 1 loop)
decrease - invisible decrease (knit 2 stitches together into 1, inserting the hook only behind the front walls of the next two loops and knitting 1 sc from the two elongated loops)
zzs - knit for back wall loops
() - repeat the actions indicated in brackets the specified number of times
HEAD

White thread, ch 6
Row 1: start knitting from the second loop from the hook
Row 2: (sc, inc.) x 6 (18)
Row 3: (2 sc, inc.) x 6(24)
Row 4: (3 sc, inc.) x 6 (30)
Row 5: (4 sc, inc.) x 6 (36)
Rows 6-10: 36 sc (36)
Row 11: increase. x 6, 4sc, increase. x 6, 20 sc (48)
Row 12: (7 sc, inc.) x 6 (54)
Rows 13-17: 54 sc (54)
Row 18: (7 sc, decrease) x 6 (48)
Row 19: (6 sc, decrease) x 6 (42)
Row 20: (5 sc, decrease) x 6 (36)
Row 21: (4 sc, decrease) x 6 (30)
Row 22: (3 sc, decrease) x 6 (24)
Keep knitting
BODY
Row 23: 24 sc (24)
Row 24: (3 sc, inc.) x 6 (30)
Row 24: (4 sc, inc.) x 6 (36)
Row 25: (5 sc, inc.) x 6 (42)
Rows 26-32: ST 42 sc (42)
Row 33: (5 sc, decrease) x 6 (36)
Row 34: (4 sc, decrease) x 6 (30)
Row 25: (3 sc, decrease) x 6 (24)
Row 26: (2 sc, decrease) x 6 (18)
Row 27: (sc, dec) x 6 (12)
Row 28: decrease. x 6 (6)
NOSE
White yarn, ch 6
Row 1: starting from the 2nd loop from the hook
4 sbn, 2 sbn in the last one. n. Turn and continue working, knitting on the reverse side of the chain.
4 sbn, 2 sbn in the last one. item (12)
Row 2: 12 sc (12)
EARS 2 pcs.
Row 1: KA, 4 sc (4)
Row 2: increase. x 4 (8)
Row 3: (sc, inc.) x 4 (12)
Rows 4-8: 12 sc (12)
Row 5: decrease. x 2, 8 sc (10)
Rows 6-10: 10 sc (10)
Row 11: decrease. x 2, 6 sc (8)
Row 12-14: 8 sc (8)
Fasten the thread, leaving a long end for sewing.

HAND
Row 1: KA, 5 sc (5)
Row 2: increase. x 5 (10)
Rows 3-9: 10 sc (10)
Fill and fasten the thread, leaving a long end for sewing.
HIP
Row 1: KA, 6 sc (6)
Row 2: increase. x 6 (12)
Row 3: (sc, inc.) x 6 (18)
Row 4: (2 sc. inc.) x 6 (24)
Row 5: 24 sc (24)
Fill and fasten the thread, leaving a long end for sewing.

PAW
Row 1: KA, 6 sc (6)
Row 2: increase. x 6 (12)
Rows 3-8: 12 sc (12)
Row 9: decrease. X 6 (6)
Fill and fasten the thread, leaving a long end for sewing.

We present for you spring bunnies - amigurumi.
crocheted . The author of these babies is handicraftswoman Stephanie. who started knitting toys at the age of 10 and still does not change her hobby. And it's wonderful! After all, thanks to her, we can create these amazing animals with our own hands. In general, it should be noted that amigurumi - irreplaceable creatures. Think for yourself: they are knitted quickly and easily (in most cases), they require few materials. But there are a great many areas of application for these toys! Of course this is good toys for children, Original gifts for relatives and friends, amigurumi can also be interior toys. And what pleasure you will get from knitting these touching babies! So, we boldly take hook in hand and start knitting. crochet cardigan with patternKnitting materials:
Knitting a bunny head:
We start knitting with beige or white yarn.
crochet lessons Liliya Ulanova1st row: We close 6 sc in an amigurumi ring.
To learn how to knit an amigurumi ring, watch the following master class on our website:
crochet doublets2nd row: 2 sc in each loop of the previous row. (12 loops)
3rd row:*1 sc, increase* - repeat 6 times (18 loops).
how to crochet knitted souvenirs4th row:* 2 sc, increase * - repeat 6 times (24 loops).
polyethylene crochet video tutorials5 row:*3 sc, increase* - repeat 6 times (30 loops).
6th row:*4 sc, increase* - repeat 6 times (36 loops).
crochet for luxury ladies7th row:*5 sc, increase* - repeat 6 times (42 loops).
8th row:*6 sc, increase* - repeat 6 times (48 loops).

Rows 9-13: 48 sc.
crochet fashion magazine 524Row 14:*6 sc, decrease* - 6 times (42 loops).
Row 15:* 5 sc, decrease * - 6 times (36 loops).
crochet patterns and description of a shawlRow 16:*4 sc, decrease* - 6 times (30 loops).
Row 17:*3 sc, decrease* - 6 times (24 loops).
knitting crochet seatsWe fix the eyes at the bottom of the head. We begin to stuff the bunny's head.
Row 18:*2 sc, decrease* - 6 times (18 loops).
Row 19:*1 sc, decrease* - 6 times (12 loops).
free crochet patterns from japanDecrease until the hole is completely closed.
Using brown thread, embroider the nose. The author offers two options for designing the bunny's face.
crochet courses in Belgorod
crochet types
Knitting ears:
1st row: 5 sc in amigurumi ring (5 loops).
2nd row: 2 sc in each loop of the previous row (10 loops).
children's knitted dress crochet pattern3rd row:* 1 sc, increase * - 5 times (15 loops).
crochet pineapple dresses9th row:*3 sc, decrease* - 3 times (12 loops).
10-11 rows: 12 sc.
sharing patterns for crocheting shawlsRow 12:*2 sc, decrease* - 3 times (9 loops).
We finish knitting the details, leave long ponytail yarn in order to then sew the ears to the head. Sew on the inside of the ears.

Knitting a bunny body:
crochet multi-tiered roses1st row: 7 sc in amigurumi ring (7 loops).
2nd row: 2 sc in each loop of the previous row (14 loops).
3rd row:*1 sc, increase* - repeat 7 times (21 loops).
Crochet hat with earflaps for women patterns4th row:*2 sc, increase* - 7 times (28 loops).
knitted women's vests crochet9th row:*2 sc, decrease* - 7 times (21 loops).
10th row:*1 sc, decrease* - 7 times (14 loops).
We finish knitting, leaving a long tail of yarn.
crochet rugs watch videoKnitting handles:
We knit with beige or white yarn.
1st row:
2nd row:*1 sc, increase* - repeat 3 times (9 loops).
4th row:*1 sc, decrease* - 3 times (6 loops).

Knitting legs:
Beige or white yarn.
1st row: 6 sc in amigurumi ring (6 loops).
2nd row:
3rd row:*1 sc, increase* - 6 times (18 loops).
We begin to stuff the connected part of the legs.
7th row:*1 sc, 1 decrease* - 6 times (12 loops).
We continue to stuff the leg.
8th row:*decrease* - repeat 6 times (6 loops).
We finish knitting and leave a tail. Cut out an oval from felt and sew the sole to the leg.
Knitting a bunny tail:
We knit with beige or white yarn.
1st row: 6 sc in amigurumi ring (6 loops).
2nd row: 2 sc in each loop of the previous row (12 loops).
4th row: 6 decreases (6 loops).
crochet with beadsWe finish knitting and leave a tail.
Crochet hare, baby Khrum. Description of Elena Balanenko
Materials: hook No. 1.5, yarn of suitable thickness, frame wire, leatherette and half beads for the eyes, dry pastel for tinting, filler, chenille wire for the front and rear legs. Taking into account the materials used, the bunny should be 6 - 7 cm (with ears - 12 cm).

Crochet Scops Owl hare, translation by Lidia Gureeva

Crochet hare with snood, author Natalya Kiryan
Crochet bunny from Polina Kuts
For knitting you will need:
- Cotton yarn 50 g / 125 m (with these parameters, the height of the toy is approximately 30-35 cm):
- beige
- blue
- black (small piece for embroidering the muzzle).
- Synthetic fluff filler
- Hook No. 2-2.25 mm
- thick needle
- Scissors
Funny crochet hare
Crochet hare from Natalia Mir
The rabbits' faces are made of felt.
Crochet hare from a Thai magazine
The master class was designed by Larisa Glinchak (Rozetka).
Any schematic description of a toy is universal. The language in which the explanations for the knitting pattern are made is not particularly important.
But sometimes it is still difficult to understand which side to start knitting and assembling parts. Sometimes my interest in sports just awakens, like when solving a puzzle.
I would like to bring to your attention one such solution.
I came across the knitting pattern for this doll in a scan of a Thai magazine. Let's try to tie it together using a verbal description and step-by-step photos.
Crochet hare from Olesya Solozhenko
Hare - crochet amigurumi
Cute crochet hare
For knitting you will need materials:
- yarn for knitting;
- a hook of a suitable size;
- stitching needle;
- filler for toys;
- felt or fabric for ears and legs;
- eyes (can be replaced with buttons, half beads or embroidered with threads);
- threads for embroidering the muzzle.
Crochet bunnies
Crochet scops owl hare
Crochet gentleman hare
Crochet hare according to the description my-crochet-privacy
Crochet hare with big ears
Tied up Chuchkalova Marina
Hare in a crocheted skirt
Attention!!! In order for the toy to meet the amigurumi parameters, the thread must be thin. Recommended hook size is from 1 to 2mm.
Materials: hook, yarn white, red, eyes, nose. The toy is knitted with single crochets.
Crochet hare
If it’s not sunny in your city today, and the weekend doesn’t promise anything sparkling, then be sure to tie up the Hipster Hare, he will make you happy and distract you from gloomy thoughts. :)
Toy height: 10cm.
Thread quality: 100% cotton.
We will need:
- remnants of beige, white, dark green and light green threads;
- just a little bit of black thread;
- a small piece of padding polyester;
- suitable hook;
- needle;
- scissors.
Bunny - boy crochet
Translation for joint knitting - Lydia Uspenskaya.
Yarn - Nymph KAMTEKS (wool 35% / acrylic 65%. 300m/100g). Hook No. 2.5.
Crochet amigurumi bunny. Description of Marina Chuchkalova
Crochet colored bunny or Easter bunny
Such a hare can be knitted for Easter.
You will need leftover yarn for knitting in different colors, a crochet hook, some filler (synthetic fluff, holofiber), eyes for toys or a couple of black beads, and a needle.
Crochet pot-bellied hare
Legend:
- amigurumi ring
- sc single crochet
- increase from one loop bottom row knit two single crochets
- decrease knit two adjacent columns together under one top
Crochet hare in shorts
For knitting you will need Yarn Art Jeans threads, hook No. 2-2.5.
Although he can be not only in shorts, but also in a skirt:
Crochet hare from Vera Terekbaeva
For hare farming we need:
- 300 grams of thick yarn.
- Hook No. 3.5-4.0. Here, choose how you feel comfortable knitting. The main thing is that no gaps are visible!
- Filler
- Two black beads for eyes. diameter 0.6-0.8mm
- Remains of black yarn for embroidering a face
- A little pink floss or any other cotton yarn for embroidering the nose.
- Plus I used a small piece of pink felt. This way the embroidery looks much neater, and the nose turns out to be convex.
For clothes:
- 50 grams of olive yarn or any other color. I took Jeans from YanArt.
- Knitting needles No. 3-3.5
- Some blue yarn
- 2 meters of lace
- 6 wooden beads, diameter 1.5cm
Knitted bunny based on S. Lutterotti
For lovers of cute and cuddly knitted toys, we present a description of a bunny that everyone will remember for its unusual face. The knitted amigurumi bunny will become a great gift for any occasion and will bring a lot of joy and warmth.
The toy's knitting pattern is based on Samantha Lutterotti.
Have fun knitting!!!
To knit a bunny we will need:
- yarn (50 g = 80 m);
- hook No. 3;
- filler (for example, synthetic winterizer);
- some cardboard for the base of the legs;
- beads and a button to decorate the face.
Designations:
Increase = 2 tbsp. b/n in one loop of the previous row;
Decrease = skip 1 tbsp. b/n of the previous row, knit 1 tbsp. b/n.
Crochet sunny hare. Description of Anarik
Crochet rattle. Author Tatyana Stepkina
Crochet skinny bunny. Author Angela Feklina
To create a toy you need:
- Yarn Jeans in three colors
- Hook (I have number 2)
- Filler
- Needle for sewing parts
- Beads, thin needle, fishing line or thread in the color of clothing for sewing on beads
- Threads for nose embroidery
- Two large beads for eyes and black thread for embroidering eyelashes
From the tips of the ears to the heels 27 cm (using my materials), without a frame, does not sit or stand on its own. Lightweight and soft toy.
Crochet hare, work from our website

Initially, there was an idea to knit an amigurumi bunny, but since amigurumi are more modest in size (my bunny ended up being 15 cm tall), the toy can be classified as an ordinary crocheted one. I've always loved the idea of combining yarn and
Read completely

Hello, my name is Irina. In connection with the approaching Olympic Games in Sochi, I decided to knit such an Olympic bunny for the competition. Name: Olympic bunny (author's work) Height 60 cm (including ears) Yarn consumption: for the bunny's body: 3 skeins
Read completely

Hello! My name is Svetlana Novoselova. I live in the city of Tyumen. I have been interested in knitting for a long time, and knitting toys has become my favorite pastime. I would like to submit Julia the bunny for the competition. Crocheted from mohair+acrylic yarn, tinted decorative cosmetics And
Read completely

Hello! My name is Elena Belyak, I live in the Orenburg region in the village. Kotubanovsky. I want to show my work, bunny. The toy measures 15 cm wide and 11 cm high (without ears). The toy is made in mixed media,
Read completely

Hello, my name is Anna. I want to participate in the knitting competition “White Rabbit 2011” in the “White Rabbit” category. For my hare I used angora yarn, a 1.5mm hook, a nose, eyes, 10 buttons (for attaching arms, legs, head). Bunny size: 15
Read completely

Hello! My name is Marina Anatolyevna. I work as a teacher in correctional school. I have been interested in knitting for a long time. I put a piece of my soul into each of my work, and I teach this to my students. I love accuracy and originality in my work. I present at
Read completely

Hello, my name is Alisa, I am from Kaluga. I started crocheting about a year ago and now I can’t stop. For me, my debut is not only participating in a knitting competition, but also writing a description for
Read completely

Knitted bag- bunny. Body, head, arms and valve knit in white according to the basic description, see part 1. Front legs (2 parts) Knit in white according to the main description for the paws, see part 1. Hind legs (2 parts) Rows 1-10: knit
Read completely
Crochet hare, video tutorials
Crochet amigurumi toy “Long-legged hare”
The hare is crocheted according to the description of Polina Kuts from YarnArt Jeans threads, crochet number 2.5.
Video master class, part 1
Video master class, part 2
The video should load here, please wait or refresh the page.
Video master class, part 3
The video should load here, please wait or refresh the page.
Plush Crochet Bunny with Long Amigurumi Ears
For knitting: hook No. 5, 1 skein of yarn 100% polyester Dolphin BABY Himalaya 100% polyester, 120m/100g (or DOLCE YarnArt yarn), synthetic fluff for stuffing.
The video should load here, please wait or refresh the page.
We also recommend
 When is the best time to send your child to kindergarten?
 Cast iron wedding: how many years have passed since the wedding?
 Milanese bracelet watch (754)
 Live broadcast - Dzhigarkhanyan’s divorce from his young wife How the relationship between Vitalina and Armen Borisovich developed further
 Minimum length of service for an old-age pension: what it should be in Russia
 Set yourself up for positive thoughts