How to beautifully wrap a wedding gift with your own hands. Beautiful and unusual DIY gift wrapping (50 photos)
Giving gifts is as pleasant as receiving them, but in addition to the prepared surprise, packaging is also important, which will give it a complete and presentable look. But to understand how best to pack a gift in gift paper, you should study several features and options for this procedure in order to choose the most optimal one for yourself.
Paper selection
The most common way to decorate a gift is gift paper.
It comes in several types, each of which has its own differences:
- Sheet glossy paper. The paper can be of different colors, both plain and multi-colored. The density of the sheets is minimal, which allows them to be used in various interesting wrapping options.
Most often, this type of paper is used for packaging boxes in the shape of a square and rectangle.
- Craft. Characterized by increased wear resistance and density. To the touch, kraft paper is much rougher than the previous version and has a ribbed surface with a cross section.

Great for gifts in retro or Provence style, as well as large sizes. Such packaging requires additional decoration on top.
- Silence. This type of packaging is papyrus Whatman paper. Its thin airy structure allows you to give the gift an elegant and elegant look.

Tishyu is also used as a filler in a gift box. It is convenient to wrap objects of complex geometric shapes in this paper, which gives them additional volume.
- Polysilk. It is a stretchy film onto which a metallic shade is applied. It only comes in a single color version.

Used for wrapping objects with sharp corners, as well as toys. The gift is placed in the middle of the packaging list, and the edges rise up and are decorated with a bow made of the same material.
- Corrugated paper. For packaging gifts, material with large embossing is used. Often this look is complemented with polysilic bows, which gives the packaging a sophisticated look.

You can wrap any objects in this paper: boxes, bottles, tubes.
- Mulberry. Designer look of crinkled paper. Available in a variety of colors, and in some cases also has an ornament or design.

Used as a wrapper for objects of any shape. If necessary, the gift is complemented with a small decor on top.
Choice of colors
How to pack a gift in gift paper, as well as give it sophistication and presentability, will help you study the features of using different shades of the material.
The packaging and the item inside must be in harmony with each other, since color mismatch can ruin the overall impression of the surprise.
Primary colors:
- Yellow. Sunny color, reminiscent of a ray of sunshine. Gift wrapping made in this tone gives a warm and cozy touch. Ideal for adding childlike spontaneity and playfulness to a surprise. It is not recommended to mix with other colors. But you can add purple, brown, blue or green decor on top.
- Orange. A shade that personifies strong positive emotions and also sets one up for admiration. But it is important not to overdo it, since this particular color can both decorate a gift and ruin it. It is ideal to combine orange wrapper with green, yellow, brown, purple, blue and red.

- Pink. Great for gifts for women, as it evokes touching and joyful emotions. It is best to combine it with all shades of red and purple, and additional white decor will help to effectively emphasize the tone.
- Violet. This option is ideal for a mysterious and extraordinary gift, as it symbolizes secrecy, mystery and fantasy. It is best to combine this tone with white, silver, yellow and pink for gift wrapping.
- Red. This packaging tone signifies fiery feelings and passion, and sometimes symbolizes irritation and anger. Therefore, when giving preference to this color for gift wrapping, you should weigh everything, unless we are talking about surprises for the New Year, since the red tint is very relevant for this holiday.
It is ideal to combine red packaging with silver, gold, white, pink and gray tones.

- Blue. It is recommended to use this tone for gift wrapping for a man, as it is associated with success, nobility, and fidelity. Dark blue color harmonizes perfectly with blue, silver, white, yellow, and for lighter tones it is recommended to choose pale shades of yellow and pink.
- White. This tone is universal, as it can be combined with any bright color. But you should not give preference to it as the main color for packaging, since it is cold and therefore the impression of the gift will be the same. It is best used for contrast, using details in this shade, which will give the surprise a festive feel.
- Green. It is considered a neutral shade that is appropriate for any occasion. The variety of tones of this color allows you to choose the appropriate option for packaging. The green tone symbolizes wealth and respect. It is recommended to combine dark shades with yellow, orange, white and gold, and light shades with brown, gray, yellow.

- Grey. Used for gift wrapping, symbolizing nobility and restraint. And to add sophistication, it should be combined with red, pink and purple shades.
- Brown and black. These tones are rarely used, although they are recommended for formal gifts. But in order to dilute the tone, it is recommended to complement the wrapper with details in silver, purple or gold.
- Silver, steel and gold. It is best to use these colors as a complement to the main color. But it should be taken into account that steel and silver are cool tones, and therefore should set off packaging made in the same palette.
But it is better to decorate a gift made in warm shades with details in a golden tone. In addition, these colors combine well with white and black.
If you choose multi-colored gift paper, the details should be made from the tone that is present in the package, but not dominant.
This will allow you to unobtrusively highlight the gift and give it a sophisticated look.
Standard size box packaging
How to pack a gift in standard-sized gift paper: following certain rules for the procedure will help. For the first time, you should practice on a newspaper, and after working out the procedure, use the prepared material.

Step-by-step instruction:
- Measure out the required amount of paper. To do this, place the box in the center face down and leave a few centimeters of paper on the sides so that there is enough paper on all sides.
- Make a fold of the vertical side of the paper measuring 1 cm and glue double-sided tape to it without removing the protective layer on the other side. Connect both sides so that they fit snugly against the box. After this, glue them together according to the established principle, so that the junction is exactly in the center. If everything is done correctly, the seam will be almost invisible.
- On the side, fold the top edge of the paper to fit the size of the box. Then screw the flaps on the sides. And stick tape on the edge (1 cm) of the bottom side without removing the protective layer. Fold it over and make sure that the seam is exactly in the center. Only after that glue it.
- Turn the box seam side down and make sure the packaging fits tightly.
- Decorate the box with a ribbon or bow, choosing them taking into account the characteristics of the main shade.
Square or rectangular
Most often, gifts already have their own factory packaging in the form of a square or rectangular box, but to give the surprise a more sophisticated look, you need to wrap it in beautiful gift paper.
How to wrap a square or rectangular gift:

- Spread the prepared material on the table, back side up.
- Wrap the box with paper on all sides and leave an additional margin of 4-5 cm. After this, cut a piece from the roll.
- Make a 1 cm bend along one of the long edges and glue double-sided tape over it without removing the protective layer on top.
- Also secure the second long edge with a small piece of adhesive tape 1.5 cm further from the center of the box.
- Place the prepared fold on top, but so that it runs exclusively in the center. Once you are sure of this, remove the protective layer and glue it.
- To wrap the remaining two sides, you should initially bend the side flaps tightly.
- Then make a 1 cm fold along the edge of the bottom side of the paper, and glue double-sided adhesive tape on top.
- Press the top edge tightly against the box and secure it in the center with a small piece of tape.
- After this, place the prepared bottom edge on top with a fold so that it runs exactly in the center of the side.
- If everything matches, remove the protective layer of tape and stick it tightly.
As a result, the central seam can be hidden using a satin ribbon of the required color.
Long shaped box
 To give a gift in a long box a presentable look, you must adhere to a certain procedure:
- Measure the length and width of the box.
- Cut a strip of paper according to the calculations obtained, adding a margin of 3 cm.
- Spread the prepared sheet, wrong side up, on a hard surface.
- Place the box in the center.
- Make a 1 cm bend along the bottom edge and glue double-sided tape to it on top.
- Fold the top side tightly over the edge of the box and secure with a small piece of adhesive tape.
- Place the prepared fold on top and glue it evenly.
- On the remaining sides, you need to bend the side flaps inward to form a triangle.
- Then secure the top edge tightly along the box.
- Make a 1.5 cm bend on the bottom and stick tape on top.
- After this, fix it on top of the previous layer.
Round or oval
These recommendations will help you figure out how to pack a gift in round or oval gift paper, since in this case the procedure is carried out a little differently.
 How to pack a gift in gift paper if it is round: step-by-step instructions
 Step by step steps:
- Measure the height and width of the box and, adding 3 cm to the results obtained, cut a strip of gift paper.
- Turn the box on its side, wrap it completely, leaving a margin of 1.5 cm at the top and bottom, but first remove the lid.
- Carefully fold the remaining edges in and down the box, securing them with tape.
- Cut a circle from gift paper, the diameter of which will be 0.5 cm smaller than the bottom side of the gift, and glue it.
- Make a circle similar to the size of the lid, but at the same time, increasing its diameter by 1.5 cm, glue it, and bend the resulting stock down with decorated folds.
- Cut a strip 1 cm wider than the lid of the box, glue it to the side, and tuck the remaining stock into the middle and secure it with tape.
Flat
To pack a gift in a flat box, it is better to use the following optimal option:
- Measure the height and width of the box.
- Calculate the required size of a piece of paper by adding the length and the double result of the width of the gift.

- Place the gift crosswise on the back of the paper.
- Glue a small piece of tape to the bottom corner of the paper and secure it in the center of the box.
- The opposite corner of the paper should be fixed on top using the same principle.
- Fold the ends at the sides and make 1.5-2 cm inward bends along the remaining sides.
- Alternately secure the remaining 2 sides with adhesive tape in the center.
- Mask the place of fixation with additional decor.
Custom size
Sometimes gifts have a non-standard shape, which makes the packaging process a little more complicated.
In this case, you can resort to the following tricks:
- Cut out a base from thick cardboard, the size of which should be equal to the diameter of the gift.
- Using the same principle, cut a strip of corrugated paper or polysilic, adding a margin of 2 cm.
- Make a 1 cm bend along the side edge, and glue double-sided tape on top without removing the protective layer from the top side.
- Secure the bottom edge of the paper at the bottom in the center of the prepared base with adhesive tape, creating decorated folds.
- Place the box with the gift inside and seal the edges on the side, placing the prepared fold on top.
- Tie the top of the wrapper with a colorful ribbon.
How to pack a big gift
Sometimes the size of a gift can significantly exceed the standards - it is enough to simply cover the original packaging with the material you like and decorate it with a satin ribbon or bow on top.
In the case of a huge gift, it is enough to wrap it in film or cover it with gift paper, and decorate it with additional decor on top. Such packaging can be easily removed later when presenting a gift.
If the gift is small
If the gift fits in a small box, then you shouldn’t overly burden it with wrapping.
It's better to use the following packaging option:
- Cut a square from gift paper, the length of the sides should be 2 times the height and width of the gift.
- Place the box in the center across the paper.
- Raise the ends of the material up, connecting them in the center.
- Secure with thin tape and carefully straighten the edges.
A few more ideas on how to pack a small gift.


Packing without box
You can pack a gift in an original way even if it does not have a box. In this case, you can make a special bag out of gift paper that will give the surprise a special look.

How to wrap a gift:
- Cut a strip of gift paper based on the size of the gift, adding 5 cm in length and width.
- Make a fold of 2 cm on top and 1 cm on the side.
- Place double-sided tape on the side fold and connect the edges.
- On the opposite side, move your hand to form a uniform fold.
- Wrap 3-5 cm of paper at the bottom, depending on the width of the gift.
- Straighten the resulting top and bottom sides, and fold the side flaps into the middle.
- Make a 1 cm fold at the bottom edge and apply double-sided adhesive tape.
- Secure the edges together by placing the side with tape on top.
- Reach your hand inside the bag, straightening the bottom and folding the sides inward.
- Use a hole puncher to make holes for the handles on top and make twine through them, securing them with knots at the ends.
How to wrap a gift in an unusual and creative way
How to pack a gift in gift paper in an unusual and creative way, the options below will help:
- Package in the form of a shirt. This method will help you present a gift to your beloved man in a rather original package. The shape of the packaging resembles a men's shirt made of wrapping paper.
- In the form of candy. This packaging method is especially relevant when the gift needs to be packed very quickly. But at the same time, the unusual shape of the packaging can give it a sophisticated look.
- In the form of an envelope. This type of packaging is suitable for small, flat-shaped gifts. If desired, you can write the addressee of the future recipient on the top of the envelope.
Packaging in the form of a shirt
This gift wrapping option is suitable for a small men's gift.

To use it, you must follow these steps in a specific order:
- Cut a sheet of paper twice the width and length of the gift and add a margin of 2-3 cm.
- Turn the material over to the reverse side.
- Bend the sides so that they meet exactly in the center. This will be the front side of the shirt.
- Turn the future shirt over and fold the top edge of the paper towards you.
- Turn the package over with the front shelves and bend the corners, imitating a collar.
- Turn the bottom edges of the halves outward so that they protrude beyond the edges of the shirt.
- Fold the entire product in half, placing it behind the resulting collar.
- In this case, the edges turned outward will be on top and will act as sleeves.
If desired, the packaging can be supplemented with small details.
In the form of candy
An excellent option for packaging a gift without a box can be the shape of a candy.

Even a child can do this method:
- Take the required sheet of gift paper, the width of which is equal to the gift, adding a margin of 2 cm, and the length exceeds it by 1/3.
- Wrap the gift and tie the side tails with ribbon or twine.
Envelope
Sometimes it is enough to pack a surprise in a decorated envelope made of gift paper.

To do this, you need to perform several basic steps:
- Unfold the paper and fold it in half.
- Place the gift on top, but there should be a margin of 3 cm on all sides.
- Cut according to the received parameters.
- Unfold the paper in one layer and place it face down.
- Fold the sides inward by 1 cm and the top edge by 2 cm.
- Glue the sides together, leaving the top fold unchanged.
- Place the gift and make a hole on the top side with a hole punch.
- Thread the ribbon and tie the flap of the envelope into a bow.
Box design
You need to pack a gift not only in gift paper, but also add an unusual design. But how to do this correctly and what to use from available means needs to be figured out.
The most original ideas for decorating a box:
- Tags. This addition looks very stylish and, moreover, you can write your wish and the name of the recipient on it. To do this, you need to cut out tags from thick cardboard and make holes in them with a hole punch. You can attach it to the box with ribbon or twine.

- Newspaper. If you don't have gift paper, you can create a unique design using an old newspaper. This will help you design a gift in a retro style.
- Butterflies. This decor will help give the gift an unusual romantic look. In this case, cut out butterflies from cardboard of different sizes. Bend their wings upward and secure them to the packaging using double-sided tape.
- A ball of thread. A small box can be placed inside a multi-colored ball of thread. To do this, you will need to wrap the gift and attach a tag with the necessary instructions and wishes on top.
- Buttons. The unusual nature of the packaging can be emphasized with the help of these accessories by pasting them over the box on one or several sides. To do this, you need to choose buttons of different sizes, but of a suitable tone.

- Pompoms. Gifts in winter can be decorated in this way. This will emphasize warm feelings and give the box an original look. It is best to make pompoms from woolen threads, choosing the optimal shade to match the main tone of the box.
- Pictures. You can add a certain charm to a gift with the help of photographs. They should be glued on top of the box on the sides and on the lid.
- Geometric figures. Place several types of figures on the sheets, using paper of different shades. Cut them out and stick them at a distance of 5-7 cm on top of the twine. Decorate the box by wrapping the resulting thread lengthwise and crosswise.
- Natural flowers. This option is an excellent addition to the main gift. It is best to use flowers of small diameter, placing them in the form of a bouquet in the center of the box and tying them with a satin ribbon of a suitable tone.

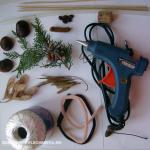
- Sprigs of pine needles. By adding such decor to a gift, you can give it an unusual, original look. It is best to use freshly cut branches that emit a pleasant pine aroma, securing them with a gift ribbon.
The recommendations outlined will help you master the principle of wrapping gifts in gift paper. But everyone decides for themselves how to use them, since you should always use your own original ideas. Only in this case can a gift bring positive emotions and set one in a positive mood.
Article format: Natalie Podolskaya
Video about decorating gifts with paper
Video on how to wrap a gift in gift paper - three simple and quick ways:
We give gifts to loved ones, friends, colleagues on birthdays, New Year, and other holidays. Those who believe that content is more important than form think that it is quite possible to do without a beautiful wrapper. Candy with or without a wrapper is equally delicious! However, even a very serious and respectable person will be sincerely delighted to receive an elegantly and inventively packaged gift.
The most popular “container” for it, like hundreds of years ago, remains paper. Let's see how to wrap a gift in paper.
Paper like the ancient Chinese never dreamed of
The choice of paper is enormous. Stores offer packaging paper that is thin and durable, glossy and matte, corrugated and embossed.

Sheet glossy paper
The most convenient for our purpose. Comes in a variety of colors and patterns.
Craft
Craft is intended specifically for gift wrapping. This type of paper is slightly ribbed to the touch, with transverse embossing. Produced in rolls of ten meters in length.
Silence
Quietly thin, light, airy. Therefore, it is also used as a filler. Objects of complex shape are wrapped in silence, which this type of packaging fits elegantly and prominently.
Polysilk
Gifts of non-standard shapes are often packaged in polysilk. Large decorative bows are made from it. Resembles a thick film, stretches a little. For these not-quite-paper-like properties, polysilk is loved by designers and stylists.
Corrugated paper
Plain, rough corrugated paper is familiar to everyone as an element of packaging flower bouquets. It is often used to decorate souvenir bottles and other gifts of narrow elongated shape, packaged in boxes and tubes.
Mulberry
Mulberry is a type of handmade paper made in Thailand. The color range is extensive. It often has a pattern or ornament, sometimes with inserts of floral materials (dried flowers, fragments of stems, leaves).
These types of wrapping paper do not exhaust the entire selection. There are also mother-of-pearl, silk, crinkled, embossed, gel... The ancient Chinese inventors of paper never dreamed of this!
We pack a square or rectangular box

First, let's learn how to properly pack a gift with your own hands if it is in a square or rectangular box.
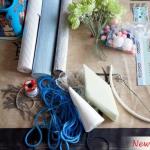
We will need:
- packaging paper
- ribbons, cords for decoration
- tape measure or centimeter
- scissors
- tape (preferably double-sided - ordinary tape will be too noticeable, and it remains to be seen whether it will be possible to disguise it accurately enough).

We pack a round or oval box
Let's figure out how to pack a round gift. Hats, tea or coffee sets, sweets, cookies, and tea are sold in a round or oval box. Not every professional packer can handle a box of this shape, so again, practice on scrap paper first.

We measure the box in height. Cut a strip of gift paper 2–3 cm wider. We paste this strip around the box, not forgetting to tuck 1 cm under the bottom, 1-2 cm inside. Naturally, remove the lid. Cut out a circle or oval from wrapping paper slightly smaller than the bottom. Glue it to the bottom of the box so that the folded seam allowance is not visible.
With the lid it's the other way around. Cut out a slightly larger circle or oval, glue it and the seam allowance on the sides, making neat folds. We cut out a strip of paper 1 cm wider than the height of the lid. Glue it flush with the top of the lid, folding the protruding seam allowance inward.
Here is another master class in pictures using corrugated paper

The final touch is the box design
We have figured out how to properly wrap a gift in paper. Now you need to decorate it in an original way. Let's look at a few ideas.
The box can be tied with a ribbon or ribbon. No, it's too banal. What if with several ribbons or ribbons of different colors and textures?

If you chose plain, unpatterned wrapping paper, tighten the box with thin thread or ribbon and attach a flower or bow on top. This bright accent will give plain paper a special charm.

For a man's gift, more discreet packaging is more suitable. You can tie tiny plastic Christmas tree balls to New Year's Eve; for a birthday party - small bows or other decorative decorations. Anyone can do this in an hour, it will look spectacular!

It is better to put a children's gift in a bright textile bag or arrange it in the form of a large candy. Kids love to take out all sorts of interesting surprises from packages.

Gift shops sell ready-made packaging boxes. If your gift is large, look there: maybe you can guess the size?
In general, it is useful to go shopping in search of fresh ideas on how to successfully complement gift wrapping. Among various cute little things you can sometimes find something that will be useful to you. Brightly colored natural bird feathers or miniature butterfly brooches, for example. Or you can rummage through your household supplies and find original ribbons, decorative laces, and miniature souvenirs that just need to be glued to a gift box. For those who know how to crochet, making a round flower is a matter of minutes, and glued together with ribbons to the package, it will look like a designer exclusive.


Use your imagination, and your efforts and experiments on how to wrap a gift will not be in vain, but will be appreciated.
Beautiful wrapping paper, wallpaper, foil and fabric scraps are great decor for a cardboard box that can be given a second life. After shopping and giving gifts, what remains is an aesthetic and convenient container that is a pity to throw away due to its spaciousness and practicality. Sometimes packaging can rival gifts in beauty, and it is always the first thing people pay attention to. A shoebox transformed with your own hands and beautifully decorated will serve as a “storage” for all sorts of little things for many months to come.
A shoebox can be turned into a stylish decorative item
Thrifty owners do not have anything superfluous or unnecessary, and they will use everything that can be reused. Sometimes masters approach their work so creatively, the degree of transformation is simply impressive. For example, creative people are able to decorate an ordinary box with their own hands in such a way that it will compete with antique boxes.

It's amazing how you can transform an ordinary cardboard box
Imagination and resourcefulness are the best advisers in decorating. You can use other people's ideas, adapting them to your capabilities and materials. But it is not only the method, technique or technique of decorating the box that is important; what is much more interesting is the consistency of the filling and the appearance of the packaging, which has been given a “second life”.

Organizer for storing handicraft items

Stylish boxes will decorate the interior of any room
So, the original appearance of the container is not important for the work, the main thing is that the old shoe boxes for decor are intact and of the correct geometry. Most often this is an ordinary parallelepiped or cube, but there are also octagonal boxes. Although it is not necessary to take shoe containers, polygonal boxes are produced most often for candies, and they are quite aesthetic in themselves.

You don't have to be a professional decorator to decorate an old box.
Craftswomen use several boxes of different sizes and shapes, which are decorated with common materials or decorated using common techniques. Then they are stored, tied with a ribbon, somewhere on a visible set. There is no shame in giving such packaging as a gift, for example, 3 polka dot boxes, as in the photo.

A scrap shoebox, polka dot paper and ribbon are all you need to create a unique decorative item.
Boxes with intricate decor will decorate any interior; they are suitable as an original idea for decorating a room with your own hands. Containers of the same format are proposed to be decorated from the inside. These new lidless "boxes" can be nailed to the wall as a good alternative to shelves.
Advice. If the boxes are located on the wall along the same line, it is better to strengthen them with a common strip from below.
You can place a carrier in a decorative box on the computer desk where gadgets will be charged. The idea of hidden charging is interesting because all the wires will be hidden. It also eliminates the need to search for something that should not always be in sight, but may be needed at any time.

Now chargers will not be scattered around the house
Wall-mounted cardboard boxes can be used to store or display small, lightweight items:
| 1. | Hidden socket with carrying case | For storing and powering chargers, cords and headsets for mobile phones. |
| 2. | Hand-made | Display beautiful knitted toys, homemade jewelry, and children's crafts. |
| 3. | Cosmetics, nail polish/nails, hair care items | Hair dryer attachments, combs, hairpins, elastic bands, hairpins. Hairspray and foam. Bottles of gels, files and nail polish remover. |
| 4. | Collection of mini toys | Kinder surprise figurines, origami toys, knitted characters, Barbie clothes. |
| 5. | Souvenirs brought from vacation | Shells, starfish, corals, urchin fish, and other objects of marine fauna. |
| 6. | Designer details | Lego, unassembled puzzles, detachable blocks. |
| 7. | Stationery | Writing instruments, boxes of pencils, rulers, squares, colored erasers. |
| 8. | Handicraft tools | Buttons (in small boxes), sewing threads and needles, knitting needles, hooks, scissors. |
| 9. | Shade-loving indoor plants | Mini succulents and cacti (many need additional lighting). |
Filling a shoebox with DIY decor depends on many factors, including lifestyle, hobbies, and the overall number of small items in the home.

Convenient place to store jewelry

Shoe boxes can be used to store books
Advice. Decorate identical boxes with decorative inscriptions or stickers to make it easier to find what you need.

For decoration, you can take old maps from the atlas
The original design of the boxes with your own hands can eloquently remind you of what is inside. A small box for pencils, crayons and brushes is decorated according to the theme. Containers for handicrafts are pasted over with buttons and other small things to be opened with a silver or golden aerosol, as in the photo.
Of course, skillfully decorated boxes cannot but be used for their intended purpose. It is suggested to store evening shoes worn on a special occasion in decorative containers. You can store shoes or sandals in golden boxes in a place of honor to leave a tangible memory of a happy event (wedding, graduation, sea cruise, trip to Paris).

To make such a vintage suitcase out of a box, you will need paint, a belt and a little imagination.
Before the decorating process:
- Look through all the shoe (and other) boxes in the house to select the newest, intact, thick cardboard ones.
- Distribute what items you will use the boxes for in the future.
- Prepare a place (with good lighting) and tools for work.
- Collect everything you might need as wrapping materials and small decorations, buy what’s missing (glue, paper).
- Decide on a technique for decorating boxes with your own hands (quilling, decoupage, origami, etc.).

Decorating the box with pieces of wallpaper and buttons
Experienced craftsmen know that creativity requires enough space on the table to lay out the necessary items. It is advisable to remove everything unnecessary so that it does not distract in the creative process. The free time factor is also important - you don’t always want to return to the unfinished work of decorating boxes, but you need to start when you have the motivation and desire to create with your own hands.

Remnants of wallpaper are a suitable material for decorating boxes
Important! Think bigger, use other people's ideas, maybe you have a more interesting scrap, wallpaper or wrapping paper than in the example samples. The final result directly depends on them.

Original box decor with jute rope
For most types of needlework, approximately the same set of tools and available materials is used:
- glue (PVA, liquid nails, silicone, etc.);
- sharp scissors and a stationery knife;
- stapler with staples;
- double-sided and plain tape;
- square and ruler;
- yarn, ribbons, threads;
- spray paint;
- eraser, marking pencil, chalk, marker.
Before work, take the necessary measurements - the basic material should be enough to decorate the boxes with your own hands. Decoration elements are easy to vary.
Memorable gifts in original packaging
You can buy anything as a gift to people dear to your heart, but when the work of your own hands is attached to it, it is doubly pleasant. Using the same technique or common materials, you can decorate boxes, frames and photo albums. Small shells, dried flowers, gem crumbs or other natural materials are suitable for this.

You can create a beautiful gift wrap by wrapping the box in burlap and decorating it with twine flowers.
Most often, to decorate a gift cardboard box with your own hands, you select something from the category of decorations:
- beautiful buttons;
- artificial pearls;
- small and medium beads;
- small beads;
- pieces of a chain, old brooches, earrings, pendants.

Decorating shoe boxes is not only useful, but also very exciting.
You can decorate gift publications (books, notebooks, diaries) with such materials. A specially designed cup box makes a trivial gift an especially memorable gift. A beautifully decorated shoe box makes great packaging for home baked goods. In an original container you can present something to your boss or friend for a sweet feast. These are chak-chak, cookies, homemade chocolates or cakes according to your own recipe (it will be written inside on the lid).
Paper box decor
To decorate the box you will need:
- compact box;
- paper for the base (photo printout, textured wallpaper, hologram);
- good glue;
- stapler and tape.
You need to wrap the box and lid with background material, but so that there are fewer bends. The corners need to be folded very carefully and the paper secured by cutting off the excess.

Just “try” the paper to the box and fold the edges as shown in the photo

Carefully fold the paper along the marked fold lines, then unfold the sheet and make cuts

Place the box on the blank and glue the paper using a glue stick
The bottom of the box can be lined with velvet paper or thin cardboard, which will hide the folded corners. We wrap the lid in the same way.

If you are using double-sided paper, the cover can be covered with the reverse side
Next, we decide how to decorate the box with your own hands on the lid in an original way - the decor can be voluminous. These are ribbons and paper figures - hearts, flowers, stars. The decoration of the lid can be varied depending on what will be stored inside or presented as the main gift.
Decorating with fabric
Leftover beautiful fabric is an excellent material for needlework, think about this when thinking about how to decorate a shoebox with your own hands. Pasting will not work, since the adhesive substance often bleeds through the fibers. You have to limit yourself to tightening the box and its lid. You can secure the fabric with double-sided tape and staples.

Let's prepare fabric, lace, glue, double-sided tape, thread and stapler
Advice. Try the glue on a small piece; it may not be noticeable on the thick fabric or eco-leather you choose.
Suitable for covering a cardboard box:
- leather and eco-leather (imitation leather, dermantine);
- velvet and velor;
- jacquard and brocade;
- denim;
- thick silk and linen;
- furniture flock and artificial suede;
- guipure (for decoration only, it is difficult to hide seams and corners).
The pattern of colored fabric is also important; it will give additional meaning to the gift and decorate the box with your own hands. Bright colors will make the offering more spectacular, polka dots and flowers will make it feel homely, hearts and roses will make it more sensual and romantic.

We cut the fabric to size, stick tape on the inside and cover all sides of the box one by one.

We secure the edges of the fabric with glue at the corners and then decorate them with lace.

For the lid of the box it is better to use a different fabric - the decor will be much more interesting
Box decor using sophisticated technology
Those who are interested in a certain type of needlework have the opportunity to demonstrate their talents in decorating a shoe box with their own hands.
The most popular techniques remain the following:
- Volumetric origami (figures made from paper blocks assembled into figures) and planar applique.
- Quilling (reminiscent of elements of unwound serpentine, folded into objects).
- Decoupage (use special napkins with a pattern).

Beautiful box decorated with napkins using decoupage technique
Of course, you can master any technique from scratch, but it is better to work with the appropriate skills. Although nothing is impossible when there is a desire - any technique can be learned in a couple of hours by watching a master class on video and decorating a shoe box with your own hands.
Video: decorating a shoe box using decoupage technique
Photo gallery


The most ordinary gift in original packaging carries a different meaning and significance. Today we will learn how to beautifully pack a gift in paper, box, film, for birthdays, February 23, March 8.
If you show a little imagination and inspiration, you can make an unusual gift wrapping with your own hands, surprising and delighting your loved ones with your creativity.
You can buy paper, film and cardboard for work at a stationery store or use any available material:
- Wallpaper leftovers, newspapers, magazines, maps
- Shoe boxes, jars, flower pots
- Any beautiful fabric or scraps of burlap, linen, velvet, drape. silks
- Buttons, braid, beads, beads, ribbons, cords, ropes
- Natural material - fresh flowers, herbariums, twigs of evergreens, nuts, berries
It is worth experimenting with the shape and material for packaging, moving away from the usual and template pompous or hackneyed options, such as a plastic bag. Duty cookies, beautifully wrapped and presented to friends for the New Year, will be a pleasant surprise.

You don't have to wait until a holiday to give a gift. Wrap a beautiful bottle of champagne in a sweater or shirt sleeve and tie it with a rope. In 10 minutes the packaging is ready, you can go visit.

Fashionable gift wrapping in Japanese style furoshiki. We take a square piece of durable and bright fabric (from 30 cm or more, depending on the size of the gift) of any texture and wrap the gift in it, and tie it on top.

On a visit with a bundle containing a surprise for the hosts, you must agree, this is a very unusual packaging solution.
How to pack a gift in gift paper step by step instructions
Paper is the most common packaging material.

If you decide to wrap a gift with your own hands, you have hundreds of options for high-quality, beautiful wrapping paper:
- matte and glossy
- smooth and corrugated
- thin, transparent and dense
- with one-sided and double-sided pattern
- plain and colored
Wrapping paper can be used to creatively wrap a tiny box of jewelry or an entire car.
How to wrap a gift in gift paper?
We will need:
- gift (we took a rectangular shape)
- tape, scissors
- wrapping paper
- pencil
For work, we free up space on the table so that nothing gets in the way
- Lay out a piece of paper or roll face down
- Place the box with the gift on it, also face down.

- We wrap the box, mark the place where you need to cut the paper and bend it, leaving 3-4 cm in reserve

- Cut off excess paper

- Place the box in the center of the sheet
- Fold one edge of the roll, on the long side of the box, 2 cm

- We lift the paper from both sides to the center of the box
- We fix the uncurled edge with tape, moving 2 cm from the center of the box

- Place paper with a curved edge on top and fix it
- Secure with transparent tape so that the center runs exactly in the middle
- When decorating the package, the central seam can be covered with ribbon or braid

- On one side of the box we fold the corners in the form of triangles

- Fold the bottom edge of the paper 1 cm - 1.5 cm

- Press the top edge of the paper against the box and secure it

- We lower the top edge of the paper, pressing it against the box, and fix it
- Raise the bottom edge of the paper, carefully connect it in the center with the top edge with tape

- One side of the package is ready

- We place the box vertically and also do it on the opposite side

- Fold corners into triangles

- We wrap one side 1 cm and connect it to the other with tape exactly in the middle

- Box packaging is ready

You can complement the packaging decor with decorations made of ribbons, bows, and flowers.
Instructions on how to pack a round gift in wrapping paper
A round box decorated with gift paper looks festive and elegant. This packaging option is used by the Japanese, fine connoisseurs of beauty.

To work you will need:
- gift in a round box
- PVA glue
- tape, preferably double sided
- scissors
- to decorate a brooch

Packing a round box in paper is not difficult:
- Determine the width of the package by twisting the paper around the box
- We remove excess packaging material and secure the edges with overlapping tape.
- From the bottom and top of the box, mark on paper the size of the radius of the bottom and lid of the box
- Cut off the excess paper, leaving a margin of 2 cm
- We press a piece of paper with our finger to the center of the box
- Gradually fold in the remaining paper
- Cover the joint by gluing a circle of paper to the bottom and top of the package
Decorate the top of the package with brooches, ribbons, and flowers. The gift is ready and can be handed over to the recipient.
How to wrap a gift in film?
For many years, film held the palm as a packaging material and is now in demand:
- film transparent, translucent (cellular), matte (polysilk)
- double-sided and single-sided film
- decorative packaging film with designs, patterns, pictures, emoticons, holograms
If you are giving a fruit basket, flowers, a painting, then the film will not only serve as packaging, but will emphasize the beauty of the gift.
Packing gift baskets with transparent film (cellophane)
Laying out the transparent film on the table surface, place the basket on it and collect it at the top, securing it with a bow.
The main thing is to choose the right size of film, beautifully place a gift or several gifts and get creative with tying a ribbon and bow.

We pack candies, coffee, tea, Easter cakes, champagne and soft toys under transparent film. For gifts, you need to make a base for the packaging; it can be a box of chocolates, a chocolate bar, a book or a piece of cardboard.
Polysilk film is a new material for gift wrapping
Polysilk packaging film is sold in rolls, has excellent stretch, and has a metallic or golden sheen.
- To wrap a gift, cut off the required piece of film

- We collect the film on top of the gifts and tie it in a knot

- We cut the ends of the film with scissors, we get a pompom

- Polysilk film has a wide range of applications; it can be used to pack an ordinary gift, as well as a car or motorcycle.

Decorative and transparent films are used by florists to pack flowers.
How to pack a gift in a box?
Convenient gift packaging is a box; if it has an unpresentable appearance, it can be packed in gift paper or film. Originally designed boxes of different sizes and shapes make beautiful gift packaging.

Gift packaging - shoe box
The simplest packaging option is to decorate a ready-made box for shoes, tea, coffee with wrapping paper, not only on the outside, but also on the inside.
- Box packaging using collage technique- sheets of paper or fabric of different shapes and colors, selected according to the color scheme, are assembled into an abstract pattern

- Box covered with newspaper or special paper with the image of printed matter using black ink or carbon paper to give it a vintage look

- Fabric is suitable for decorating the box any texture and pattern. You can make the lid and box in different colors.

- Box packaging in patchworg style from assembled pieces of bright fabric using braid, ribbons, buttons, varnished on top

- A box in the shape of a chest is painted with acrylic paint or covered with napkins using the decoupage technique. For decoration we use unnecessary belts, a metal or paper tag

We fill the empty space of the box with any filler.
Simple DIY square gift box
You can make a gift box yourself if you have scissors and a piece of paper on hand; the size depends on the size of the future packaging; it can be assembled without glue.

Completing of the work:
- We print the template on a printer or draw it on paper
- Cut the workpiece along solid lines
- Fold along the dotted lines
- We assemble the box so that the fragments with semicircular ends are between the other two, and the semicircles remain outside
- We hide the gift in the box and close the lid
- You can tie the packaging with a bow

We decorate the packaging with appliques and bows. ribbons, flowers and buttons.
Ideas on how to pack a big gift
Large packaging is intended for a large gift or packed in several layers of paper using filler. The giant box performs not so much a decorative function as it hides the gift itself from the eyes of others, maintaining intrigue.

- For packaging we use a box from electrical appliances, glue decorative paper or appliqués on it, tie a bow and the packaging is ready. Such a large box can hide a person, a large soft toy, a blanket, pillows, and electrical appliances.

- Inflatable balloons packed in a large bag or box made of kraft paper. We make a bag or box and place inflated and connected balloons in it. As soon as the hero of the occasion opens the lid of the box, a chain of balloons flies into the sky - a creative and cheerful surprise for dear and close people.

- If you decide beautifully pack the dishwasher, washing machine, cover the finished box with gift paper. This way you can maintain intrigue and maintain interest in the contents of the box not only among the person to whom it is presented, but also among other guests.

- Packing in colorful gift paper, pillows, rug, blanket We do it on the same principle as packing round boxes (see above)

There are many options for packaging for small gifts, sometimes with a dose of irony and humor.
Ideas: how to pack a small gift?
If you are giving your loved ones a small gift, choose the packaging:
- box
- box
- bonbonniere
- pouch
- basket
Every creative person can add additional elements to the packaging decor, which will make the gift wrapping your own design work.

The most common way to pack a small gift is a box, which can be of various shapes.
Gift box for sweets, jewelry in the shape of a house
You can decorate such a house with a bright ribbon or make a beautiful frame for the window.

The finished diagram of the box must be printed on a printer; we select bright, colored paper. You can cut a template from a piece of thick paper, which is easy to find in every home. 
- We draw the house template by hand, preferably using a ruler, bending the parts along the dotted lines
- Cutting out the window
- We make two slits in the bottom on the sides of the house and insert tape
- We glue the house (except for the top)
- We make slits in the upper part of the side walls, parallel to the lower ones
- We stretch the ribbon and put candies, souvenirs, and jewelry inside
- We close the roof of the house without gluing it, tying a bow

The gift box is ready!
Gift box in the form of a dress
If you are giving a gift to a girl or young woman, a small box - a dress - would be an interesting option. It is done quickly, you can experiment with its color and style.
- Print the dress template

- We transfer the template onto colored paper and cut it out to create a gift bag.

You can put cosmetics, jewelry and sweets in this box.
Beautiful cardboard box for earrings
There are many options for how to beautifully package earrings or other jewelry in a small original box.

Simple option:
- Take a piece of cardboard and draw a square with hemispheres extending from each side
- Cut out the template and make a box
- Tie with ribbon or thread
- Use a hole puncher to punch holes in the leaf caps and insert a rope

A similar, but more complex version of a box for a small gift, for the manufacture of which you will need glue

You can hide jewelry, money, cosmetics in such a funny box
Pyramid box for a small gift
Delight your friend with the decoration and the beautiful packaging in which we present it

Choose thick paper, preferably plain paper

- Draw a square, each side of which is one of the sides of an equilateral (or isosceles) triangle
- Use a hole puncher to make holes for ties at the vertices of the triangles.
- The sides of the triangle have an additional supply of paper to give the shape of the box and to ensure that there are no gaps
- Bend the template along the lines
- We stretch the ropes through the holes and assemble the pyramid

Beautiful beads found their rightful place in the original packaging.
How to pack a birthday gift
When choosing packaging for a birthday gift, we take into account: the gender, age and taste preferences of the hero of the occasion.
Packaging a birthday gift for a child
If the gift is intended for a child, the packaging should be bright and cheerful. The very sight of her should bring a smile and a good mood. Don’t rush to throw away good boxes that come into your home with purchases of hats, shoes, and electronic devices.
- Cover the finished box with bright wrapping paper, make an applique, such packaging will delight the little birthday boy

- Agree, sneaker gift box will cause no less delight than the gift itself

- The original solution would be wrap a gift in a large candy, and instead of filler you can use sweets

- A bicycle for a child is a long-awaited gift, we will pack it in bright paper, We will decorate it with balloons and ribbons and hand it into the hands of the lucky owner.

- A beautiful box with a big bow, a burlap bag or a basket will become packaging for a pet.- a gift that every child dreams of. If it is a bird in a cage or an aquarium with fish, you can simply cover it with a beautiful piece of fabric.

- Like this box - the frog will be a pleasant surprise for the baby, regardless of what is in the middle

- If your child is going to a friend's birthday party, Collaborate to create original packaging in the form of candies with images of funny faces on the candy wrappers. While the packaging is in the template, the child can paint it as he pleases.

In such boxes you can put models of cars, figurines, sweets, jewelry for girls, wishes.
Birthday gift packaging for women and girls
For lovely ladies, choosing beautiful packaging is half the battle. We offer various options for how to wrap a gift in an original way, based on age.
- For girls, colored wrapping paper with flowers or polka dots is suitable. with images of youth idols.

- Ladies of Balzac age will be pleased to receive birthday gift in kraft paper packaging with beautiful artificial flowers.
- An elegant bud can be made from a napkin, polysilic or corrugated paper, it turns out elegantly

- Vintage birthday gift packaging for older women, with pieces of guipure and lace, it looks stylish and tasteful.
- We tie the gift with a beautiful bow.
- You can wrap the packaging with beads, ribbon, or pin it with a brooch.

- White round box made of cardboard and covered with wallpaper - ceremonial packaging for the birthday girl.
- Such packaging can hide under its lid: a beautiful piece of jewelry, underwear, a scarf, a scarf or a stole.

- Women are great individualists. Wrap the gift in craft paper and write your name on it. It goes from being simple to becoming a “personalized” gift and will please the birthday girl’s vanity.

- A romantic gift for a girlfriend or teenage girl, decoration in walnut shell packaging
- We cover the inner doors with sparkles, velvet or silk and hide the gift
- We tie the shell with a string or a bow
- A great option for making original gift wrapping

Birthday gift packaging for women and girls has many options, so knowing the character of the birthday girl, choose according to her character, hobbies, and age.
Gift wrapping for a man's birthday
Packaging for a man's gift should be strict and, to some extent, brutal. If we choose paper, it is better to use neutral shades - blue, green, red.

- Celtic "Heart" knot made of woolen threads and a tag in a gift package for men- a laconic and stylish addition

- Scheme for weaving the “Celtic Knot”

- If we choose a box, it will look good option - a cardboard box tied with a thin golden ribbon, in We will leave all sentiments in packaging design for the weaker sex.

- A random sequence of zeros and ones (matrix effect), Newton's laws or chemical and mathematical formulas are a great option for drawing on wrapping paper for men's gifts

- Kraft paper men's gift packaging always stylish and popular, with a small detail - a pin in the form of a tie pin.

- Packaging: men's shirt or sweater, which we put on a box with a birthday gift.
- The shirt was worn as a gift, preferably in a square package
- Buttons fastened
- The sleeves were turned down and secured with pins

In packaging for men's gifts, minimalism and laconicism in design are encouraged.
A birthday gift tailored to your hobbies and personality traits
- If you know that the hero of the occasion loves to travel, use a geographical map as packaging or paper with images of countries and landmarks.

- For a music lover's birthday, wrap the gift in a sheet of paper with notes

- For lovers of antiquity and historical novels gift packaging in kraft paper in the form of a parcel, as postal workers do and did in the last century, with a postage stamp and seal

- For car enthusiasts Kraft paper packaging with a miniature model of a sports car on an improvised track made of tape.

If you put a piece of your soul into the packaging of a gift, this speaks about your attitude towards the recipient.
How to pack a gift for March 8?
March 8th is a sea of flowers, compliments, smiles and pleasant gifts. Women's Day is associated with the onset of the first days of spring. When wrapping a gift for March 8, we use artificial and fresh flowers, as well as herbariums and sprigs of evergreens.

Beautiful brooches, hairpins, beads, lace and buttons are an original option for decorating gift packaging for March 8

Kraft paper for gift wrapping on March 8
Popular craft paper, goes well with individual decorative elements: lace, guipure, knitted napkins

The wonderful furoshiki technique will help you wrap a gift without a box
Women can't help but like the national Japanese gift wrapping technique. We tie a piece of beautiful, bright fabric, gathered over the gift, into a bow.

You can present a gift in a beautiful silk scarf, in which case the packaging also becomes a gift.

Gift packaging in a bag made of burlap, linen or cotton
An ordinary burlap bag can be given French chic by decorating it with lace, flowers and frills. Excellent gift packaging for older women; you can put cosmetics, perfumes, and sweets in the bag

Beautiful gift wrapping for March 8th in the form of candy
You can hide a handkerchief or scarf in this candy. The packaging is beautiful, easy to do, we involve children in the work

Packaging in the form of various boxes
We make a box, choose the template you like, and decorate it:
- appliqués
- flowers,
- beads
- buttons
- braid
- ribbons
Gift packaging for women and girls is stylish and beautiful.

There are many options for how to wrap a gift for a friend, mother, or sister for March 8th. The work will not take much time and will not require financial investments, only imagination and the desire for creativity.
How to pack a gift for February 23?
Tested by many years of experience - men love spectacular presentation of gifts, especially on February 23, when women's attention is focused on them.
Gift wrapping for February 23rd in craft paper
On the eve of the holiday, you need to think about how to effectively wrap a gift.
Kraft paper is suitable for this purpose:
- Decorate it with a card with the numbers 23
- We tie it with woolen threads or burlap
- We will sew a button to the package, you can put a stamp on it

Packaging “Gift for a gentleman” made of kraft paper for February 23
Original packaging, easy to use, will not leave your man indifferent

To work you need:
- kraft paper
- ribbon or strip of fabric
- piece of leather
- buttons
- scissors

A few decorative details and the usual packaging turns into a gentleman's package:
- We wrap the box with kraft paper according to the instructions, see above
- We place a contrasting tape in the center, in our case blue
- Glue buttons along the tape
- At the top of the package we place a butterfly cut out of leather
Original and simple packaging will bring a smile to the sternest representative of the stronger sex
Wrapping a gift for “My King” in kraft paper
Every man is a little vain at heart. Gift packaging with the inscription: “To my king” will please your loved one and increase his self-esteem.

Packing a gift:
- Cut out a man's profile with a crown from paper
- Using a hole punch to make holes for the rope
- After the gift has been carefully wrapped (according to the instructions above), place a piece of contrasting color paper or foil under the cut out profile and crown
- We decorate the crown with beads, placing them on glue
- We extend the rope with a pleasant message “To my king!”
What man can resist a gift when he sees such packaging?
Beautifully wrapped gifts photo:


A gift in a beautiful gift wrapping has a presentable appearance. You can pack a gift in a store, with the help of professionals, or go to the first newsstand and buy a package. Using our tips, try to wrap a gift yourself, showing imagination and creativity. The result of your work will be happy faces of people close to you.
Video: Three ways to wrap a gift
Agree, the anticipation of a gift is no less pleasure than the gift itself! Ah, these sweet moments when you try to guess what is hidden inside an elegant box, impatiently untie the satin ribbons, tear off the crispy paper covers!
But gifts are pleasant not only to unwrap, but also to pack. Buying nice little things for your colleagues in advance, choosing gifts for your closest ones and whileing away the winter evenings by decorating them and signing cards is a sure way to awaken the New Year's mood if it is still dormant!
Masu box
For warm-up, we chose masu bo x - an origami box. You can even roll this up in a taxi on the way to visit: you don’t need any scissors or glue, just a couple of sheets of paper. Moreover, even those whose highest achievement in origami are paper airplanes will master the simple principle of their creation.

Notes and tips:
1. For this box, we chose thick double-sided scrapbooking paper at Leonardo (40 rubles per sheet), but this was a mistake. Firstly, the back of the paper would still end up hidden. Secondly, the paper turned out to be too thick and therefore unsuitable for origami: it did not bend well and cracked at the folds. As a result, we had to roll it from colored paper with a density of 120 g/m2 (10 rubles per A4 sheet), although a thinner one would have worked perfectly.

2. Remember that the base must be smaller than the lid! We decided that if we cut the sheet by three or four millimeters, that would be enough, but in the end, the parts of the box still turned out to be almost the same.
3. You can decorate the box (and at the same time hide extra folds on the lid) using ribbons (a set of five satin ribbons with New Year’s prints cost us about 150 rubles). Tip for perfectionists: to hide the edges, thread them through the slots in the lid (you can easily figure out where to make them) and secure from the inside with a glue stick. Be sure to loosen the tension on the bands a little so that the lid can be bent.

4. For this little experiment, I didn’t want to buy a package of filler for the boxes, so we simply cut the thin craft paper in which the bouquet was once packaged into thin strips. It turned out beautiful and environmentally friendly!

Having warmed up with origami, we decided to make a “pillow box” in which it is very convenient to put candies.

Notes and tips:
1. Before folding the box, crease along the fold lines - push them with a non-writing pen or other thin, but not sharp, object. Without this, it will be almost impossible to bend a sheet of paper along a curve. (In general, we advise you to press through all the places where future folds are made.) And another piece of advice - it’s easier not to print it out, but to draw a diagram of the box yourself. Yes, to draw a line of valves, you will have to use a handy round object, but then it can be used instead of a ruler when creasing, because this cannot be done accurately by hand.

2. The valves on one side can be pierced with a hole punch to insert the ribbon. But we don’t recommend trying to glue them together: it’s almost impossible to press the valves together for the glue to set, and besides, they already stay closed very reliably.
3. For this box we took pastel paper (16 rubles per sheet). The density of 160 g/m2 was perfect for a small box, and the velvety surface recalled the starry sky and inspired decor.
4. To decorate the box the way we did, choose the constellation you like and draw it with a white gel pen (it’s better to do this on an unfolded box). To glue the stars (again favorite “Leonardo”, RUR 72), dip a cone of toothpicks into the glue, make a dot on the paper and attach the star. We used PVA glue, but keep in mind that it does not hold synthetic materials very tightly. Secondary stars can be made from simple small sparkles (they will cost about half as much as curly ones) - also apply glue to the paper and sprinkle some fairy dust on this place.

Envelope
The four-petal envelope is a beautiful, simple package that doesn't even require any glue. It rolls up easily and is great for gift certificates, CDs, pendants and other small items.

Notes and tips:
1. For this packaging we took paper with a density of about 140 g/m2, but we could have chosen thicker paper.
2. The petals can be decorated with sparkles - just run a cotton swab dipped in glue along the cut and dip the paper in them.

3. If your gift is not completely flat, then you can make “walls” a few millimeters high on the box (as in the photo above).

Paper pyramids
And finally, our favorite - paper pyramids! They look great and, despite their apparent fragility, are quite strong. The pattern for creating them is perhaps the most complex, but nothing needs to be glued or intricately bent. This box will perfectly fit a handmade chocolate candy, a flash drive, jewelry, a Christmas tree toy... Anything! 
Notes and tips:
1. For the boxes - yay! – the double-sided paper that was purchased for origami was ideal. Pastel also behaved wonderfully.

2. We cut out a snowflake on the red box with a model knife, and so that it would not be visible through it what was hidden inside, we used tracing paper - we cut out a four-pointed star from it according to the size of the box and secured it with a glue stick.
3. It is convenient to make holes for the ribbon tie with a hole punch, but in the absence of one, you can cut it with a paper knife or pierce it with a needle.

P.S.
In the 21st century, it is impossible not to think about saving resources and ethical treatment of nature. If your inner ecologist protests against packaging as a harmful excess, but you still want to please the recipient with a beautiful box or securely wrap a fragile gift, then you can always find a compromise solution. We have already written above that the filler for boxes can be made from old parchment. Think, maybe, instead of origami paper, you can take a beautiful magazine sheet, instead of synthetic glitter, decorate the boxes with your own drawings, and replace satin ribbons with twine or cotton lace.
There are a lot of gift design options, it all depends on your imagination and, believe me, even if it seems to you that you don’t have a single worthwhile idea, they will appear as soon as you pick up paper and scissors and start creating your first homemade box!


Quartblog Digest
Let's figure out how you can place a blue sofa in the living room interior, what to combine it with, and look at photo examples of stylish options.
In this article we will study what floral wallpaper should look like in the interior of a bedroom, living room, kitchen and nursery. We’ll also look at photo examples of stylish options.
Let's look at the color blue in the interior. In this article we will look at what colors it goes with, how to use blue in different rooms and what psychologists say about the shades of this color.
Kvartblog has created the most complete guide to the loft style in the interior, which will help you understand the philosophy of style, decide on materials and design, and also show photos of the most interesting examples of industrial housing.
Kvartblog will show and tell you how to properly make a Japanese-style bedroom. Check out our design gallery!
We also recommend
 Presentation "February 23 - Defender of the Fatherland Day" presentation for a lesson (7th grade) on the topic February 23, history of the holiday presentation
 What does a children's railway look like around the world?
 Do-it-yourself web with a chestnut spider and a dragonfly made from natural materials
 New Year's topiary Christmas tree: we decorate the holiday ourselves Topiary for the New Year's tree
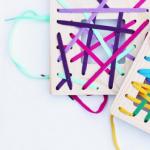 DIY educational toys for kids
 Asymmetrical stylish vest