Quilling is an Easter egg. Manufacturing examples with photos
Hello, Dear friends!
Imagine, our competition “Gifts for loved ones with your own hands”, one might say, has acquired international status! =) The fact is that the next participant who sent us her master class lives in Poland. Her name is Joanna Łada. Generally speaking, we have already gotten to know Joanna a little. For some time now she has been a regular reader of KARTONKINO, taking an active part in the life of the site. (And this is a great honor for me! Thank you, Joanna!) At the same time, Joanna's decision to join the competition was a big surprise for me =). I admit, I was even a little worried, because Polish language I “speak” at the level of a Google translator, capable of conveying the general meaning of what is written, but absolutely helpless when you demand precise wording from it... Be that as it may, the “language barriers” were successfully overcome (although what kind of barriers can there be when We all here essentially speak the same language - the language of creativity?). And now I am pleased to present to you a master class on creating an amazing Easter egg using the technique volumetric quilling. Do you think such a product is very difficult to make with your own hands? You'll never know for sure until you try =). Perhaps Joanna's master class will give you optimism and inspiration.
Master class by Joanna Łada:
Easter Egg(quilling)
Hello! My name is Joanna Lada. I am 70 years old. I live in Poland, in the city of Bialystok.
My hobbies include cross-stitching, quilling, scrapbooking, origami and other types of needlework. But I can't draw at all...
I was invited to a children's hospital as a volunteer, where I am happy to share my knowledge with children. During one hour of quilling lessons, children can, for example, make a sprig of rowan with a bunch of berries. Despite their illness, they are happy and ready to learn something new with pleasure. Please forgive me, but as soon as I start talking about children... I love children!
.
The idea for this Easter egg using the quilling technique is not mine, I discovered it on the pages of one of the handicraft blogs (www.innascreations.blogspot.com). I tried my hand and, as you can see, everything worked out.
Before starting work, you need to prepare in advance:
- strips of paper from which we will create our model (in this case I used paper in four shades of red),
- scissors,
- paper glue or any other non-toxic glue,
- a box of sewing pins (hairpins),
- ruler,
- quilling needle,
- stencil for quilling with holes of various diameters,
- a brush for applying glue.

As a basic form, I used a foam plastic egg 20 cm high, on which, for my own convenience, I drew vertical lines, which greatly facilitate the work (in this case there are 16 of them).
The foam egg must be placed in a plastic bag, pulling the latter tightly and tying it in the place from which you are going to start working.
In truth, it wouldn't be a bad idea to first design the pattern we want to create, but I've learned from personal experience that the best patterns come out of the process.
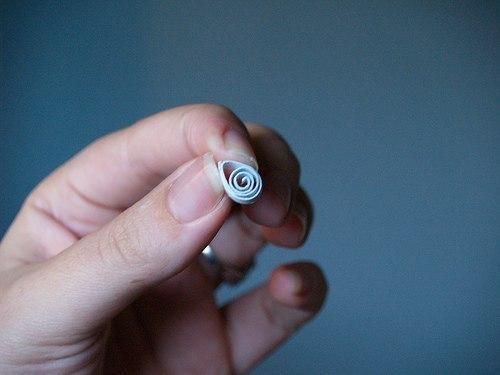
Let's start with strips 15 cm long, twisting them into circles with a diameter of 10 mm. We glue all the quilling elements together and, after gluing, fix them on the egg with two pins.
Lay out the first row in a circle, then the second and so on. It all depends on your imagination.

Approaching the middle of the egg, it is necessary not only to increase the diameters of the circles in the rows, but also to use strips to make them different lengths.

Important! When working on such a large object, it is necessary to make at a time only the number of quilling elements that we need for one row, while comparing the size of each new element with the first.
The pattern will be formed during the work process. Of course, the presence of a photograph is already ready eggs will greatly simplify the work.
.
Features of gluing.
- You need to use very little glue - literally as much as will fit on the tip of the needle. If there is too much glue, it will begin to flow onto the surface, and this can lead to local discoloration of the paper.
— Having reached the middle of the model, you must remember that you do not need to glue the next row. The egg begins to narrow, and the next row will run along a smaller circle. This means that if this row is glued to the previous one, it will simply not be possible to remove the finished product from the foam egg. Therefore, we fix it, as they say, “dry”.
We make the second half of the model by turning the form over and moving upward.


Once you have finished gluing, you will need to wait about 12 hours to ensure that all the pieces are well secured and connected to each other. After this, you can remove the pins (except for the middle row) and carefully cover everything with varnish or glue, being careful not to glue the middle rows together.
Leave the work for another 4-6 hours and then the product can be removed from the mold. This process is quite a difficult task, since in the absence of the proper skills, the work on which so much time and effort has been spent can simply be ruined. Therefore, you need to remove the structure very, very slowly, carefully covering each half with your entire palm.

During this operation, the bag in which the egg was wrapped usually remains on the mold. But, if difficulties arise, you can try to carefully cut the polyethylene with scissors - then the foam form will pop out on its own, and we will only have to manually remove the parts of the bag from the halves of the quilling egg.

Next, we glue both halves, and at this point the Easter egg using the quilling technique can be considered almost ready. Of course, if you used paper with a density of 80 g/m2, then the product at this stage will have to be varnished again.
The last thing that remains to be done is to glue a paper circle of the appropriate diameter into the hole in which the end of the bag was located.
In total, the whole job took me 10 hours (excluding gluing time), but, nevertheless, I am satisfied with the result.
The admiration of your friends will be the best reward!
Let me remind you that all competition entries are presented in the “Competitions” menu section. Go ahead, get acquainted, share your impressions in the comments.
Have a great mood and creative inspiration!
See you again in KARTONKINO !
Easter card using quilling technique
Completed by: 6th grade student MKS(K)OU "Krasninskaya boarding school of the VIII type" Leninsk-Kuznetsky district, Kemerovo region Ekaterina Maksimova, 13 years old
Curator: Sizikova Valentina Vasilievna, art teacher of the MKS(K) OU "Krasninskaya boarding school of the VIII type"
To work we will need:
A sheet of red cardboard;
Quilling kit (set of colored strips of paper);
PVA glue;
Scissors (regular and curly);
Wooden skewer;
Step-by-step production.
1. First, we need to roll paper rolls (22 pcs.). To do this you need:
Glue the white and yellow (orange and white) strips together and screw them onto the strip.
.jpg)
.jpg)
Remove the roll, loosen it a little and form a part in the shape of an eye.
.jpg)
2. To get fluffy flower, take a wider strip of paper and cut a fringe along one edge. Glue it to a narrow strip, then twist everything and form a flower shape (4 pcs.).
.jpg)
3. You need to wind green spirals (10 pcs.). We bend the ribbon in the center and twist its ends in one direction. One end should be higher than the other.
.jpg)
4. Take a sheet of red cardboard and use curly scissors to cut out an egg shape. This will be our card base.
5. Glue several colorful stripes onto the base.
.jpg)
.jpg)
6. Now we will glue the details of the drawing.
.jpg)
.jpg)
7. To make it more original, add a small pink bow.
.jpg)
8. This is how our Easter card turned out.
.jpg)
Hi all! For several days now, we have been preparing for Easter, and we are trying to surprise readers, and also showed how to make the most delicious Easter cake (). Be sure to try it.
Moreover, in previous issues the topic was already touched upon easter eggs(), and also did . And all these topics will be more relevant than ever on the eve of Easter.
Easter is a cheerful, bright and favorite holiday of Russians, along with the New Year. Therefore, most of the population begins to prepare for it a few days in advance. Yes, we know that everything can be purchased at almost any store. However, homemade baked goods and gifts will always be more enjoyable. After all, you can involve your children and loved ones in the process.
One of the required attributes Christ's Sunday are eggs. That's why housewives start cooking a large number of eggs and decorate them in various ways.
There is a huge variety of techniques for performing such crafts. For this, various available materials are used. In this article we will look at several options for making a souvenir egg. Preschool and school institutions may hold competitions for the best symbol of Christ's Resurrection, so let's look at some ideas that will help your children win.

Quilling is a paper rolling technique that was developed in Europe by monks. They thought about how best to design icons and books. As a result, they came up with a method in which they wound on bird feather gilded stripes. Thanks to this method, it was possible to make beautiful frames. Today, quilling is a fashionable activity.
Using this technology, you can make your own souvenir egg for Easter. Below will be a master class on special technology. First, try making a souvenir with a simple pattern.

You will need to prepare:
- Scissors.
- Quilling strips.
- Glue.
- The basis.
You can use a Kinder Surprise egg as a base. You can also use polystyrene foam. Paint in suitable color acrylic paints.

For the next step, you will need a special needle and quilling strips. But if you don’t have the opportunity to buy them, you can use a knitting needle, a toothpick or a wooden skewer, and you can cut the strips yourself from colored paper.

Now you need to wrap the ribbon tightly around the wooden skewer.


Then you can continue winding without a skewer.

Lubricate the end of the tape with glue and secure it. It is advisable to use a stencil ruler, thanks to which you can form a roll of any diameter.


Twist several ribbons of different colors. To give the desired shape, you can slightly squeeze and pull the ends of the rolls.

Now grease the rolled paper with glue and fix it onto the prepared base.

Think over the pattern in advance or improvise as you make the souvenir craft.


If you want to make a hollow egg, then use foam plastic as a base, fix the rolled paper with needles and glue it together. Thus, form half of the egg, then proceed to the second part, just do not glue it to the first. When the work is finished, simply remove the blanks from the foam and glue both parts together. There is another option - use a small balloon When you form an egg, simply pierce the ball with a needle and carefully remove it from the souvenir.
See what beautiful souvenir eggs can be made using this technology.


Gain experience, experiment, and you will definitely succeed.
Easter egg made from origami modules. Step-by-step instruction

Modular origami is a technology for assembling various shapes from modules. This process is quite painstaking, so you will need to be patient to make at least one Easter egg.
Let's look at the instructions for making a souvenir, as shown in the image below:

For this we need 842 triangular modules, of which 96 modules are needed per egg lilac color, 73 – of blue color and 193 – yellow. The stand will require about 180 parts.
If you have never made figures using this technique, then first you need to understand how to make triangular modules. To do this, watch the video instructions below:
When you have prepared the required number of parts, you can begin assembling the Easter egg. It is important to note that making a souvenir in this way is not recommended for people with mental disorders, as they simply do not have the patience.
To better understand the process of making such an egg, look step by step instructions in the video below. Follow the order of all assembly stages.
If you don't succeed the first time, don't be discouraged. Take a break, rest a little, and try again with renewed vigor.
DIY Easter egg made from ribbons

You can make very beautiful souvenir eggs yourself at home. For this we will use satin ribbons of various colors. There are several technologies for making ribbons. In this article we will look at the artichoke method. There is nothing complicated in the process, as it might seem at first glance. The main thing is to understand the manufacturing principle and follow the steps.
To prepare, we need a foam base. If you want to make a life-size egg craft, then you will need ribbons 5 cm long and 2.5 cm wide.

You will also need several needles with caps.

Ribbons of the required length can be cut with scissors. But to speed up the process, it is recommended to make markings on plexiglass and prepare the sections using a soldering iron for children's creativity, popularly called a burner.

When the required number of ribbons is ready, you can begin making the egg. First you need to determine the middle of the base, and start from there. Step back about 2 mm from the top of the tape and pin it with a needle into the very center of the egg.

Then carefully bend the tape with a corner on both sides and secure with a needle.


To make the rows even and symmetrical, pin the second ribbon on the opposite side.

Do the same on the other sides.

The top is almost ready. Now you need to align the corners and pin them to the base.

Step back 5 mm from the center of the egg and begin to form the next row.

Starting from the second row, the ribbons should be folded not in a straight line, but overlapping.
![]()
You can use ribbons of the same color or different ones. In this example, from the third row, we pin pieces of a different color. To do this, step back 5 mm from the second row, and fix the ribbon between the two corners, as shown in the photo below.

An egg of this size will only have 9 rows. You can put souvenirs on a plate, in a basket, or make beautiful coasters. To do this, cut out a star-shaped base from cardboard and wrap it beautifully with satin ribbons.
Beaded egg for a competition for school and kindergarten

If your child was given an assignment in kindergarten or school to make souvenir eggs for Easter, then you can make a souvenir from beads. Some people think that this method is very difficult, however, even children can cope with this task.
If you have never used this technology, you can use the most in a simple way: mix beads of different colors in a bowl, then grease a natural or artificial egg with glue, and simply roll it in the beads. Of course, such art is unlikely to lead to victory in the competition, so it is recommended to use a more difficult option.
- Prepare the egg base and skim it.
- In the next step, start making a string of beads. To do this, you can use wire or fishing line. String beads of different colors.
- Coat the middle of the base with glue and secure the first string of beads. Thus, glue several rows until you completely cover the egg.
- The souvenir should be left overnight so that it dries well.
And if you are guaranteed to get first place in the competition, then use ready-made diagrams weaving:


To an inexperienced person, this activity may seem very difficult. But, when you understand the technology, you will very quickly make a beautiful egg.

If you want to reproduce more intricate patterns, then you will need paper in pink, green, red, yellow color. You will make this craft even faster than the first one, since you don’t need to make many elements. In addition, there is no need to make the workpiece; take a chicken egg, but first boil it hard. To prevent the shell from bursting, before cooking, remove the egg from the refrigerator and let it warm up at room temperature. Then salt the water well, then the shell will not burst.
While the boiled egg is cooling in cold water, we will make decoration elements using the quilling technique. The description of this process begins right now.
Decorating a boiled egg
You can buy strips that are designed for this type of needlework, or make them yourself. If you prefer to make everything yourself from start to finish, then place a sheet of 2-sided pink paper in front of you and, as described above, cut several strips, the width of which is 3 mm.
Using them, twist them onto a toothpick and make several spirals. Don't forget to tape the free end so that the figures are complete. Now each spiral needs to be given a slightly different shape. It can be a “drop”, “bird’s foot”, “curved drop”. How to make these and other basic elements of the quilling technique will be discussed in more detail in the next section. You can decorate an Easter egg with any of them.
In the meantime, slightly loosen the twisted spiral, squeeze it on one side so that the inner curls unfold slightly. You have a “drop”. Glue this element to the egg and several similar ones nearby.
To make a flower stem, cut a green strip 3 mm thick and 15 cm long. Wind it onto a toothpick or needle in a spiral, placing the next curl under the previous one. Cut out semicircular leaves from the same paper and glue these parts of the flower in place.
This is how you can decorate Easter eggs with your own hands.
Quilling - basic elements
They will help you find new ideas for the design of Easter paraphernalia. How to make a “spiral” and a “drop” was described above, now about how to make an element called a “bird’s foot”, or, as it is also called, a “cross”. It is also made from a “spiral”. Loosen it a little, give it a triangle shape. Do not clearly mark one of the corners. Pull the opposite side towards it, press it with your finger so that the straight line becomes concave.

If you are making an Easter egg using the quilling technique using the pattern presented above, this and the next element will come in handy.
The “arrow” will come from a weakened spiral, from which you will also first form a triangle, and then pull its two corners towards each other and press them with your fingers to fix them.
The heart will look very touching. You can give an Easter egg decorated with it to your loved one. Divide thin tape from paper in half. Twist from opposite ends in a spiral. Leave a small distance between these shapes so that the fold becomes the center of the heart. Secure the two spirals at the top with glue.
The “S” element is made in almost the same way, only the upper spiral is slightly smaller than the lower one. When they almost come together when twisting, turn the top part to the right and the bottom to the left.
How to make leaves
An Easter egg using the quilling technique looks beautiful, where elements designed in the shape of a flower are adjacent to those that look like leaves. To do the latter, slightly stretch the spiral in opposite directions and squeeze each of the two resulting corners. Mark one of them more clearly - this is the top part of the sheet. Let the second one be semicircular, bend it slightly to the left.
Armed with such useful knowledge, you can easily make other voluminous Easter eggs.
Quilling, master class
Cut green strips, twist them into tight spirals, glue them, laying them out in the shape of ovals, on one side and the other of the egg. If you want these blanks, as in the photo, to have a dark green core, glue a bead to these places.

From paper tapes orange color twist the “S” pieces and glue them inside and outside the green ovals.
Now you need to make roses. To do this, twist an orange strip onto a toothpick. Make 2 turns - this is the core of the flower. Now twist the paper tape. Make two such folds for each turn - on opposite sides of the flower.
Before gluing the roses on, make large “leaves” out of long strips of green. Glue them first, then the roses, after which your Easter eggs will be ready. Quilling (the master class of this technique given in the article helped you master interesting view needlework) allows you to create a real miracle from simple materials!
We also recommend
 Graphite hair color is a fashionable gray hair color for those in love with the extraordinary!
 Spanish phrases for tattoos
 Elos rejuvenation technology: what it is and how it can help
 Mobius strip - an amazing discovery
 Congratulations to parents on their son's birthday Congratulations on the birth of their 7 year old son
 Scenarios for themed parties